Article

Published
19 September 2018
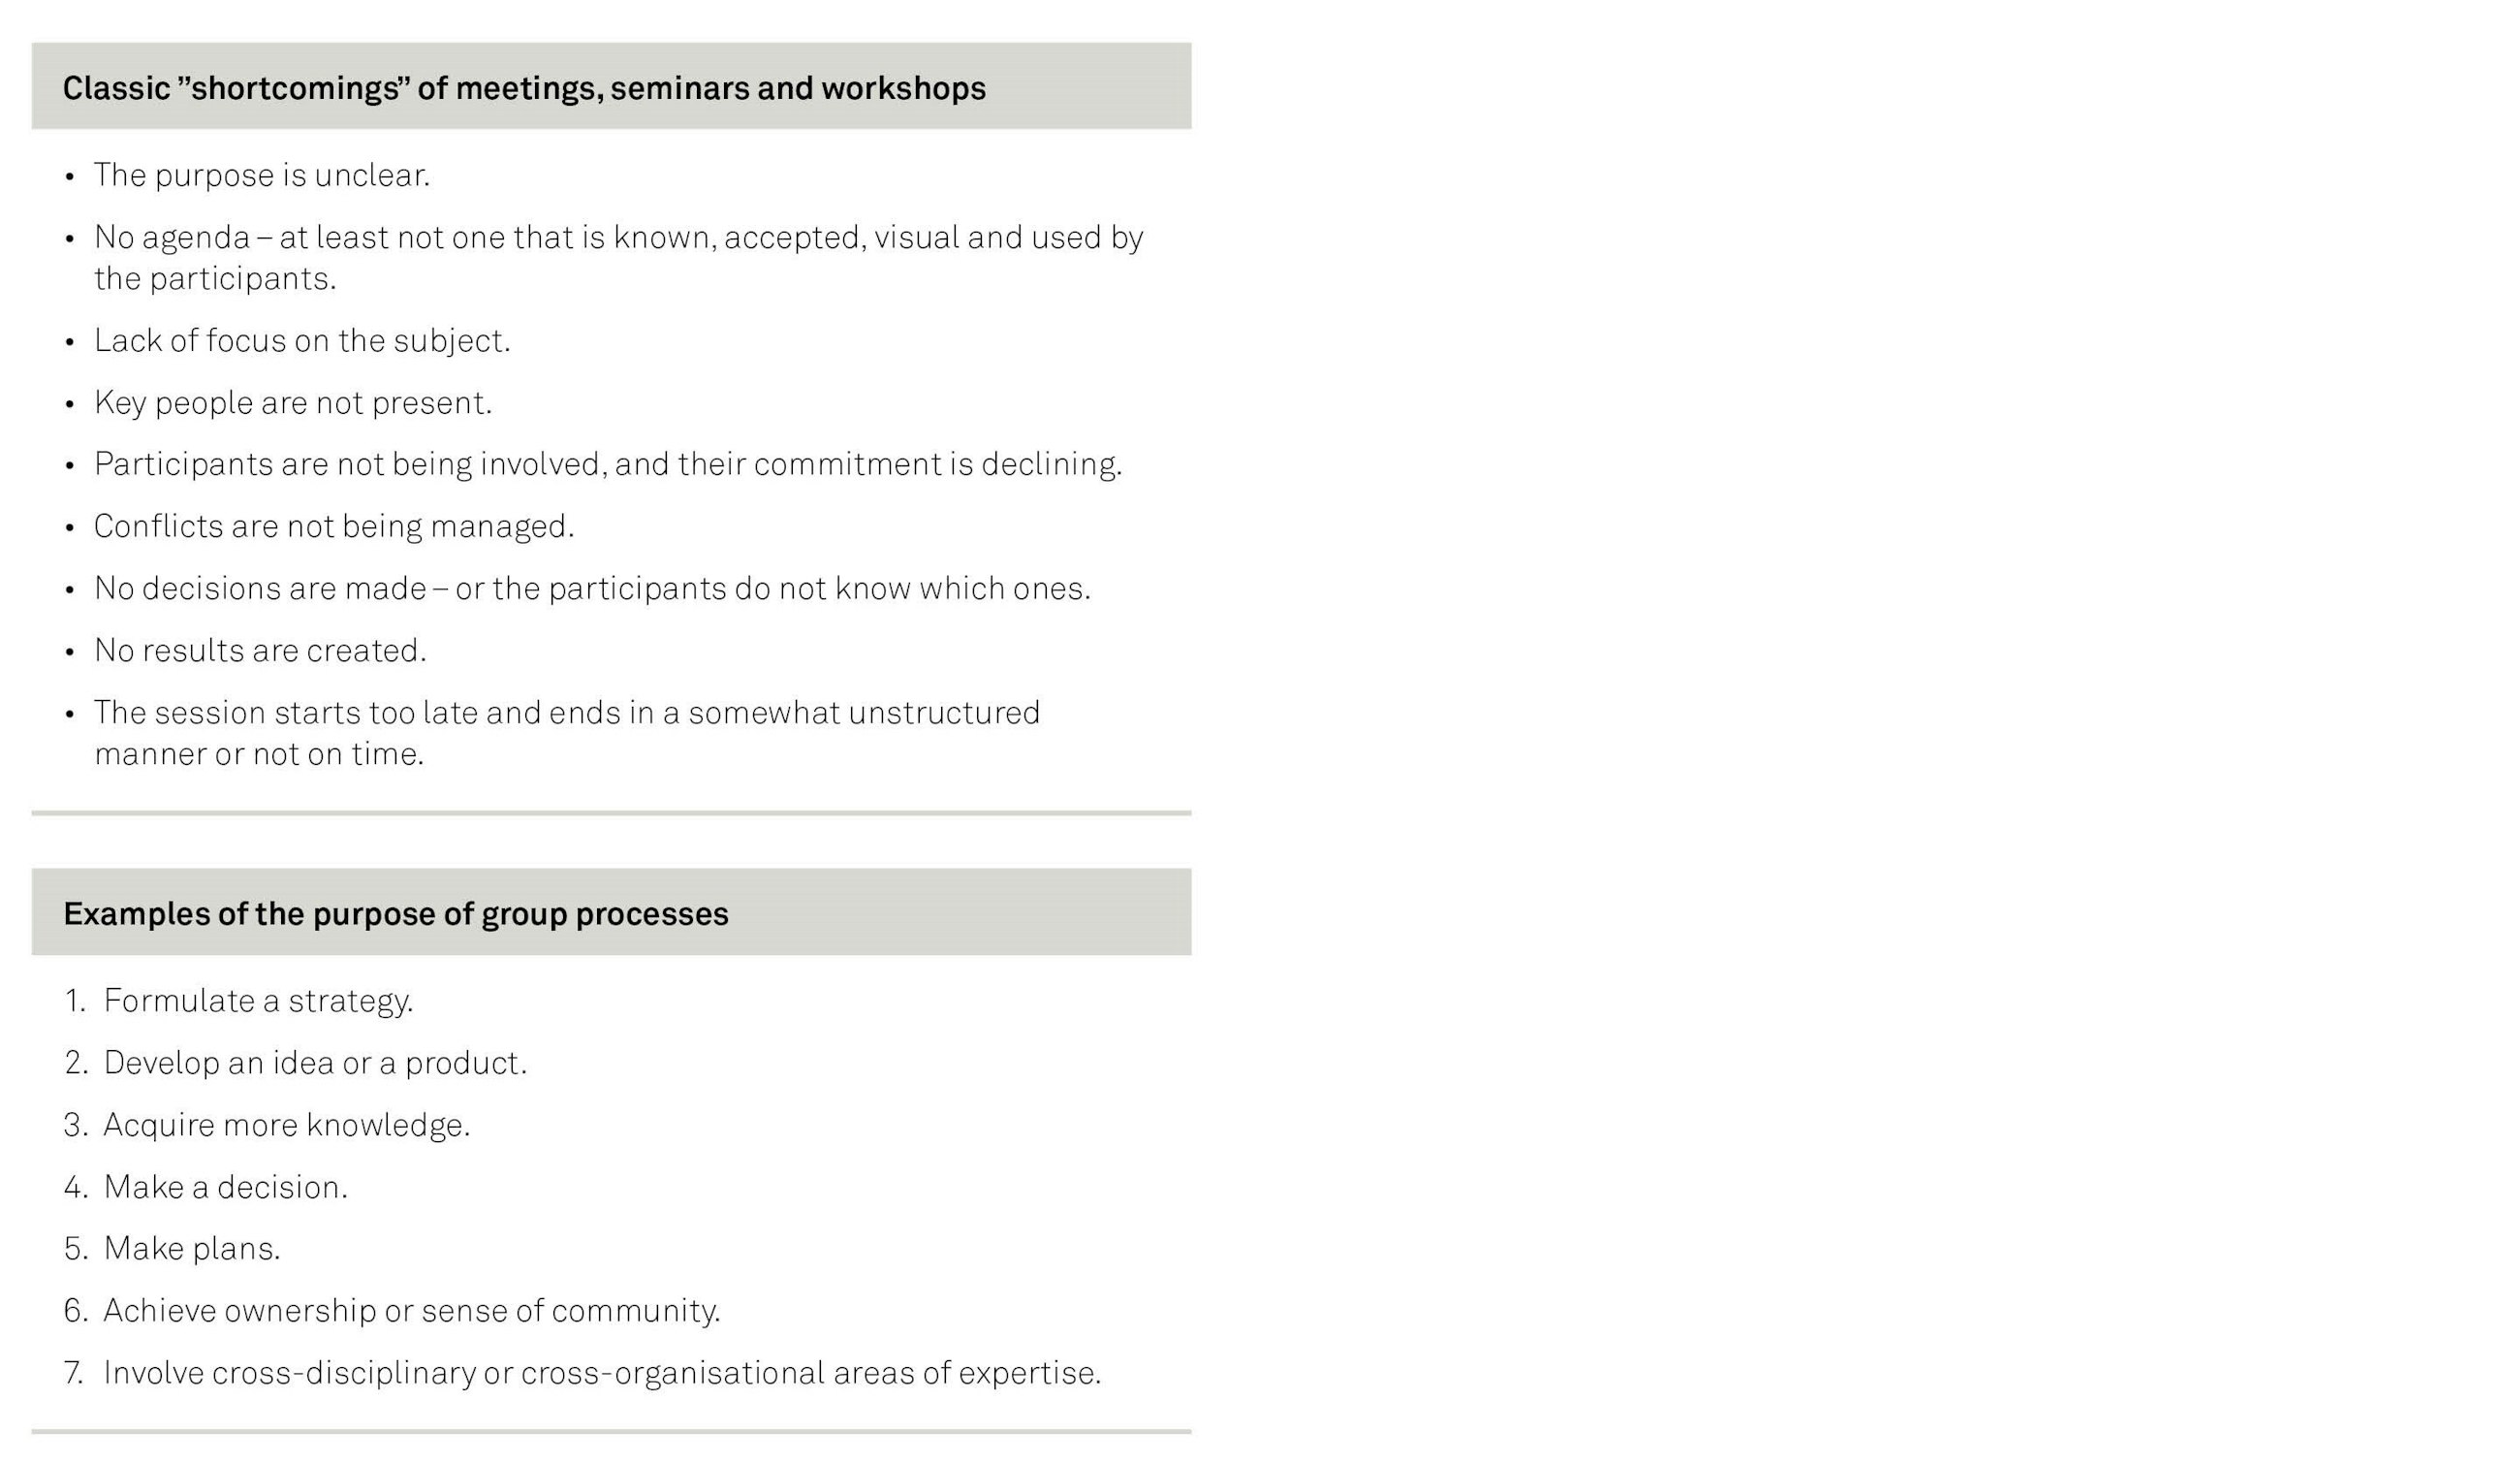
Imagine that you have been invited to participate in a three-hour long meeting. The agenda of the day is not very clear, the room is too small, there are no beverages, and the oxygen is running out. You hear the same people speak over and over again, making interminable presentations. The event lacks energy and ideation, involvement and pace. You go home frustrated and uncommitted with a feeling of having wasted your time – and you are probably not the only one. Luckily, most sessions are not that extreme. However, you will probably be able to recognise some of the above elements from, for example, meetings, events and conferences you have attended.
It may be difficult to point out why some sessions succeed, and others do not, but this is what we intend to find out. With this article, we will provide some suggestions for what you can do to add more meaning and value to the meetings and workshops you facilitate. The purpose of the article is hence to increase focus on how to create successful meetings and workshops.
Facilitation of meetings, workshops and other types of processes does not require ten years of experience, but it requires you to have a good knowledge of the art of facilitation and be able to put it into practice. In this article, we will describe the facilitator’s role and provide specific methods and tools for the facilitator to use in his/ her daily work. The article is useful to people working as chairpersons of meetings, project managers, consultants and managers who all have in common that they sometimes are to gather different groups of people who are to be involved and take ownership of different tasks and results.
The article is structured as follows:
- The facilitator’s role
- Before: The design of the process
- During: The facilitator, the task and the group
- After: Implementation and influencing behaviour
The concept of facilitation
Facilitation is about leading meetings, workshops, seminars and other processes where a group of people is aiming to reach a shared objective. The word facilitation comes from the Latin word facilis and means “to make something easier” or “move freely”.
As a facilitator, you help a particular group of people towards a shared objective by keeping an eye on the framework and the ultimate goal of the process, but without taking a position or contributing yourself. As facilitators, we guide the process in terms of form and goals, but not in terms of content as this quotation from Hunter emphasises:
“Your main focus as a facilitator is therefore to be interested – not the interesting one. In essence, you do not take centre stage or express an opinion on any given topic. On the contrary, you are there to help the group, to ensure that it achieves the desired result, and that the route to this goal is as easy and constructive as possible.
The concept of facilitation is thus about helping a group reach a shared goal and assisting them in achieving the desired results, without taking a stand or producing the content yourself, but by being fully aware of the setting and the dialogue. It is thus about managing the form and goals rather than the content. Very simply put:”
Facilitation is about process - How you do something - rather than content - what you do.
(Hunter, 2007)
Facilitation is about creating results and ownership through involvement. As a facilitator, you are a catalyst, ensuring that all the relevant perspectives are considered within certain clear bounds, without taking a position or contributing yourself.
The International Association of Facilitators describes facilitation simply as helping groups do better. In other words, the facilitator is a person who could help a group of people to perform better, to achieve better results, to come up with more innovative ideas or to reach more sound decisions. When the process within the group is completed, they will naturally be in a different and more productive place than where they started.
When applying the concept of facilitation in this article, we regard it as the ability to create more dynamics, ownership and results in group processes through intentional work before, during and after the specific session.1
In addition, we find it important to emphasise the following:
- Facilitation is something you can learn.
- Facilitation should have a purpose and contribute to creating something (results).
- Facilitation is a tool for working with groups of all sizes.
- Competent facilitation requires more than just ”being good on stage”. It is about making the participants work and take ownership of the results they achieve.
- Facilitation is about design, execution and follow-up.2
When do I know that I am a facilitator?
In some cases, it is obvious that you have formally been assigned the role of a facilitator, for example, if you have been engaged as an external or internal consultant to design and conduct a strategy development workshop or have been asked to facilitate an idea development process or a steering committee meeting. In other cases, the role of a facilitator is less obvious, for example, if you are at a large information meeting and suddenly end up in some teamwork and ”have to” assume the facilitator’s role, or if you, as a project participant, have to manage elements of a project meeting without having the formal role of project manager. If you are a manager or otherwise an expert on the content, it may be challenging for you to practise classic facilitation without taking a stand.
There will often be situations where it is even expected of you to have an opinion about the content or the decision and to actually take a stand, for example, if you are a manager, project manager, trainer or internal consultant. In these cases, we are not dealing with facilitation in the pure, ”neutral/ power-free” form that the external consultant is able to exercise to a much larger extent. However, we would like to emphasise that the facilitation methods may also be used successfully in the role of manager, project manager or internal consultant. But this requires you to be aware of when in the process you are assuming the facilitator’s role, and when you are acting as the manager and expressing your views on the subject or decision. You could, for example, be explicit about your role and intentions in order for them to know what is expected of them – are we to listen now, or are we to provide input, and what is to be discussed when?
As a manager, project manager or consultant, you will always, to a varying degree, have to assume different roles and either act as an adviser or a trainer at different times. The relationship between the three roles of adviser, trainer and facilitator is basically the relationship between focus on specialist competences and focus on the process with the people involved, which appears from figure 1.
The facilitator’s role is characterised by primarily focusing on the process rather than on specialist competences, i.e. expert knowledge of the very content. You may thus facilitate an IT strategy development workshop without necessarily being an IT expert and knowing all IT processes in the organisation. However, it is an advantage for you and the organisation if you have some basic knowledge of the organisation and its challenges. The roles of trainer and adviser will not be described in more detail in this article, but can, however, be summarised as follows:
Analyst: to be a technical specialist in an area and provide expert answers and analysis produced “at the desk”. This means that in the role of Analyst you do not need process expertise or any great interaction in your work.
Adviser: giving advice, typically related to expert knowledge, that helps the customer understand and make decisions.
Trainer: training someone in something by changing his/her knowledge, opinions, skills and behaviour.
Often the facilitator will juggle with the different roles in his/her daily work, depending on the purpose of the session that is to be facilitated.3
Stager: to design and plan a process from start to finish, but not to get down and implement it yourself. Like the Analyst, this role works “at the desk” and focuses on creating the best possible conditions for involvement, ownership, learning and results in any given process.
Figure 1: The roles

Figure 2: The change processes
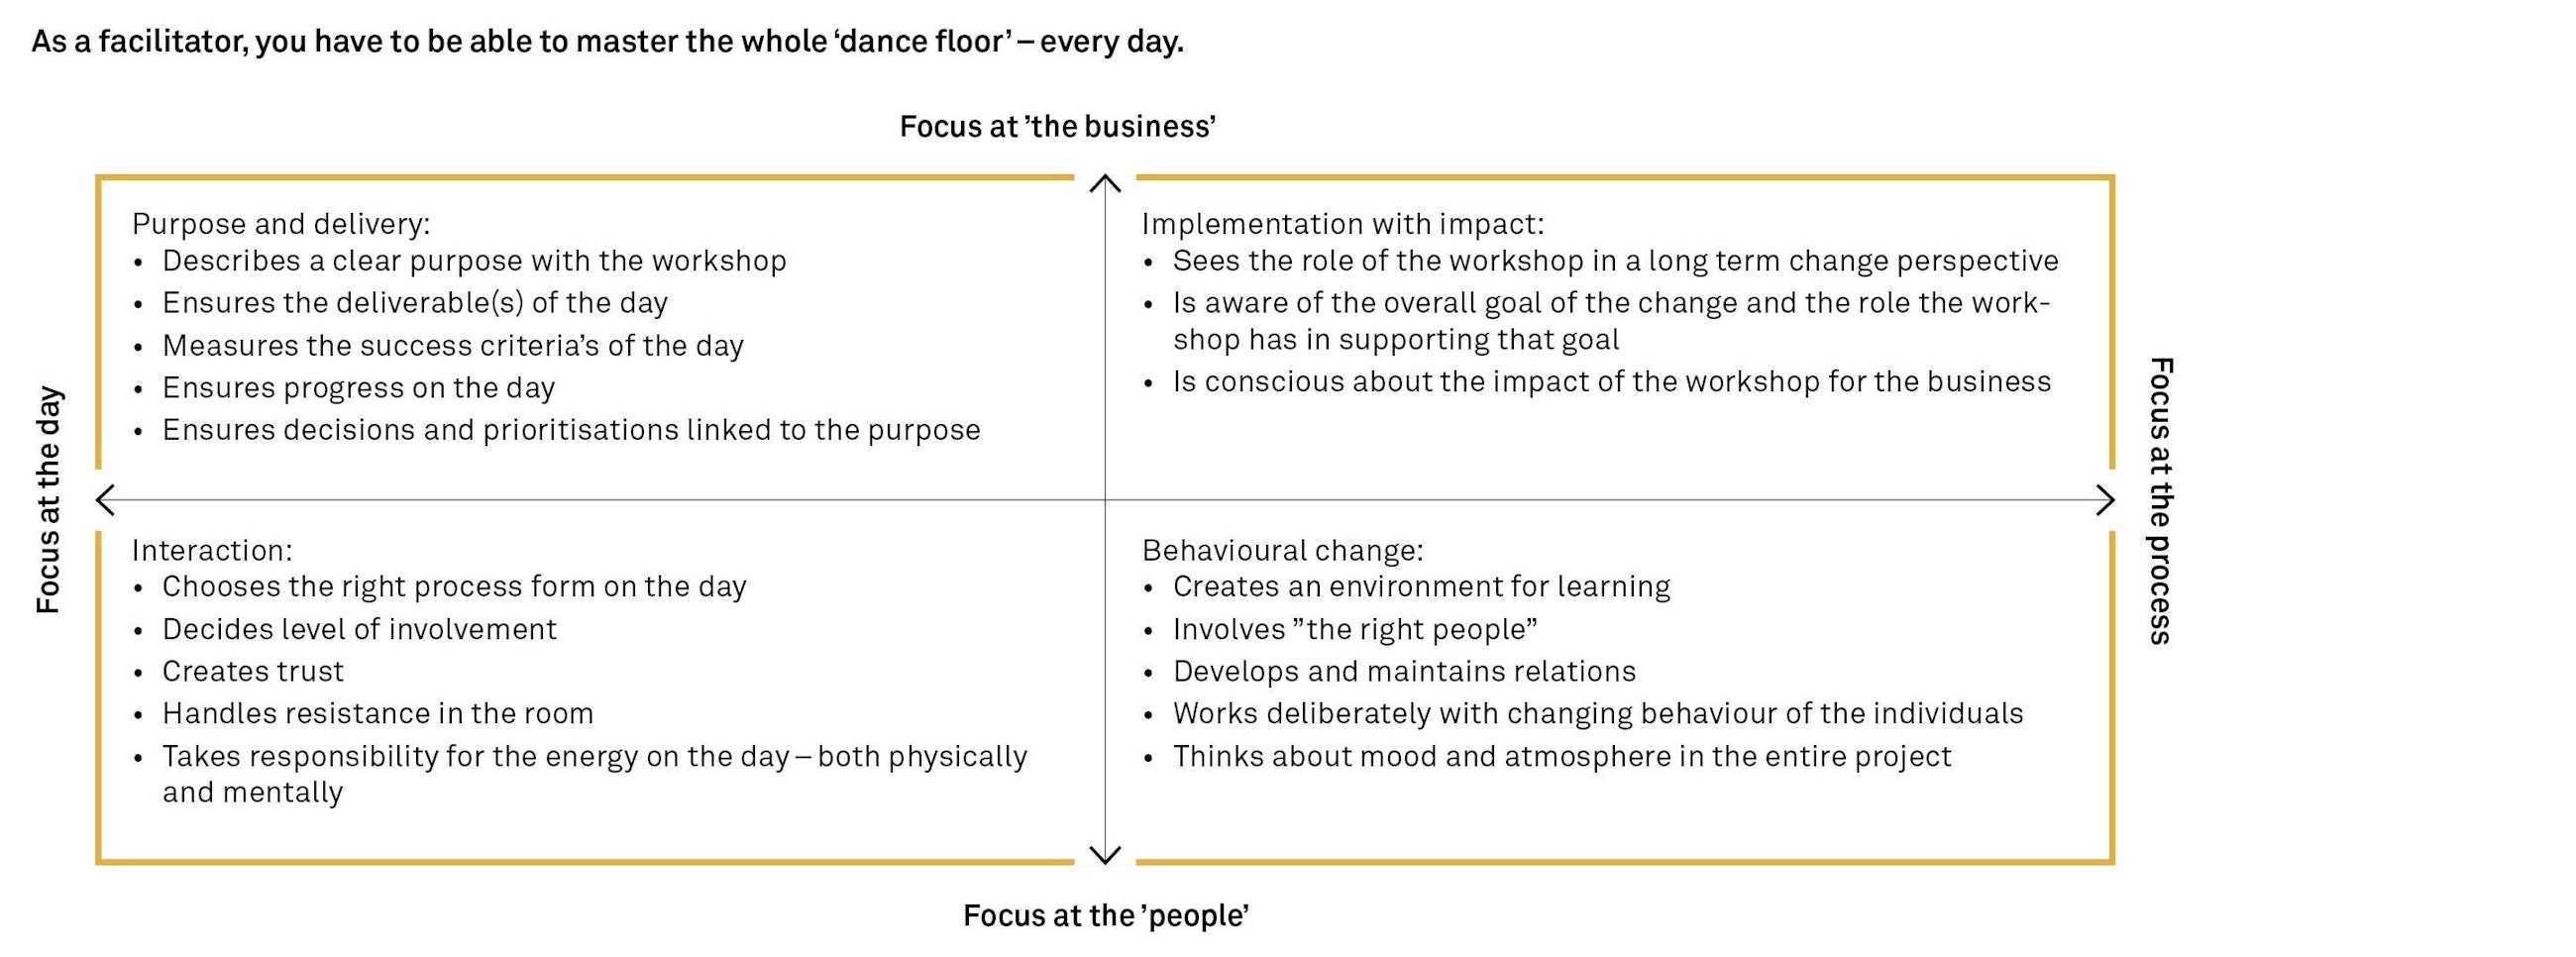
Facilitation in change processes – the facilitator’s “dance floor”
If we are to deliver results in change processes, it is not enough to think about meetings, workshops and events as isolated activities decoupled from the context that the change is part of, and which it influences and is influenced by. Facilitation is often part of a larger change activity which requires facilitators, project leaders, managers or consultants to master a number of different priority areas in order to get good results from their workshops (see figure 2).
A competent facilitator should not only focus on “the moment” and on facilitating a fruitful session with a defined purpose and a clear deliverable where the actual interaction on the day works well. The facilitator should also keep in mind how the specific day relates to the process that the “day” may be part of, even where they have only been engaged for that one day. As a facilitator, one needs to focus both on the business/organisation and on the people dimension – all within the same process. The two dimensions – the day/process and the business/people – form the basis for the model, which illustrates the four focal areas that the competent facilitator has to focus on when he/she is to drive through successful changes.
A skilled facilitator’s toolbox will contain the following process skills:
- Methods for designing good meetings and workshops
- Questioning techniques (process questions and different types of questions)
- Understanding and handling resistance, including the ability to pick up and react to moods and to break off and redirect
- Involvement techniques and process methods
- Non-verbal communication and awareness of the effect of body language, including voice, facial expression, posture, position in the room, movement and gesture
- Feedback methods
- Presentation techniques, including visual aids
- Decision-making methods and prioritisation methods
- Organisational awareness
- Understanding of preferences and learning styles
Involve people where there is a real possibility of influence
There is no doubt that involvement and co-creation have become buzzwords when we talk about change processes. However, involvement without forethought carries a risk. There are many examples of “pseudo-processes” where a group of people are brought together to co-design a series of project proposals or draw up a new set of core values, after which it turns out that the facilitator or the group behind the session had no real mandate to implement the input. This could be because the extent to which the participants can influence the process and content has not been properly clarified with the stakeholders. The co-workers’ precious time and input should be used in a meaningful way, and they naturally expect feedback and information after the event on what is to be done with their input and how it will be applied in real life.
If we have inadvertently involved them in a “closed” process where there is no real possibility of influence, we can forget all about ownership and trust in us as facilitators, both now and the next time they are invited to take part in a similar process. Figure 3 is a great tool to define what is up for discussion and involvement (the playing field) and what is not up for discussion in the workshop (the corner flags).
Figure 3: Defining the playing area and corner flags for involvement
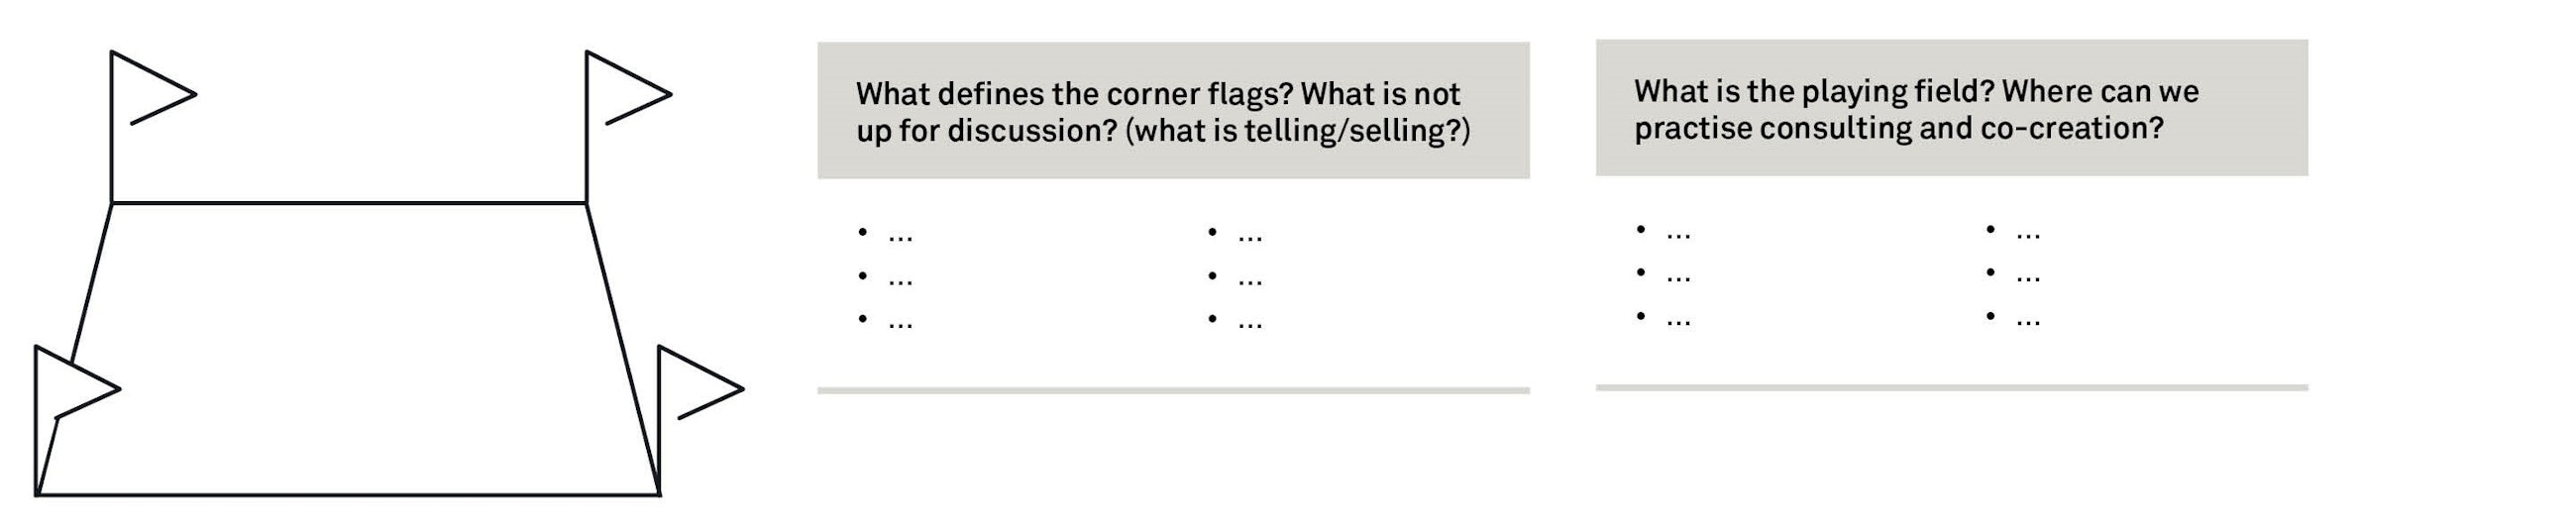
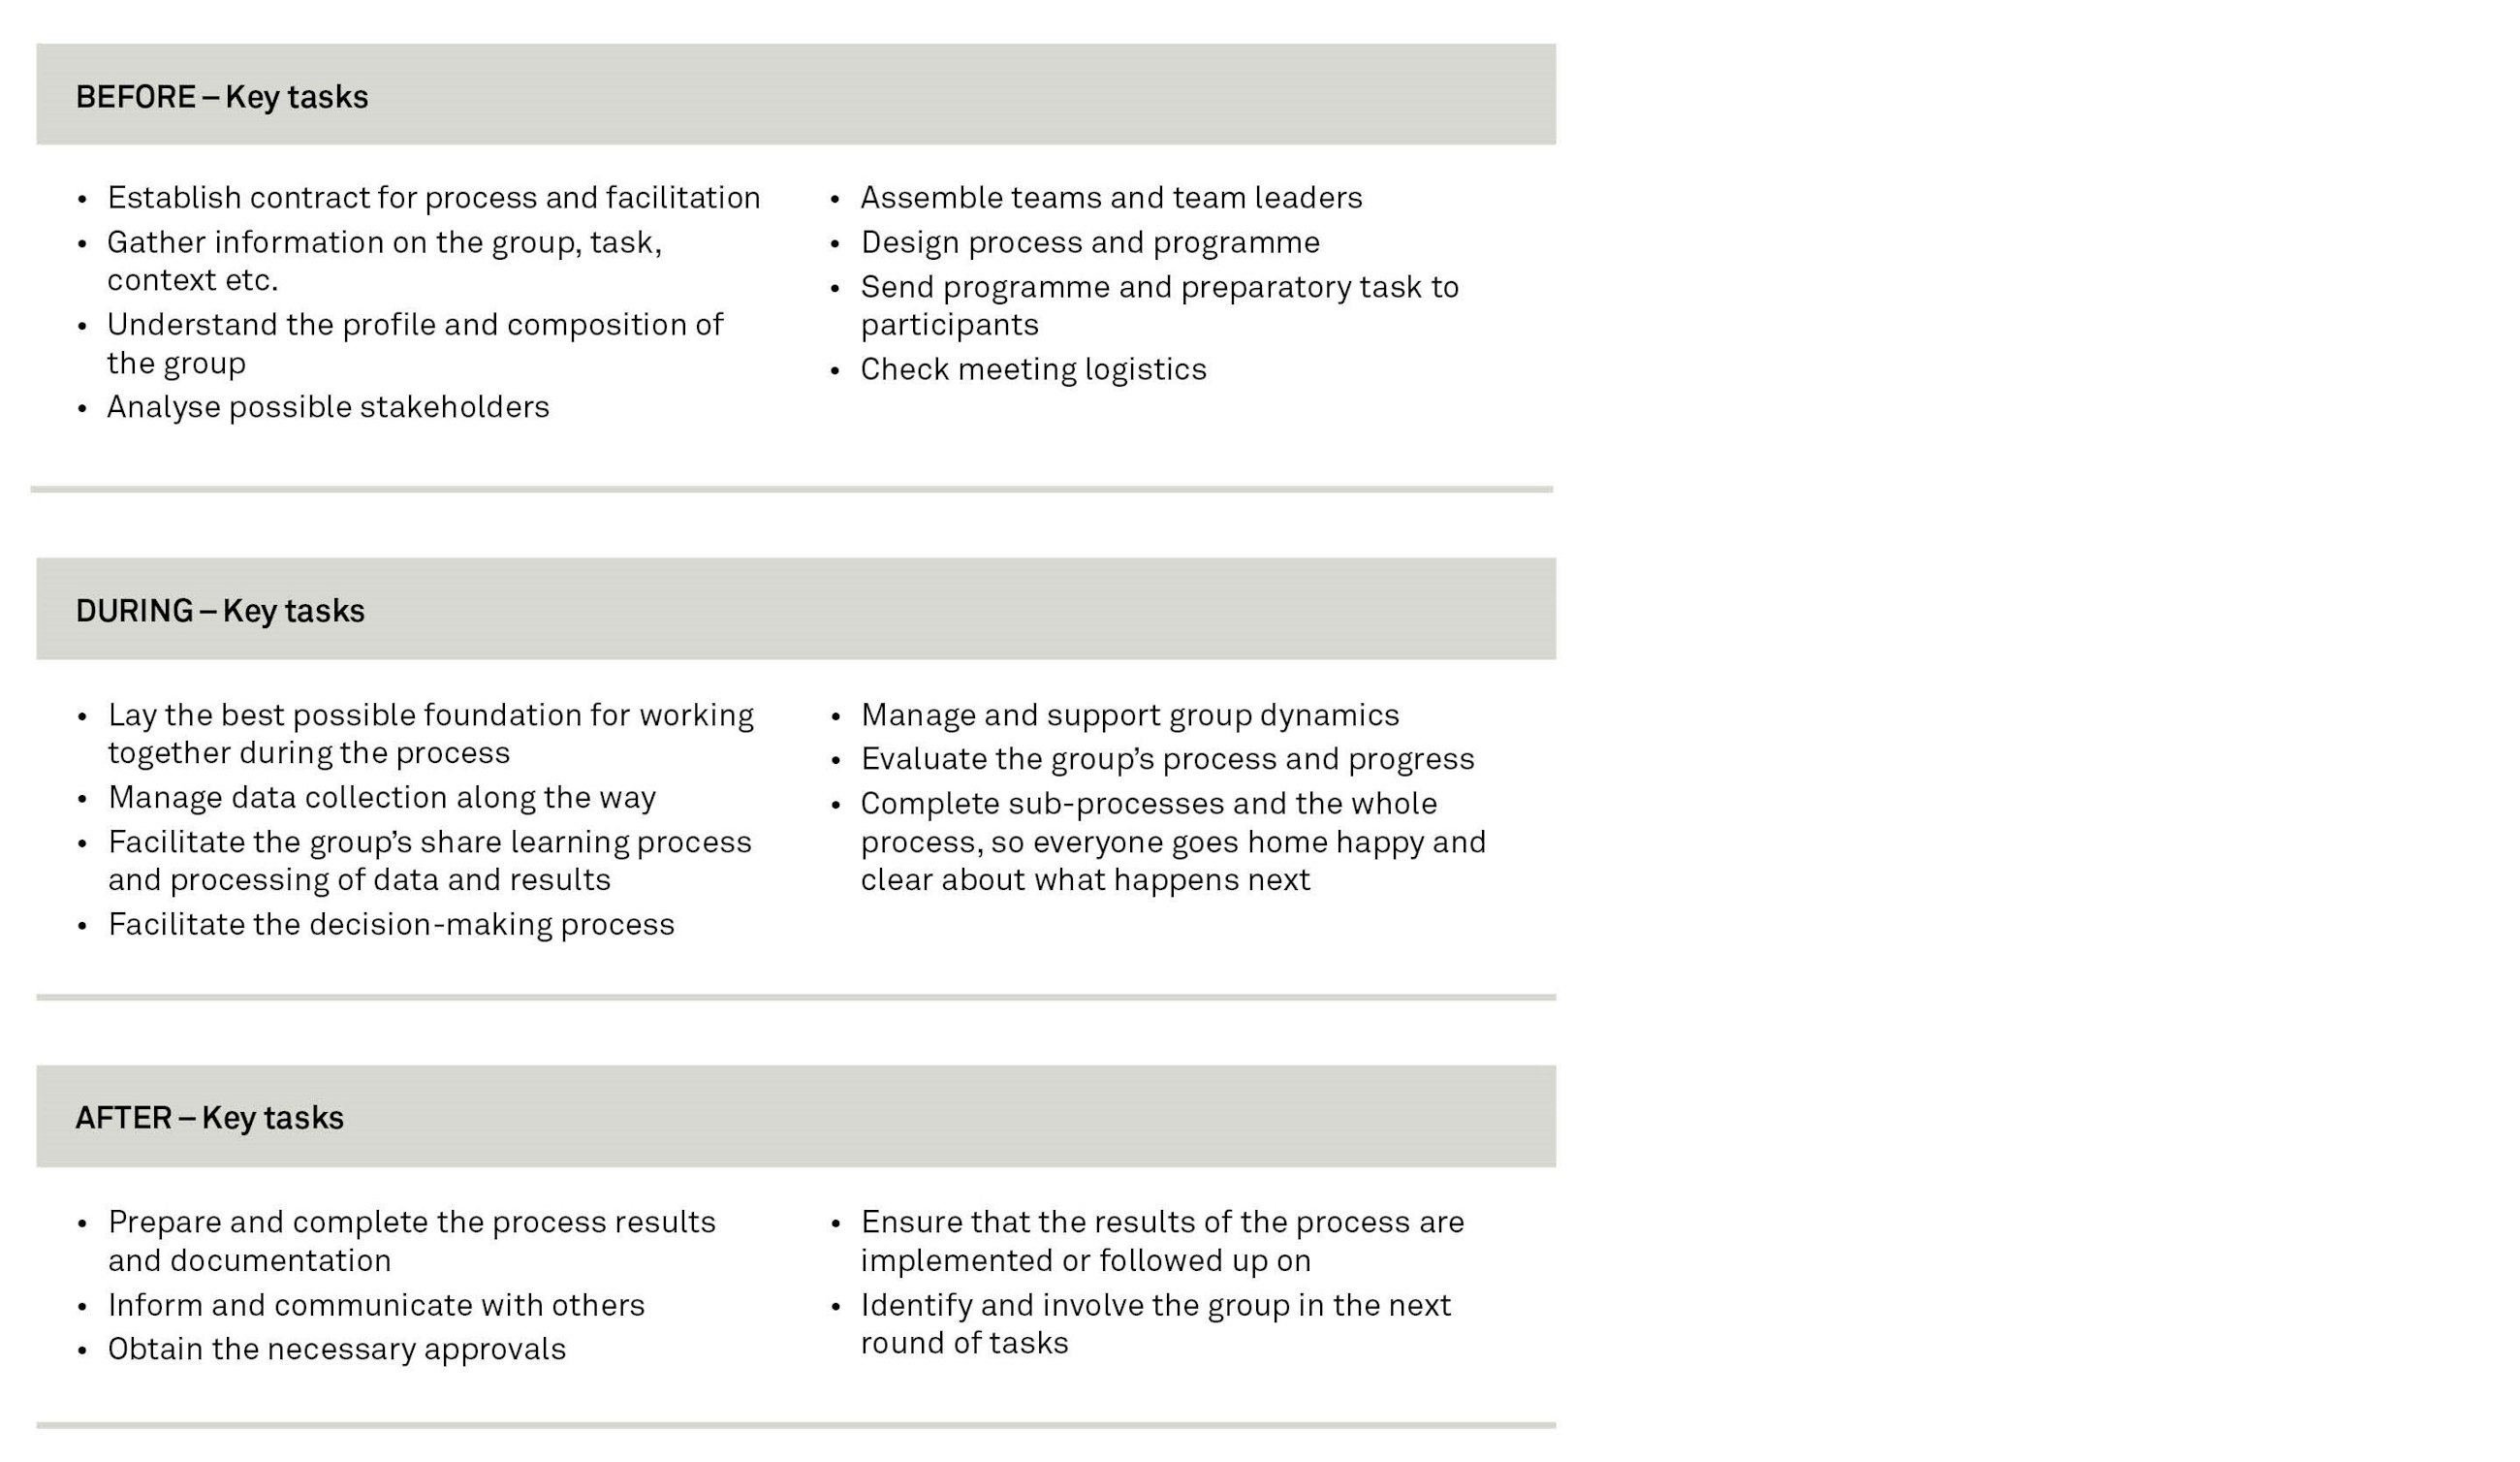
Figure 4: Think about the whole process in terms of “ before”, “during” and “after”
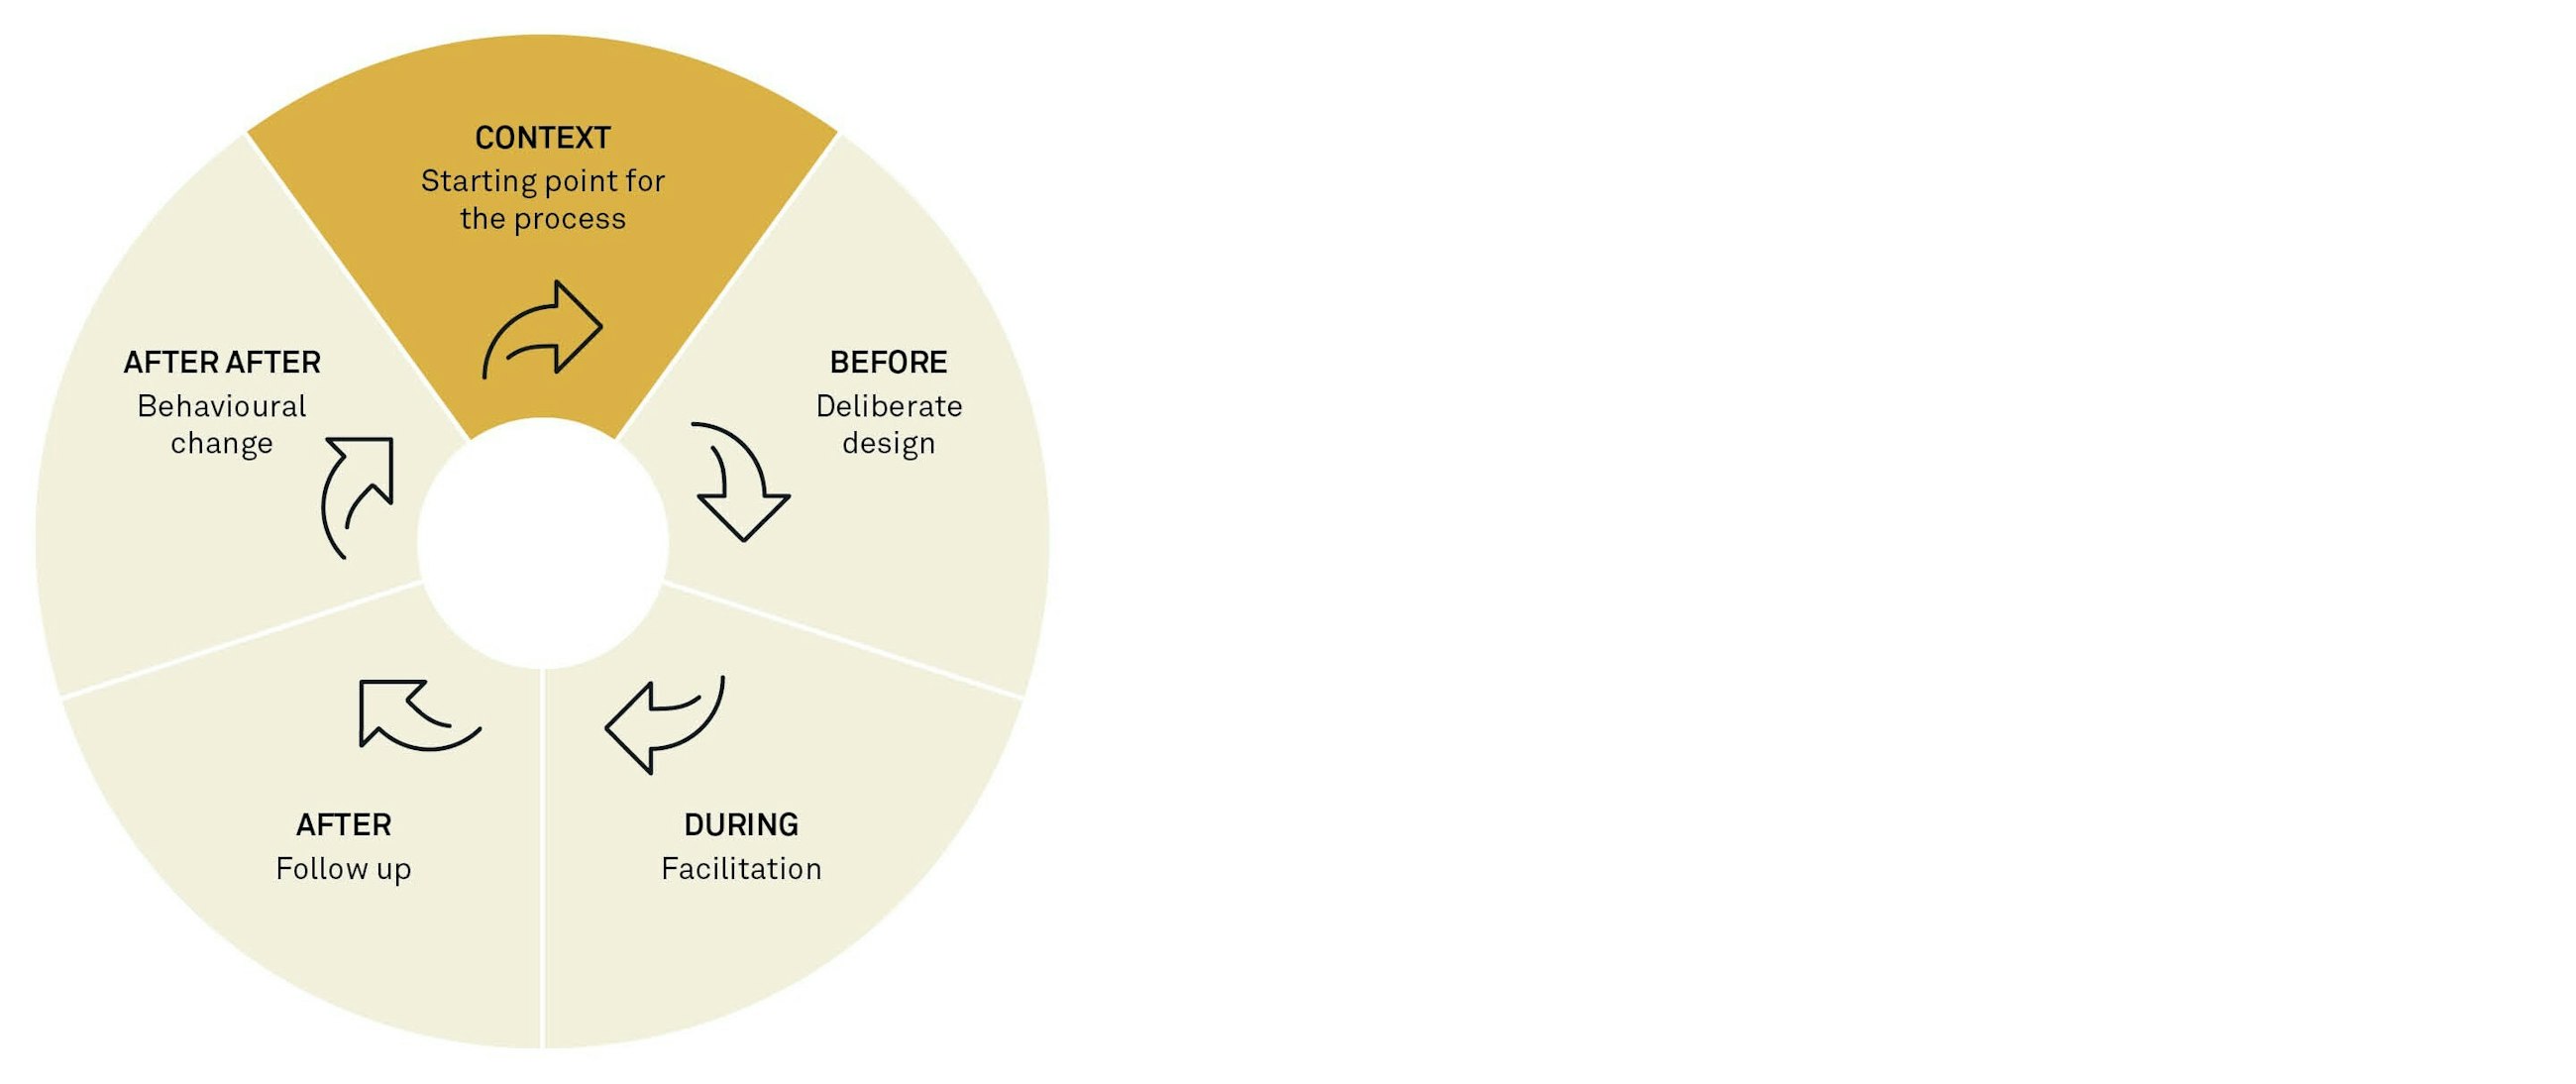
Think about your processes in terms of “context”, “before”, “during” and “after”
Facilitation is basically made up of four components: aligning expectations (context), design of the process (before), the actual facilitation (during) and implementing and influencing behaviour (after) in a short and long perspective.
Context – setup of the process: This “phase” is about aligning expectations with the client as to the framework for the process. This is where you establish the needs and the context that the process is to fit into. The facilitator’s dance floor and the playing field figure are a good basis on which to talk to the client. Here, you will quickly be able to gain an overview of what the process is meant to contribute to and how complex it is.
Conscious design (before): Designing means shaping and planning the process with the desired results and purpose in mind. In order to design the process and carry out the facilitation, we have to know the purpose of the process. As inspiration for this preparatory work, we recommend the “design star”, which will ensure that you have thought through the entire process before you implement it. Our experience is that people often invest too little time in this phase, which produces poor results on the day and difficulties with the subsequent implementation.
Facilitation (during): This is where your design (programme and script) is put to the test. “Does it work in practice?”, “Is it too complex?”, “What about the time?” and “What do I do with the unforeseen things that always crop up in processes where people are assembled?”. Even if you have produced a good programme and script, you should realise that you must always expect to adjust your script on the day.
Follow-up (after): We often spend most of our energy on the “during” phase. After all, this is where we have to be present, perform and deliver a good day or some few intensive hours. That is what is visible to the participants and to your “customer”. However, it is not enough just to deliver a good day where your attendees go away happy from the meeting or workshop. In the long run, success depends very much on the “after” phase, and how you have designed it. A really skilled facilitator will already have considered the implementation of the results in his conscious design of the “before” phase and ensured that the group is not left with a result that lacks support from the rest of the organisation, or which proves unrealistic in practice.
Changing behaviour and seeing the effect (after-after): This is the longterm perspective that your process is often part of. Here again, the facilitator’s dance floor may help to highlight how you can foster change and real effect in the long run – in relation to the people and to the business.
Figure 5: Tasks of the facilitator
The design star
An important success factor prior to the facilitation of any process is preparation. For this purpose, the design star is a useful practical tool which helps you think through the central elements before the actual meeting, workshop or process takes place.
We will now take a close look at each dimension of the star and elaborate on the elements (see figure 6).
Purpose
When designing any process, you should start by taking a close look at the assignment, including the overall purpose – what you are to end up with when the process has been completed (deliverable) and the success criteria in relation to achieving the purpose. Not until then should you make any specific choice of design. Thinking through the overall purpose as well as the purpose of each individual subelement in the process is the first step in being able to carry out an optimal process. An example of purpose of a process could be to increase the exchange of experience and knowledge about good case administration practices across three departments.
Figure 6: The Design Star

Deliverables
What is the outcome of the meeting or workshop? A deliverable is the concrete proof of the meeting’s achievements. Are you standing with an Excel sheet, some ideas on Post-It Notes, a visual project plan or a prioritised list of ideas that everyone has signed off?
Success criteria
The participants’ experience with getting at least three ideas/input for their own assignment work, they experience the process as meaningful, they get an overview of who is handling which cases and know who to ask for help with cases. It is clear to the participants what good case administration practice is. If the process is to have further effect on the ”after” phase, examples of success criteria could be: Three months after the process, the participants experience increased knowledge sharing and to a larger extent make use of each other’s help across departments.
The purpose also gives occasion for taking an honest look at one’s own abilities: Am I the right person to solve this assignment? Do I have the right profile or the right competences to make this process reach the desired outcome? Or would it be more constructive to involve one of my colleagues who has faced this type of challenge before and has more knowledge of the participants’ challenges?
The purpose is essential whether you are to design a conference, make a presentation or run a meeting. A clear purpose does not only help you in the design phase, but also helps you create meaning for the participants during the actual session. If the purpose is not clearly defined and accepted by all people involved, the process easily tends to sidetrack and become unproductive and thus does not form a basis for making the right decisions. In our experience, far too little time is often spent on this phase, resulting in unspecific deliverables which are not implemented or on which measurable follow-up is not possible.
Participants – the “co-workers” in your process
This element of the design star is about ensuring participation of the ”right” people in order to provide the largest possible knowledge base, decision- making power and quality within the specific area the process deals with (cf. you being the expert on the process, the participants on the content). If the right people are not present to make a decision or qualify the input, there is a significant risk of the process being a wasted effort as the necessary ownership of further implementation or the required organisational support is not created. To identify which people are to be engaged in a group process, the facilitator must be able to answer the following four questions:
- Who are the participants, and who will the decision influence? Also consider: number of participants, their average age and gender. Which mixture of specialist competences is present, levels, hierarchy and the participants’ preferences.
- Which level of involvement is the participants to have in the process? This question helps you differentiate the levels of involvement. There may be processes in which the participants are primarily to provide input or in which their presence is critical in relation to decision-making. If a key person with the right decision- making power has cancelled his or her participation, then consider whether a substitute should be sent to represent this person or whether the meeting should be postponed.
- What are the central organisational values? This will help you consider which of the existing traditions and values in the organisation are central to think into the design in relation to the people influenced by the design.
- Who are the participants? When the participants have been identified and selected, it is important to know as much as possible about them in order to be able to create the right atmosphere, interaction and staging in relation to the target group.
As human beings, we learn in different ways, and it is highly individual what stimulates our creativity, commitment, efficiency and desire to contribute to the process.4 For instance, some people have a preference for rational thinking and thus for making decisions on the basis of facts, specific data and valid information. The rational preferorence tends to ask the question ”what”. What is the reason for us meeting here today? What is the purpose of the workshop? In what way is it beneficial to me or the organisation? In what way does it contribute to the bottom line? Others have a more practical preference and focus on the system, organising, reliable methods and the practical implementation. Often, they ask the question ”how”. How do we carry out our plan? How are we to meet the challenge? Others again have a relational preference and focus on emotions, atmosphere and interpersonal relations. These people often ask the question ”who”. Who will be influenced by the decision? Who will be involved in the process? Who is to be part of my team? And finally, there are people with a more experimental preference. The experimental preference is characterised by being occupied with the big picture, visions and ideas. Often, they ask the question ”why”. Why do we do this in this way, or rather why do we not do it in this way?
Figure 7: Whole Brain in facilitation
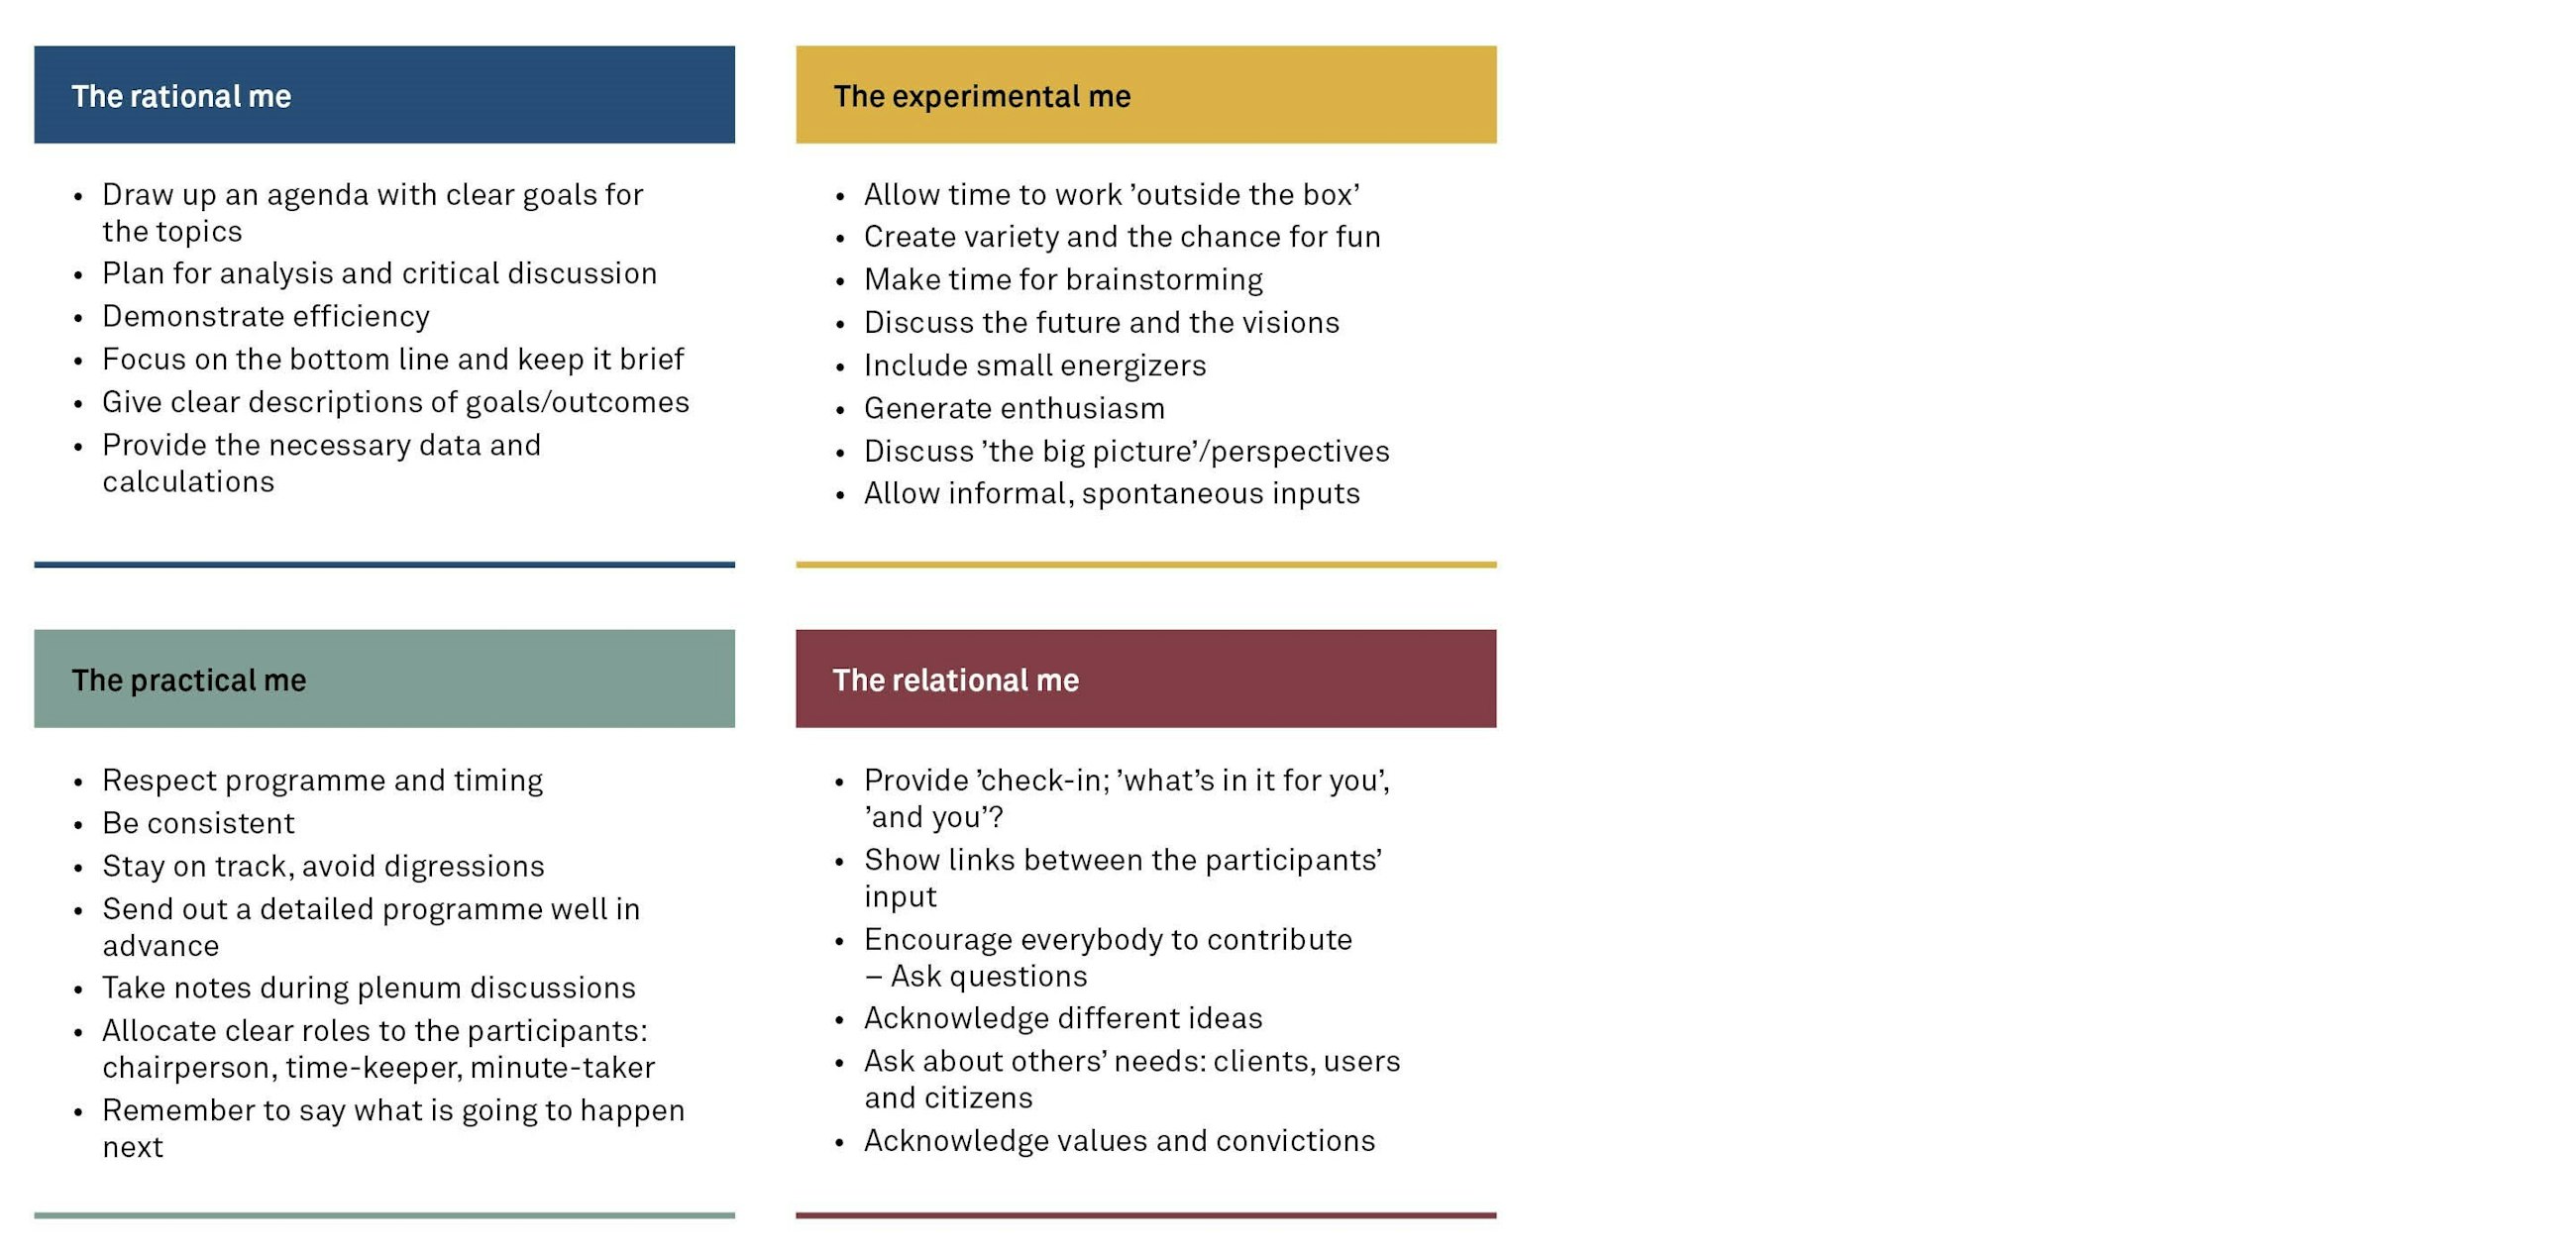
Each of the four preferences above invites different ways of facilitating in order to create motivation and enthusiasm for the individual participant. The point is to prepare your process design in such a manner that the process appeals to all of the four preferences (figure 7).
Remember that there should be room for different preferences and learning styles and that this should thus be thought into your design. As a general rule, more than one preference will always be present in your sessions, so in order to achieve the most optimal effect, it is essential for you to think about all preferences when you are deciding on the design.
Environment – creating the right physical and psychological context
The environment dimension is about the setting in which your meeting or workshop is to take place and the atmosphere you wish to create. Of course, what is most optimal is that you, as the facilitator, have an influence on where the event is to be held. Is it to take place in an internal meeting room, at a traditional conference centre, in a concrete silo, a former aeroplane hangar, a concert hall or maybe outdoors?
What is most important is that you choose the location with care and in accordance with the purpose of the workshop. Sometimes this dimension of the star is ”locked”, i.e. for some good reason, it has been decided that your workshop is to be held in a (gloomy) meeting room next to the canteen. Some organisations have special price agreements with specific (more or less inspiring) conference centres which determines the location. However, never despair, because even though the star is locked in this dimension, there is still much you can do to stage the room to support the purpose of the workshop.
We have borrowed the word ”staging” from the world of theatre where the creation of the right stage design for a play is a special art and profession. The point is that whether we wish to stage or not, we cannot help doing it. What we do or do not do in a room has an influence on the participant’s experience of the meeting. For instance, imagine a play on an empty stage (without any scenography). This is also a way of staging which has an effect and signals something. Similarly, an impersonal meeting room may signal that this process/meeting is just another one in the row.
Figure 8: Advantages and disadvantages of different table arrangements
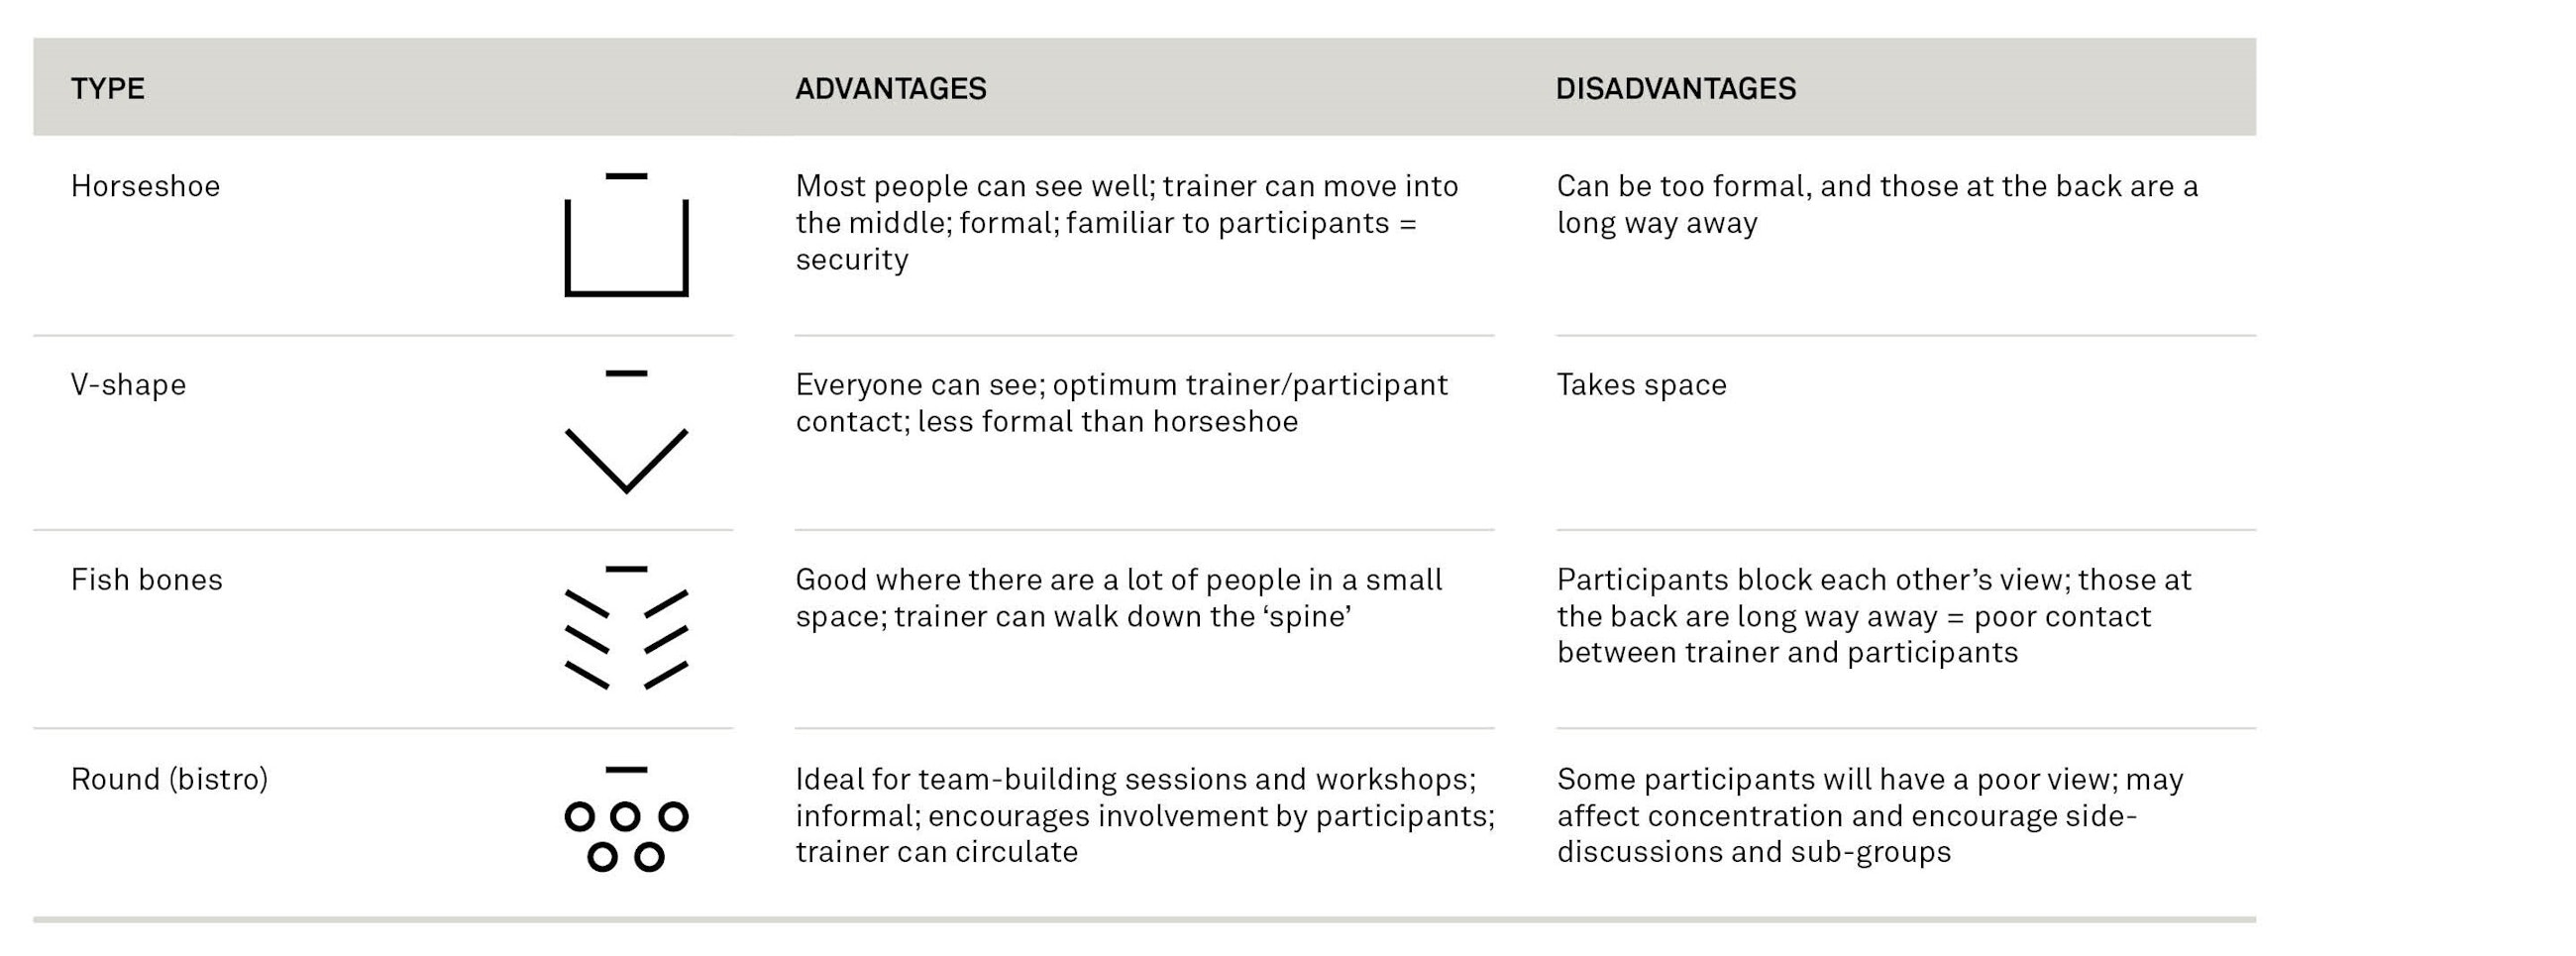
Stage the room to fit your process
If the purpose of the meeting is, for example, a working session during which some specific deliverables are to be produced in a short time, you should stage the meeting room in accordance with this. You could design the session as a stand-up meeting without the classic meeting table, you could hand out energy bars and water and play some up-tempo music when the participants arrive and make sure that all relevant material for the meeting is ready for use (markers, coloured cards, brown paper, adhesive, flipover paper etc.).5 However, if the purpose of the meeting is to collect experience, evaluate and learn from, for example, a project, you could dim the sharp ceiling light and invite the participants into a room with comfortable furniture and soft music, thus signalling focus on reflection and learning.
All types of meetings can (and should) be staged by the facilitator – also the weekly departmental meeting, which is often not very inspiring in its nature. Some simple effects for making a meeting more motivating could be:
1) The participants feel welcome in general (they are welcomed, and food/ beverages are provided), 2) The purpose and the agenda of the meeting are visible, 3) The meeting is started up in a positive manner, for example, by letting the participants explain for one minute about an assignment with which they succeeded and 4) The participants can prioritise the most important items on the agenda. This will make a difference and may be the ”small disturbance” that helps the group reach an optimal result. The point being, staging is worth the effort, and you can win some easy points here.
A very central element when designing your environment is to always check up on the location. If you have never been in the room, then go and see it before the session. If you, for example, are to facilitate a process with 40 participants who are to work on brown paper in small groups in the room during the process, you simply have to take a look at the room with your own eyes to see whether it will be possible in practice, i.e. whether the wall surfaces are large enough, and whether chairs and tables can be removed easily and fast to make room for the groups.
You should also make sure that the room is available at least one hour before the process starts, so that you have time to stage it according to your purpose and are ready to welcome the participants. The staging of the room may take some time if you have to rearrange tables and chairs, write welcome flipovers, distribute material for the participants and check the audio-visual equipment. Remember that visual elements in a room may contribute to making an otherwise gloomy room a little more welcoming and inspiring, and that it is all right if the room disturbs and creates curiosity.
Form – methods and processes to develop the script
The form dimension is concerned with which methods you are going to use in your process to reach the goal and create involvement and meaning for the participants. The range of methods is wide and covers both individual reflection and conceptualised methods, for example, 4D from Appreciative Inquiry and Harrison Owen’s Open Space Technology, as well as a number of idea development methods and sorting methods (see appendix). This is the dimension in which your programme will later turn into a script. The key thing is to choose the methods that support the objectives and goals, and which help the group in the process.
In our opinion, these methods are very useful, because they all have an overall framework which you can use more or less rigorously and adapt to the specific process. As a facilitator, you decide already when preparing your script which methods you are going to use during the process.
Choose the methods that help the group produce the result
What is most important is for you to choose the methods that support the purpose and the goal and help the group in the process. It is thus essential to have a range of methods which you may use during the process to create an adequate amount of variation in order to keep the participants engaged during the entire process.6
Figure 9: Examples of different involvement techniques for use in processes
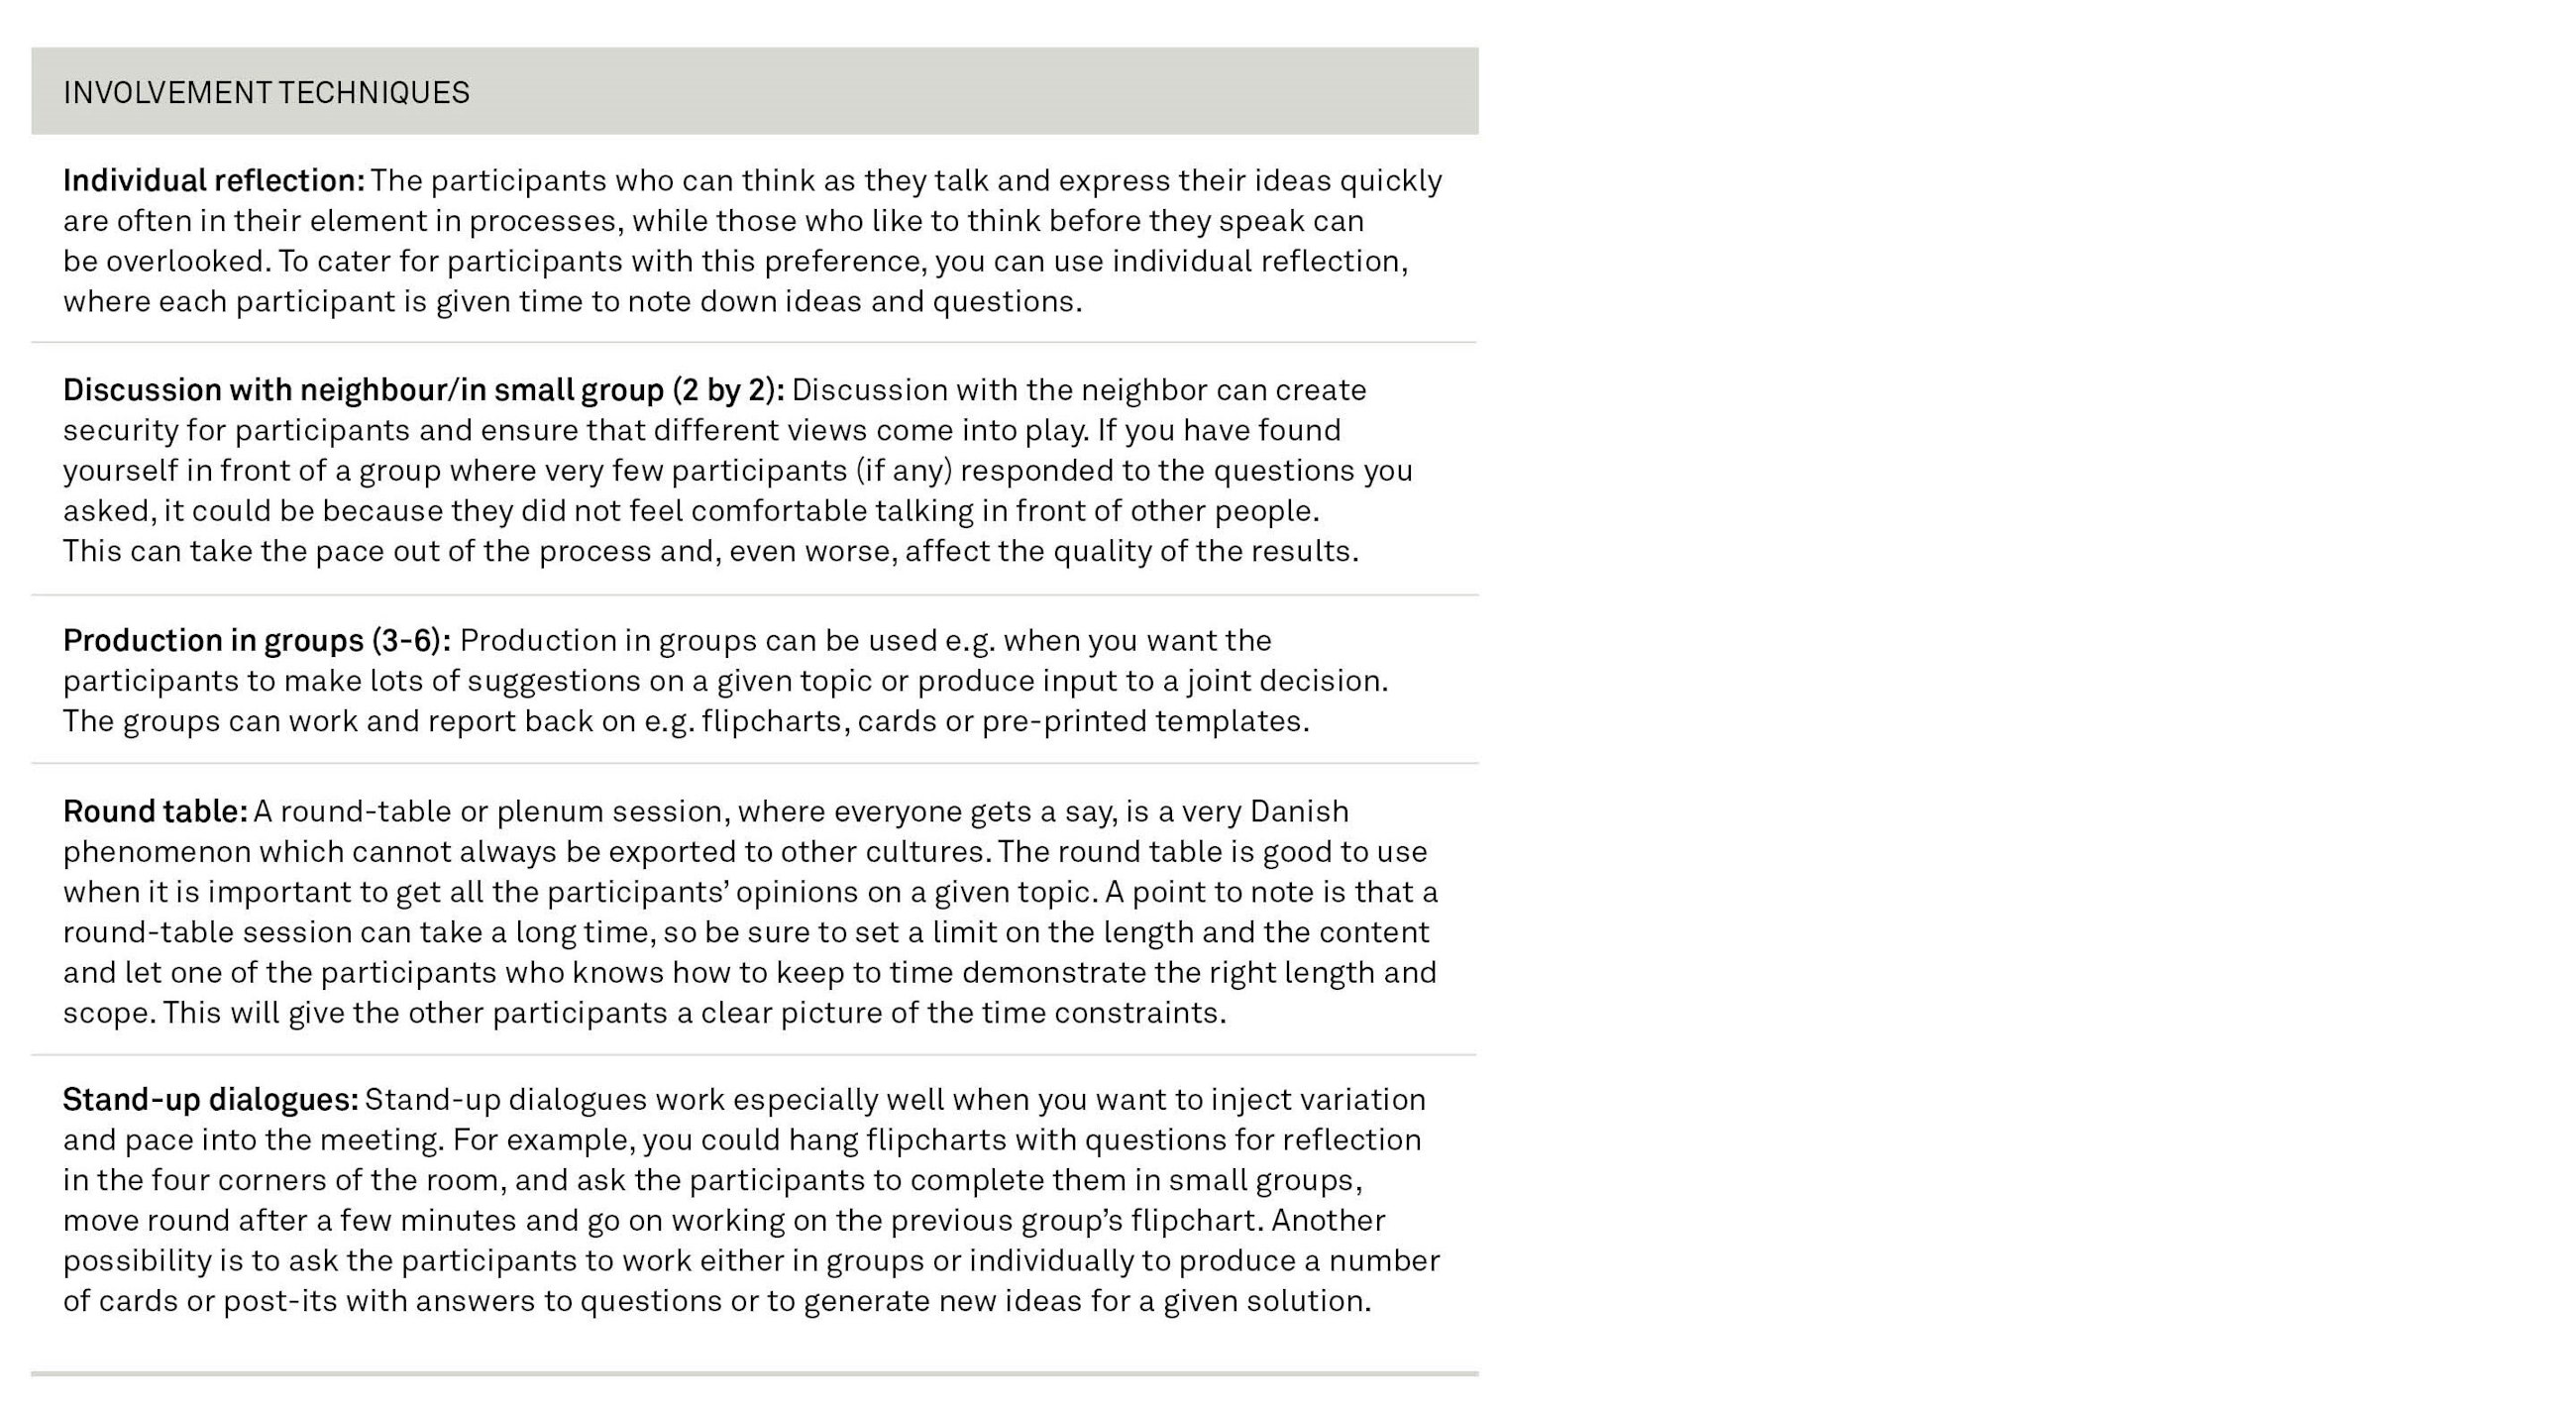
What you can do:
- The participants should get to speak within the first 15 minutes, for example, about their expectations, or they should have an icebreaker/introduction exercise.
- At least one regular break (min. 10 minutes) every hour.
- Break the programme content into 20-minute blocks, for example, 20 minutes’ introduction, 20 minutes’ group work, 20 minutes’ “plenum”. Neither body nor brain can take in any more before it is time for a change.
- During your process, you need a number of methods for creating comfort, energy and mood. We call these methods energizers, openers and closers.
- You may be inspired by figure 9 that outlines different involvement techniques you can use to vary your form.
Roles
Spend time on balancing the expectations of the roles and always take time to manage expectations of roles during the process.
In many cases, it will be a good idea that you are not the only one to be ”on stage”. In some processes, it is an obvious possibility to have the managing director or the head of department opening the meeting or process to create importance around it. This may also be done by external speakers invited to inspire the participants or explain about the latest trends or knowledge in the area. In our experience, it is sometimes difficult to handle managers. We recommend – very clearly and in advance – balancing the expectations as to the purpose of the manager’s role and what he/she is going to speak of and what will be appropriate to speak of in relation to the rest of the process.
If you have invited an external speaker, it is also important to talk to this person in advance about what he/she is going to present, the length of the presentation, which process there is going to be during and after the presentation, and whether you are to chair a Q&A session, if any, or the speaker is going to do it himself/herself. This requires a great deal of time to be spent on balancing the expectations prior to the process, but it is often worthwhile in order to keep the right pace during the process.
Co-facilitators
Maybe you are not going to be alone ”in the field” but are bringing along a colleague or one of the client’s employees together with whom you are to facilitate the process. In this case, it is also important that you match each other’s expectations of the roles and how each of you prefer working when facilitating. What do you feel good about doing when you are on stage? Is it OK to make supplementary comments when the other one is on stage? Is one of you going to be the main facilitator? And how do you help each other appear in the best possible manner?
In the case of large processes with more than 30 participants, it is often necessary to have a number of cofacilitators assist in making the smaller processes in the room run most optimally and in reaching the goal. Here, you may use co-facilitators in the form of ”chairmen of the tables” whom you have trained in advance to drive the smaller processes.
When you have considered all five elements of the star thoroughly, it is time for the ”does it hold water” test. This is a final quality check on whether it will be possible to achieve the purpose, deliverables and success criteria by means of the participating people in the chosen environment with the chosen form and method and with the roles you have decided.
From design star to script
The “before” phase is time-consuming, but the time is well spent as a properly thought-through process will produce a stronger sense of ownership among the participants and better results as well as more reliable performance and greater confidence in your own role.
A key lesson from the participants in our facilitation projects is that preparation has a far greater bearing on the value of the results than they thought when they initiated the process. How long you should spend in the “before” phase depends on several elements: the complexity of your process, the stakeholders and participants, the place, the materials, the importance of achieving specific success criteria, and how many facilitators are involved. Even a oneoff meeting can take days to design if many stakeholders are to be involved, or there are particular issues in play. It is therefore impossible to give an exact estimate of how much time you should spend on planning and designing the meeting, but usually more than you think – at least 1:1. This means that for a one-hour meeting you should schedule one hour’s preparation, and for a oneday workshop about a day’s preparation.
The design star is the first part of a three-step “before” process, also called the design phase, which includes:
- Production of the design star
- Design of the overall programme
- Production of a detailed script
When you have considered all elements of the design star, it is time to take a look at what is going to happen at a more detailed level in the process.
A typical step from the design star towards the detailed script is to prepare a rough outline of a programme in order to get an impression of the overall session on the basis of the design considerations.
After having created the idea of how the overall session is going to be and how much time is available, the next step is to design the individual sessions of the programme at a more detailed level – a script.
The purpose of preparing a script is thus that you consider how to achieve the purpose, the distribution of roles and responsibilities, how you are going to manage the process as well as the length and number of breaks, the atmosphere and the materials you want to use as well as the time. The script thus helps you to consider all aspects of the process and provides a schedule for your facilitation with exact times.
If the script is detailed enough, it will also be possible for your co-facilitators to gain an insight into your script or take over the session. In case of cofacilitation, we always work with a shared script which is optimally prepared jointly, so that all exercises and purposes are discussed, and both facilitators know the whole script and not only their own part. In this manner, you can most optimally help each other and the participants in their learning. In addition, a shared script provides a good basis for giving your co-facilitator feedback afterwards and for developing and improving your common practice the next time you are going to be on stage together. This feedback and the learning regarding the individual aspects (time, what worked etc.) are even more important if you are to facilitate the same workshop several times.
Preparing the script may be a time-consuming process, but it is worth the effort, because when you are on stage, you have considered the purpose, meaning and processes, and it will thus be easier for you to improvise and know when the time schedule may be exceeded if you change the order of items on the agenda or the length of the plenum discussion.
Figure 10: From Design Star to overall programme and script

As can be seen in figure 10, the script also contains a description of ”before”, ”during” and ”after” activities.
We have now examined the facilitator’s toolbox for planning and designing the process. The design star and the script are part of the ”before” elements which a facilitator should always use in his/ her planning to ensure successful results of the process.
The script is prepared before the process and is also an important management tool during the actual session. However, successful results are not only achieved by means of good planning. As a facilitator, you also have to be able to manage the process and navigate on the spot when the process is initiated, which is ensured by the script (see script template in the appendix).
During
This section is structured around three essential elements that can all influence a good process (figure 11):
- The facilitator – you: Includes building trust and having empowerment and taking the lead.
- The task – it: Includes giving clear instructions, creating progress and meaning and asking good questions.
- The group – them: Includes helping the group, managing energy levels and handling power and possible resistance.
Figure 11: The three key elements that influence a good process

The facilitator
The facilitator’s legitimacy, credibility and empowerment are not given. The first 20 minutes of your workshop are crucial if you are to establish good contact with the participants, secure your own legitimacy and ensure that the participants have confidence in your ability to guide the process to its goal. You are your own most important instrument in the process, and you are “on stage” before you take the floor. This means having control of the content, the process (more on these two later) and yourself.
Building trust
It goes without saying that you can only run processes and control a meeting or a workshop if the participants follow your instructions. They will only do this if they perceive the facilitator to be legitimate and confidence-inspiring. If you are the head of the group, you can rely on the natural authority that comes with your role. If you are not the leader, you have to draw on your ability to create trust in the room and on the meetings that you may have had with the participants prior to the workshop. However, a leader’s authority still does not exempt him/her from working to create trust. Whether you are a manager, project leader or consultant, you have to constantly earn the respect that the facilitator role requires.
David Maister, a former professor at Harvard Business School, has described in his book “The Trusted Advisor” how relationships and trust can be built and maintained. In his trust equation, he describes trustworthiness as the sum of credibility, reliability and intimacy divided by self-orientation.
David Maister’s trust equation

Be credible
This is about demonstrating knowledge and expertise with a high level of integrity. In other words, “Can I rely on her knowing what she is talking about?”.
As the facilitator of a group, your expertise has to do with being an expert in the process, so this is where your credibility should manifest itself. You have to believe that you can facilitate the process and that your choices are the right ones, and you need to communicate this in a convincing way both verbally and non-verbally.
Be reliable
This part of the trust equation is about being consistent in your behaviour. It is about keeping to agreements and promises. In other words, “Can I rely on her keeping to our agreements?”.
In relation to facilitation, this means keeping the promises you make at the workshop, for instance. It may be a matter of sending out follow-up material after the workshop or taking specific actions on what you agreed. It is also about ensuring that what you said you would do actually happens: If you have said, “We will finish on time today”, or “You can expect to be involved today”, you are obliged to live up to this.
Be intimate
This part of the equation is about the ability to inject more personal engagement into the relationships we enter into. It is about the ability to be honest, to listen and give of yourself. In other words, “Do I want to share other things with him/her than the purely professional?”. As with many other things, this is a matter of preference. We are not in the business of asking you to “fake” interest or do anything that compromises your authenticity – on the contrary.
Minimise self-orientation
This part of the equation is about being able to agree on a common agenda with your client – in this case the participants. It is about showing a genuine interest in helping the participants where there is no covert self-interest or hidden agenda on your side. In other words, “Can I rely on her being genuinely interested in me and my needs and not just in her own?”. This element of the equation is below the line, so it could undermine all your good work on the other elements.
We like Maister’s trust equation, which provides a concrete suggestion for how we can work actively to increase trust in other people. It also forces us to constantly increase our awareness of the importance of working on trust throughout the process before, during and after the session concerned. We have suggested some small things below that you can do to increase trust, not just as a facilitator.
Figure 13: Things you can do to increase trust

Be empowered
A key element of the participants’ trust in you and your legitimacy in the role is your personal empowerment. This section will make a few suggestions for how you can train your interpersonal skills by consciously use non-verbal communication strategically. For further advice, we suggest that you read the full article on the topic (Activate your non-verbal language by Lene Kobbernagel.7
Body language dominates your communication
Studies of personal communication reveal that whenever there is doubt about a message, we ascribe 93% of the overall meaning of that message to body language and tone of voice. The actual words of the message account for only 7%. This means that if you, as a facilitator, kick off a participatory session by saying, “I am really keen to hear your thoughts about the process of reorganisation”, as you slowly move towards the back of the room with arms crossed and allowing your gaze to drift off, then your general manner will give participants the impression that what you are saying is something you have to say and not something you really want to say. You will come across as lacking in credibility. Your body language “cries out” and invests your words with an entirely different meaning.
Three truths about your body language
- You do not know what signal you are giving off until you hear other people say it.
- When something feels unnatural, it is because you have not done it often enough.
- You can influence other people’s behaviour by changing your own body language.
Be conscious of your body language
You do not always realise yourself just how much space your habits, stature and position take up in relationships. Therefore, it is necessary to get some feedback, because you only know what signals you are giving off when you hear other people telling you. We all have ingrained and unconscious habits when it comes to how we behave in different situations. That is also true of how our body behaves. As a facilitator, it is therefore helpful to be aware of any tendencies you may have in the way you use your body when you stand in front of the room. Your legitimacy in the room depends very much on your body language and affects the relationship between you and the group. The more aware you become of the effect of your own signals, the more legitimacy, power and credibility you will have.
Our participants should feel seen and heard, sensing that they are playing a key role in the process. We can do this by using open or closed body language. An open body language simply means thinking of yourself as a spotlight: The people to whom you open yourself up physically are the people you illuminate. They get attention and space to develop and grow. The people you physically shut out, you leave in the dark. They do not get attention and will feel that they have to tone themselves down a little. So, when you are facilitating, you should move around in the space, because then you can include all groups and individuals.
Tasks to consider before the meeting starts
- Check the AV equipment
- Distribute materials
- Find out about the practical arrangements (wi-fi, bathrooms, catering etc.)
- Put up posters
- Turn music on
- Distribute name badges
- Make up flipcharts or other aids for the first part of the programme
- Talk to the people who have a role on the day (presenters, managers etc.)
Decisions the group were able to reach, and how I or the “client” feel about them
- Can we expect any kind of ( negative) reaction (from whom and how)?
- Where in the programme could I take more time?
- Where in the programme can I cut down?
- What do I do if I need to turn the energy among the participants up or down?
Be at the forefront
The best thing you can do for yourself is to feel that you are at the forefront with the process and the group. You will automatically have more headroom to pay attention to what is happening in the room and with the participants. The simplest trick for being in the forefront is to arrive in very good time before your meeting or workshop. It seems almost trivial to say it, but it will make a big difference for yourself to get to the venue and have time to make the practical preparations, so you have time and space to say a proper hello to the participants. For the participants, it will also signal importance and control if they come into the room where everything has already been made ready and the facilitator has the time to look up.
Use breaks and group work sessions to get ahead with the next practical elements, unless the breaks or group work sessions have to be used to handle more important things in order for you to achieve the objective (more on dealing with resistance later). It may be helpful to make up flipcharts for the next element, distribute materials, put up displays, move tables etc. while they are doing other things. Some of these tasks will probably be written down in the script already.
Make active use of the script
The script is a good tool for being in the forefront on the day, because you will have thought ahead about how you can make the day go well. This also means that you will have thought about how long the individual agenda items should take, and how they should be addressed. It does not mean that you should keep strictly to your plan without noticing what is going on in the room; quite the opposite. When you facilitate the different parts of the programme, you will quickly be able to see from the script whether you are ahead or behind compared to your own expectations. Hereby, you can start to consider early on in the programme whether you need to cut something out, shorten discussions or prepare some extra tasks or questions.
Take the lead with your own energy
Another very simple thing you can do to perform all day is to take the lead with your own energy. If you do not think of this, you can easily be so preoccupied with the participants, the content, your progress etc. that you use up all your physical resources both in the actual process and in the breaks and forget that you also need to recharge. So, consider when you should not just give off energy but also take it on board.
Physically, this means anything from eating during the day to sitting down from time to time. If you know that your breaks will be used for preparations, bring an energy bar and some fruit so you have an alternative to the afternoon cake that could destroy your blood sugar balance and take away your energy. You may also consider how to recharge mentally – either by going off somewhere for a little peace and quiet or by sitting down to lunch with others and talking about something quite different. You should also think about how to deal with emails, mobile calls and private matters, so they are not a stress factor during the day.
The task
The skilled facilitator focuses on content and process at the same time. We will now drill down into the general areas you can work on to keep on top of the “task”. In the appendix, you will find more on various process methods and how you can use specific methods to guide things towards your objective of the day.
In order to succeed in the task, you must:
- Communicate simply, both in your presentation of content and in your instructions on tasks.
- Create progress and meaning for the participants, so they are all on board, fully focused and can see that they are making a difference.
- Be able to listen and ask good questions.
The American psychologist and jazz musician Frank Barrett8 often uses the expression Say yes to the mess to describe what a good manager should be able to do. The expression comes from the world of jazz where a skilled jazz musician simply has to accept and go along with what happens as the music unfolds, rather than opposing it by going his own way or egotistically playing his own instrument and chord sheet. With this quotation in mind, it is easier for a facilitator to accept that we cannot control everything. So, say yes to the mess and get good at navigating through the unpredictable things, which processes that involve people will always be. As with good jazz musicians, this demands a lot of training and a clear idea of the underlying melody you are improvising on. Transferred to a facilitation context, it is then your basic design in the form of the script that sets the tune, and success in the facilitation task depends on your ability to generate interplay and fine music on the day.
Tips & tricks
- Start by considering what is the fundamental message and idea in the presentation – what do you hope to achieve with it, and what will the participants find especially interesting?
- Produce an overall storyboard – what is the conclusion from the individual slides/flipchart pages? You can do this with Post-It Notes or by taking a piece of paper and dividing it into nine boxes.
- Put active headings on each slide to support the conclusion.
- Build up each slide/page with a logical flow from left to right and top to bottom. Use as few words as possible – pictures and figures say more than a lot of words. Keep your slides as simple as possible without talking down to the participants.
Communicate simply
To complete the task, all participants must be fully focused. Two of the most essential areas to ensure that the participants are on board with the process are when to communicate content and when to issue instructions.
In almost all meetings and workshops, there is a need to communicate some content for the participants to use in the subsequent process. In the strictest sense, other people will be responsible for this part, but if you have no content presentations to give in the course of the day, you can use these tips and tricks to encourage your speakers, so they deliver tight presentations that the participants find meaningful and appropriate.
Issue clear and simple instructions
To prevent misunderstandings and confusion among the participants, it is important to issue precise instructions for tasks or exercises. A precise instruction will increase the participants’ motivation to do the exercise and ensure that it hits its target in terms of learning. We always advise you to start by explaining the purpose of the task. This gives the participants time to switch on to why we are doing it before you explain how. Apart from ensuring that the participants are ready to listen, it will also help to increase their understanding of how important the coming task is. You should always explain the task orally and have something written down to support your instruction (PowerPoint instructions, flipchart or flashcards), so people can see visually what you are explaining and have something to refer to later as they tackle the task. As a general rule, a good instruction will answer the following questions to the right.
You should also consider the order within your instruction to maximise the chances of people following. Most people cannot remember more than three instructions at a time, so give out a written instruction sheet to the group for more complex tasks. But always have in mind to try to make a logical flow and row order in your instructions.
Create progress and meaning
Creating meaning means being crystal clear about the purpose of the process and being able to communicate it to the participants so they can clearly see the sense and relevance behind their own participation. This requires you to put yourself in the participants’ place and to have thought carefully beforehand about “what’s in it for them?”. Why have these particular people been invited today, and why is this process relevant to them as individuals?
Look at the facilitator’s checklist below for ways of making clear sense of the process to the participants. It is not only important to create meaning for the participants at the start of the session; it is equally important to make a relevant connection between the present process and the overall purpose of the session, so the participants are led by the hand all the way through the various subprocesses and can clearly see the relevance. It is also essential as a facilitator to make sense of the participants’ different views and attitudes, so they gain fresh insights into each other and the content they are working on.
With your introduction, you should:
- Tell the participants about the purpose and deliverables from the session – what is to happen at the meeting or workshop, and what is the programme of the day?
- Generate enthusiasm among the participants in relation to the benefit to them of taking part in the session – what is the overall objective to be achieved, and how does it affect them?
- Empower the participants by making it clear that their presence is important if you are to achieve the right result. Why were they chosen, and what role are they to play in the process?
- Who can take decisions, and how will we do this?
A facilitated session will often be broken down into different miniprocesses (from one programme item to another on the agenda) where the participants work with different methods. Each mini-process starts with an update on where you are in the programme and the aim of the new process which is about to start. You can do this by establishing regular checkpoints:
- Review: Brief review of what has been done so far.
- Next step: Brief description of what is to be done in the next session in relation to the agenda.
- Explain the big picture: How do the next session and task fit into the overall purpose of the process for the day and the organisation’s goals?
As the facilitator, it is also your responsibility to help the group through the various subprocesses, so the right decisions are taken, and everyone has a sense of ownership of the decisions that have been taken. To this end, we have produced a number of good tips that facilitators can usefully consider in relation to their role on the day.
- Be inclusive – give everyone a chance to speak or explain why they cannot if that is the situation.
- Only ask one question at a time.
- Ask open questions. They (mostly) start with “wh-“ and cannot be answered with “yes” or “no”.
- Ask questions for which there is no single right answer.
- Ask focused questions that direct the discussion towards the objective.
- Preserve your neutrality – keep a sharp eye on your own interpretation and use of emotive words.
- Give the participants time to reflect and answer.
As participants, we cannot always answer very direct and “upfront” questions such as: “What has been your best experience of our internal collaboration in the department?”. This question is OK, but we can do more to get the group to associate, for example, by applying the approach above.
Every facilitated session needs to start with a good opening question which puts an image in the participants’ heads and prepares them to be able to answer and reflect on the question that you are asking.
Let’s take an example:
“Think of the last time you were on holiday and had a really good time. Think about the activities you were involved in: what did you do? Who was involved in the activities? What were the things you enjoyed most? Let’s write a list of things we like to do when we are on holiday.’
What you can do:
- Start with an opening question that produces an image: Think about …/Imagine …/What if …
- Expand the image so the participants can see the answer for themselves. This will normally take 2-3 follow-up sentences.
- End with a direct question.
Ask good opening questions (Source: Wilkinson, 2004)
Listen and ask good questions
The good question – the facilitator’s most important tool to help the process along.
The facilitator should have an arsenal of good questions to help the process along. Opening questions, processgenerating questions and follow-up questions. The facilitator should also be aware of the kind of answers these questions generate. The answers are only as good as the questions being asked. Be clear about the aim of your question – where do you want to take the group?
Asking good questions is a training discipline in itself, and there are many different theories you can apply that take us over into more of a coaching tradition.
Below we have selected a number of question types which will take you a long way in your facilitation practice. Let us start with the opening question.
- A good opening question will start the group off in the right direction.
- A good opening question is important for the group to be able to head in the right direction. You can work at framing your opening questions to raise various ideas and associations.
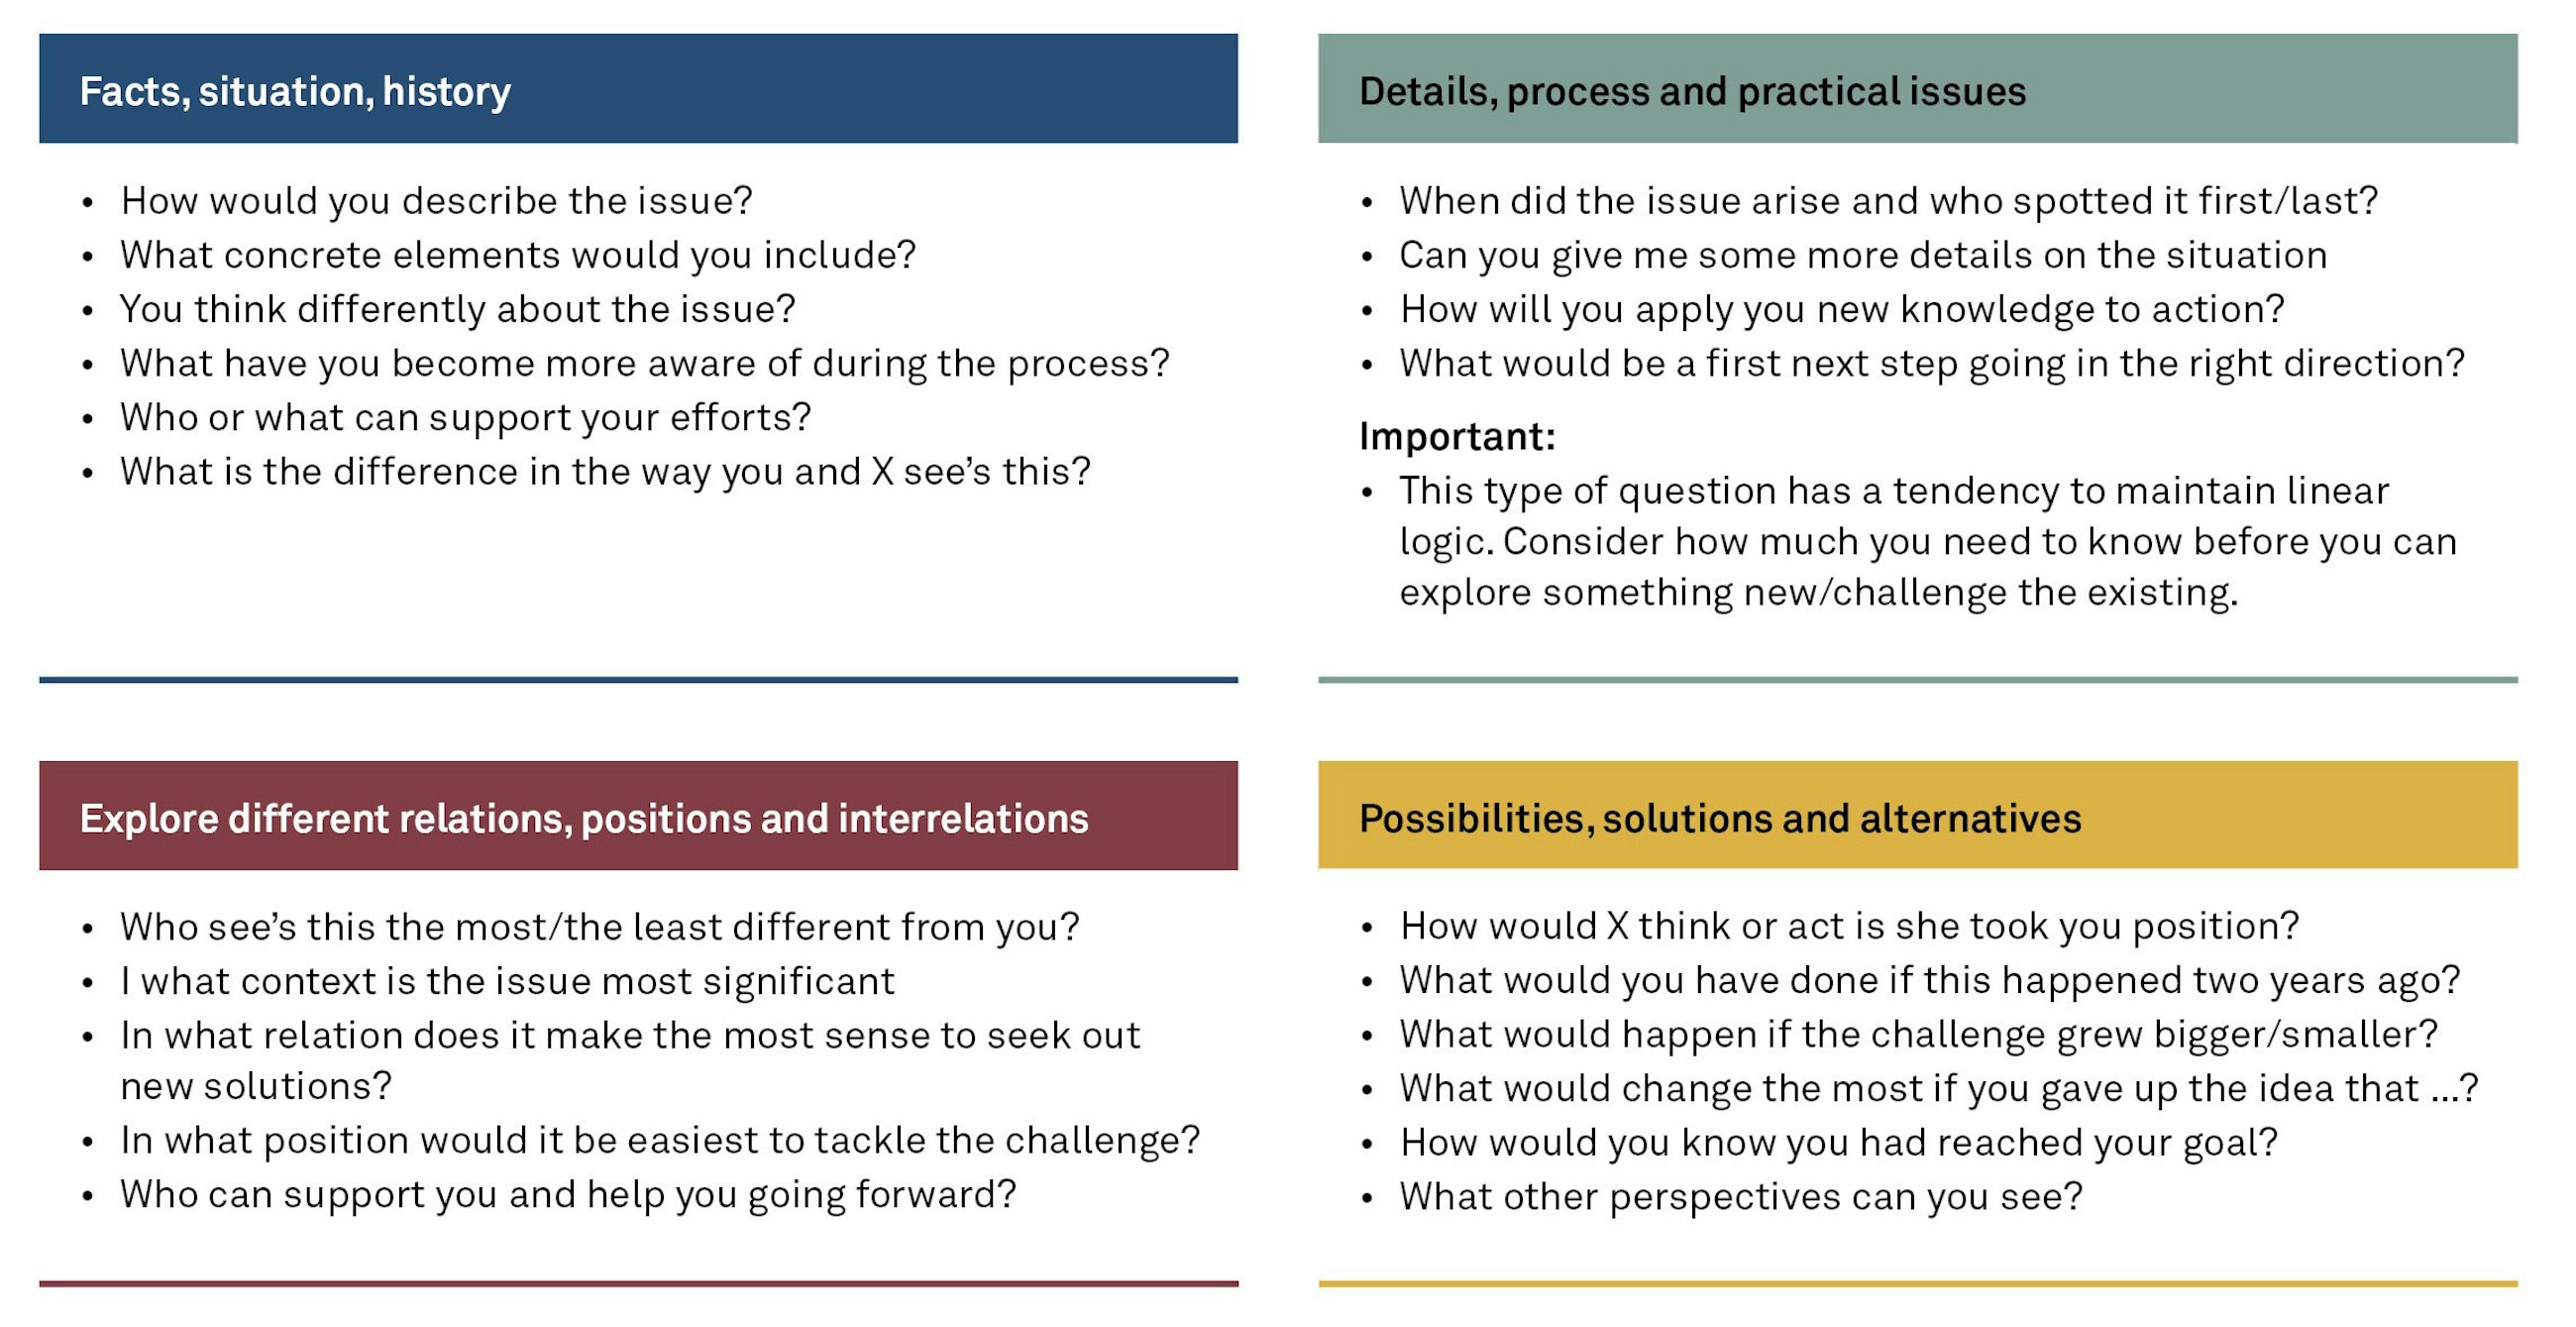
Ask questions that reveal different perspectives (preferences)
The HBDI’s Whole Brain model is a preference model. Nevertheless, we find it essential to use the model as a framework for a number of good, generic process questions. Precisely because it covers the four very different preferences, the questions that we ask on the basis of these preferences will also be different, with different objectives, so they can be used to ensure that we have “asked around” the problem.
- Questions for the rational preference are aimed at revealing facts. These relate to the situation right now and also to what happened earlier, what facts we have about the present, and what we hope to achieve. Questions based on this preference will therefore be “what” questions.
- Questions for the practical preference are aimed at identifying practical details. Here, we are looking for answers to the question “How?”. How the plan, the implementation and the organisation should look, and how we propose to do things in practice.
- Questions for the experimental preference are aimed at examining possibilities. Here, we are concerned with finding fresh solutions, ideas and alternatives to what is in place and hence challenging the status quo and asking “Why?”.
- Questions for the relational preference are aimed at examining similarities and differences. The questions will try to bring out different views and attitudes and identify areas of agreement and disagreement in order to gather them into a collective solution. The typical questions will then be “Why?”.
Asking good process questions is a discipline in itself and does not come without a good dose of training so you have a lot of different questions at hand. A good tip is to be curious about what the participants are saying, get them to expand on their ideas and respond to them.
Figure 14: Examples of questions based on different preferences
The art of listening
As a facilitator, you need the ability to listen if you are to ask probing questions. You should be able to reformulate what has just been said, and you should be able to take the discussion forward by asking fresh questions. Being a good listener means focusing on the message as a whole, not only the words, AND being able to be quiet, not take the focus and be genuinely interested in the topic.
GROUP
At the end of the day, both you and your planned process could be irrelevant if the participants are not on board, because they are the people it is all about and who need to create something through the process. We will now focus especially on how you, the facilitator, can help the group to manage the energy in the group and handle resistance/power in the room.
Help the group
Group composition for optimum collaboration
You can deliberately place the participants where you think it is most advantageous. In smaller groups, for example, you can make place cards for the participants if you want them either to sit in special groupings or to be spread out. For larger processes with multiple tables, you can ask them to take a table number when they come into the room. This gives you the maximum mix of participants at each table, while they themselves know that the allocation has not been managed. You may also consider who can usefully work together in the course of the day, and you can plan the breakdown of participants into groups beforehand. Apart from helping to produce good co-operation, this can also be a way of preventing resistance.
Check in with the group
When a group has been set to work on a task, you should go and talk to them within the first 15-20 minutes. You should allow enough time for them to get into the task, but not so long that they might have gone too far in the wrong direction. If there are several groups, and particularly if they have been sent to other rooms, it is especially important for you to go out to them and see how they are getting on. It is quite a defeat for the group to realise that they have not understood the task, or that things are not working, if they have to send a participant out to look for you instead of you coming to them. When you come out to them, your job is just to listen and observe, unless they themselves ask you for help. Note how they are getting on as a team and whether you need a small intervention to push them in the right direction or to move forward, possibly with a little appreciative comment.
The group’s ground rules as guiding principles for co-operation
It can be a very good idea to draw up some ground rules at the first meeting in an extended series of meetings or workshops. This will invite the participants into the process and give them a share of the responsibility for the success of the process. The ground rules are also there to quickly establish a group standard to be upheld by all participants. In other words, the facilitator will have greater legitimacy from being able to refer to a set of shared ground rules, and, better still, the group will often establish sanctions against each other on their own initiative if these rules are broken.
Examples of ground rules defined by the group at the first meeting under your skilled facilitation might be:
- When we are here, we are here – mentally too. This means that we read emails and texts and answer calls in the breaks.
- We arrive on time and return from breaks on time.
- We come prepared to the meetings.
- We respect majority decisions. This means backing the decisions taken in a democratic manner, even if we do not agree with them.
- We accept that the facilitator may cut us short to keep us on track.
These ground rules will help to keep everyone on track, particularly if conflicts arise along the way. If you have a long series of meetings or workshops, it may be good practice to display the rules in the room and revisit and evaluate during the process. Are they still the right rules, or should they be added to and amended slightly, and how well are they being complied with?
Decision-making power
You can help the group by making it clear how decisions are taken in the workshop. Is it the manager who takes the decision, does the manager have a veto, is it the majority that decides, or does there has to be consensus? The format will depend both on the organisational culture and norms and on the nature and status of the project.
Figure 15: How decisions are taken in the group

Manage the energy in the group
It is your responsibility as facilitator to ensure that the energy is at the right level. This does not mean that the level has to be high all the time, but that you are responsible for matching the energy to the content and the tasks the group is to work on.
Turn the energy level up and down
You can turn the energy level up and down in many ways. The most common is to use little energizers: small tasks with or without any technical content which generate energy in the group in 5-10 minutes. Our experience shows that you can get most people engaged in (almost) all sorts of processes and energizers, provided that the objective is well-defined and clear to the group and you yourself believe in what you are doing. So, you should always have a battery of energizers in your back pocket which you are comfortable with and which you can easily pull out when you need to change the energy level in the room.
The process methods that you planned in your preparatory phase can also help to turn the energy up or down by creating variation in content or form. A classic example is the café method or carousel where people are divided into small groups, go off to small workstations and, after an agreed time, rotate to a fresh task, a new table lead and perhaps even a new way of tackling the task. There are many methods of this kind to ensure that people move around and get a fresh focus by tackling different tasks.
If you sense that there is a need to change the energy level, back your intuition and do something about it. Apart from an energizer, you can also call a break, air the room, alter the format (get them to stand up more or go for a walk), or make up new groups to produce the necessary change in energy. However, this may not always work, most likely because of something other than tiredness in the participants.
When the energy in the participants turns negative
Negative energy (or resistance from the participants) in processes manifests itself in many ways. Part of the negative energy comes from us as facilitators, and part of it is down to the participants’ mutual relationships, culture and values, or it may be due to the pace of change in the organisation.
You can be sure that quite a lot of your processes will involve one or more difficult participants who challenge either you or the process or otherwise make life hard for you or the group. If you are aware of this fact, it may be easier to accept. When we bring people together on topics that mean something to them, we will experience reactions that may seem more or less appropriate or rational from the facilitator’s point of view. Our advice is therefore to accept difficulties and resistance from the participants as a fact of life in many processes and to have the will and skills to handle them, so they do not destroy the process for yourself or for the group. Remember the definition: Helping groups do better. You are there to help a group to achieve a result, so they need your ability to lead the meeting and hence also your ability to handle any conflicts that may arise along the way.
The expression of negative energy may be both passive and active:
Passive negative energy: Participants who do not engage with the process are generally silent, do other work, say one thing and do something else, do not take part in the discussion either verbally or in their body language etc.
Active negative energy: Participants who challenge your facilitation directly, talk a lot and at length, check their emails or leave the room early, talk on the phone, speak out of turn, talk to their neighbour etc.
It is important to be aware that this sort of negative energy (passive or active) can arise both consciously and unconsciously, and that it is always a symptom of an underlying problem (the root cause). It is the underlying problem that we need to react to rather than its expression in the form of negative energy.
The most important thing for us is to see that the negative atmosphere may reflect both energy and engagement, that it is often natural, and we need to be curious about it if it disturbs our process or the participants.
There is always a good reason why people act as they do
Many workshops and meetings are held as part of large change activities or projects where the participants in the process are also the target group most affected by the change – both positively and negatively. By their nature, change projects mean that when the project is implemented we will be doing something different from what we did before and that we have to change our behaviour or work in new ways. This can provoke quite natural resistance in the participants, and it is often in workshops and meetings that this resistance is able to come out into the open. So, it is our responsibility as facilitators to handle this resistance.
Our brains are liable to perceive external changes as threats
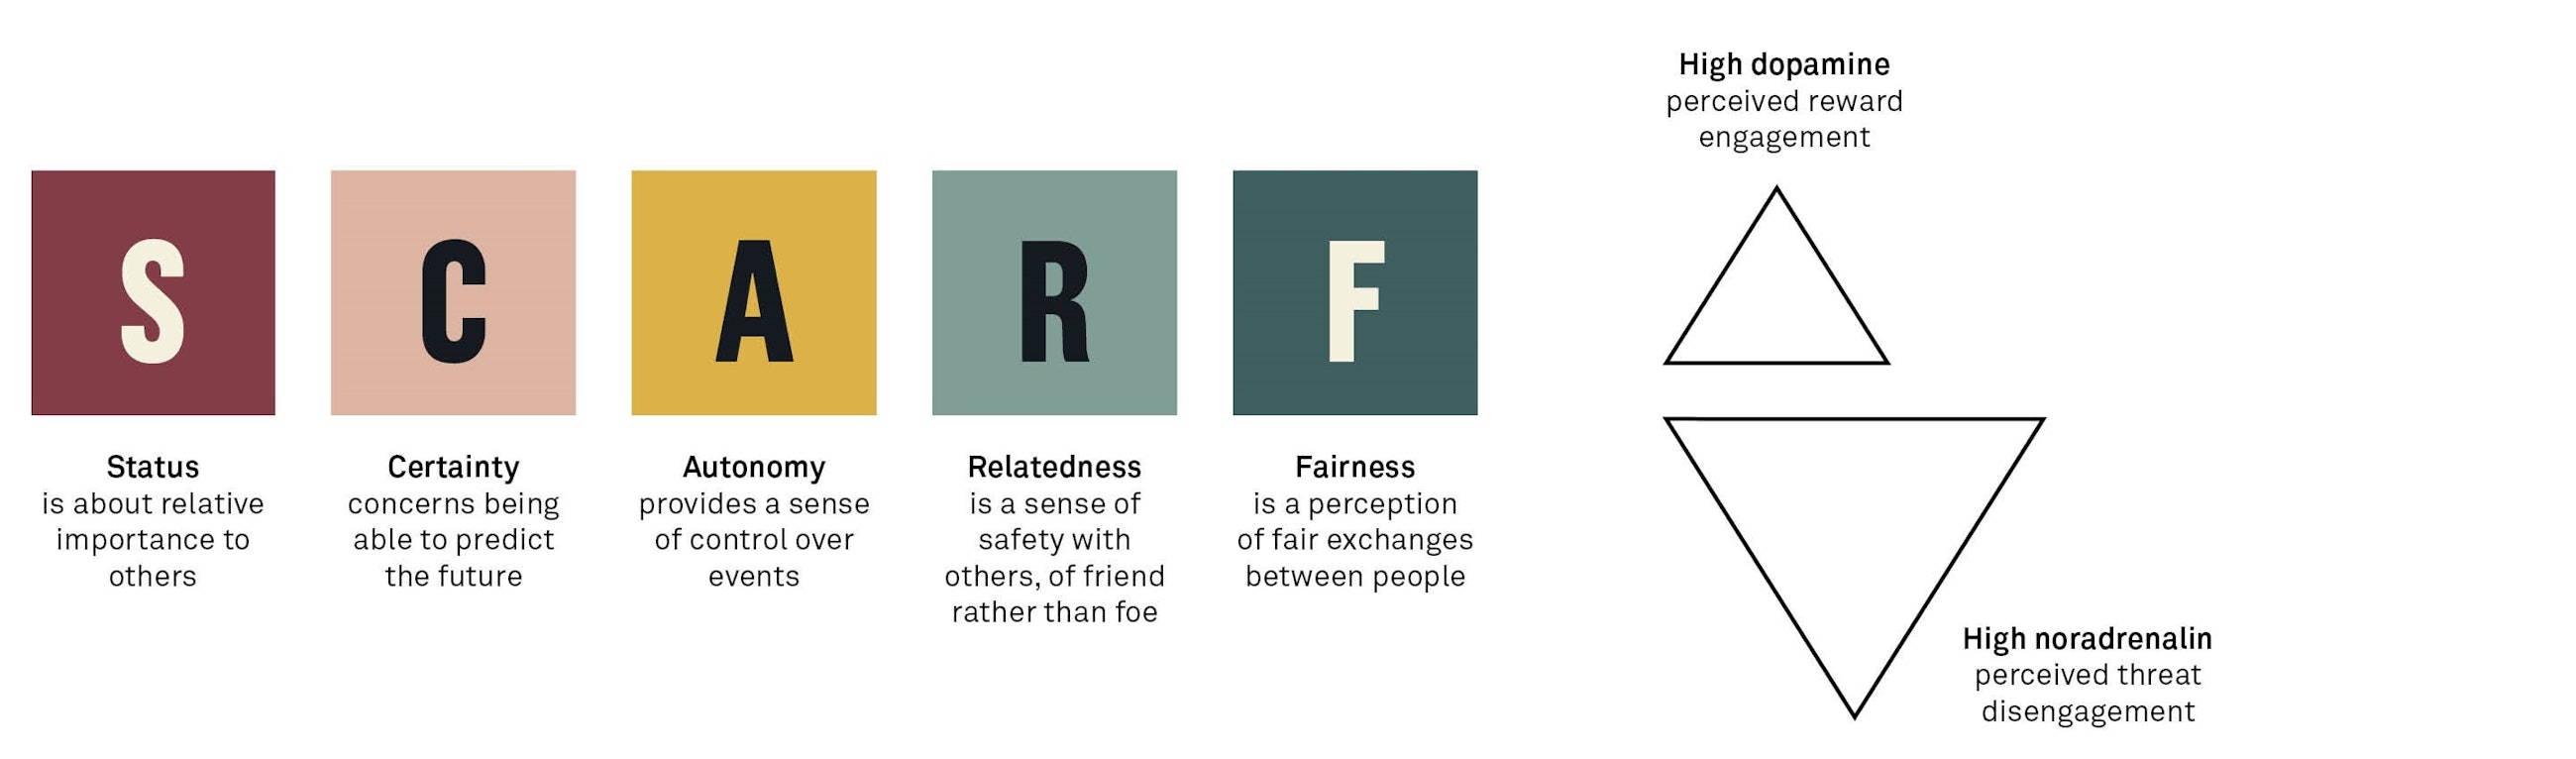
To examine the reasons why negative energy manifests itself, we will use the SCARF® model developed by David Rock and Christine Cox. This provides a number of answers to what purely neurophysiological events take place in our brains when we are subjected to external changes.
The SCARF® model was developed from brain-based research and can make us more alert to emotional reactions to things like change processes. The model can therefore help you to understand what lies behind the resistance or negative energy and/or reaction you are experiencing from the participants in a process.
The model describes five fundamental emotional reactions, which are activated to a greater or lesser degree when we are subjected to an external influence, and which have a crucial bearing on whether we associate the new with acceptance or aversion.
- Status: This concerns the effect of the process on a person’s status in the organisation. If the process causes a person to lose prestige or to surrender some tasks to others or causes some areas to be downgraded etc., you may experience reactions in your process that are related to this.
- Certainty: This concerns the extent to which one can predict what will happen as a result of the process and the change. If it entails lay-offs, transfers, new work activities, new organisation structures etc., you may experience reactions related to this factor in your process.
- Autonomy: This is about the degree of influence people have on changes that affect them; whether they have a say in things, and whether they are involved in decisions and consultations. If the change does not allow any autonomy along the way, you may experience reactions linked to this factor in your process.
- Relatedness: This concerns the degree of trust in others involved in the process and who a person has faith in. If the process challenges this sense of relatedness, for example, manager/employee or employee/ employee, you may experience reactions linked to this in your process.
- Fairness: This is about whether a change is seen to be fair or unfair. If the process means that someone feels unfairly treated or thinks that the conditions are unequally shared out, you may experience reactions to this factor in your process.
The SCARF® model is thus a good framework to have in processes to help you understand why some participants are reacting as they are, whether consciously or unconsciously. Asking yourself during the workshop, “Will this process provoke one or more SCARF® reactions, and how can I prevent or handle them?”, will help you a lot. If your process is part of a change project in which the participants are expected to change their behaviour, you may like to use the diagram below to analyse and be more aware of their reactions and form an impression of what you can do to address these (figure 16).
Figure 16: Emotional reactions to changes
Handle resistance and power
– Handle the negative energy (resistance) in processes
The participants who express negative energy or create difficulties in a process always have a reason to do so. The resistance may not always relate directly to the facilitated session or to you, but it may be due to other factors triggered by the process which cause the participant to react in a particular way. As the facilitator, you are the professional and therefore the person who has to ensure that the negative energy does not prevent the group from achieving its objective. The all-important thing is therefore that you do not allow the disruptions to grow too much but react and behave in a way that generates more positive energy for the process.
In figure 17, we have tried to show how you can prevent resistance from arising and also to offer some techniques to use in the process when you experience negative energy.
Figure 17: Methods of preventing resistance
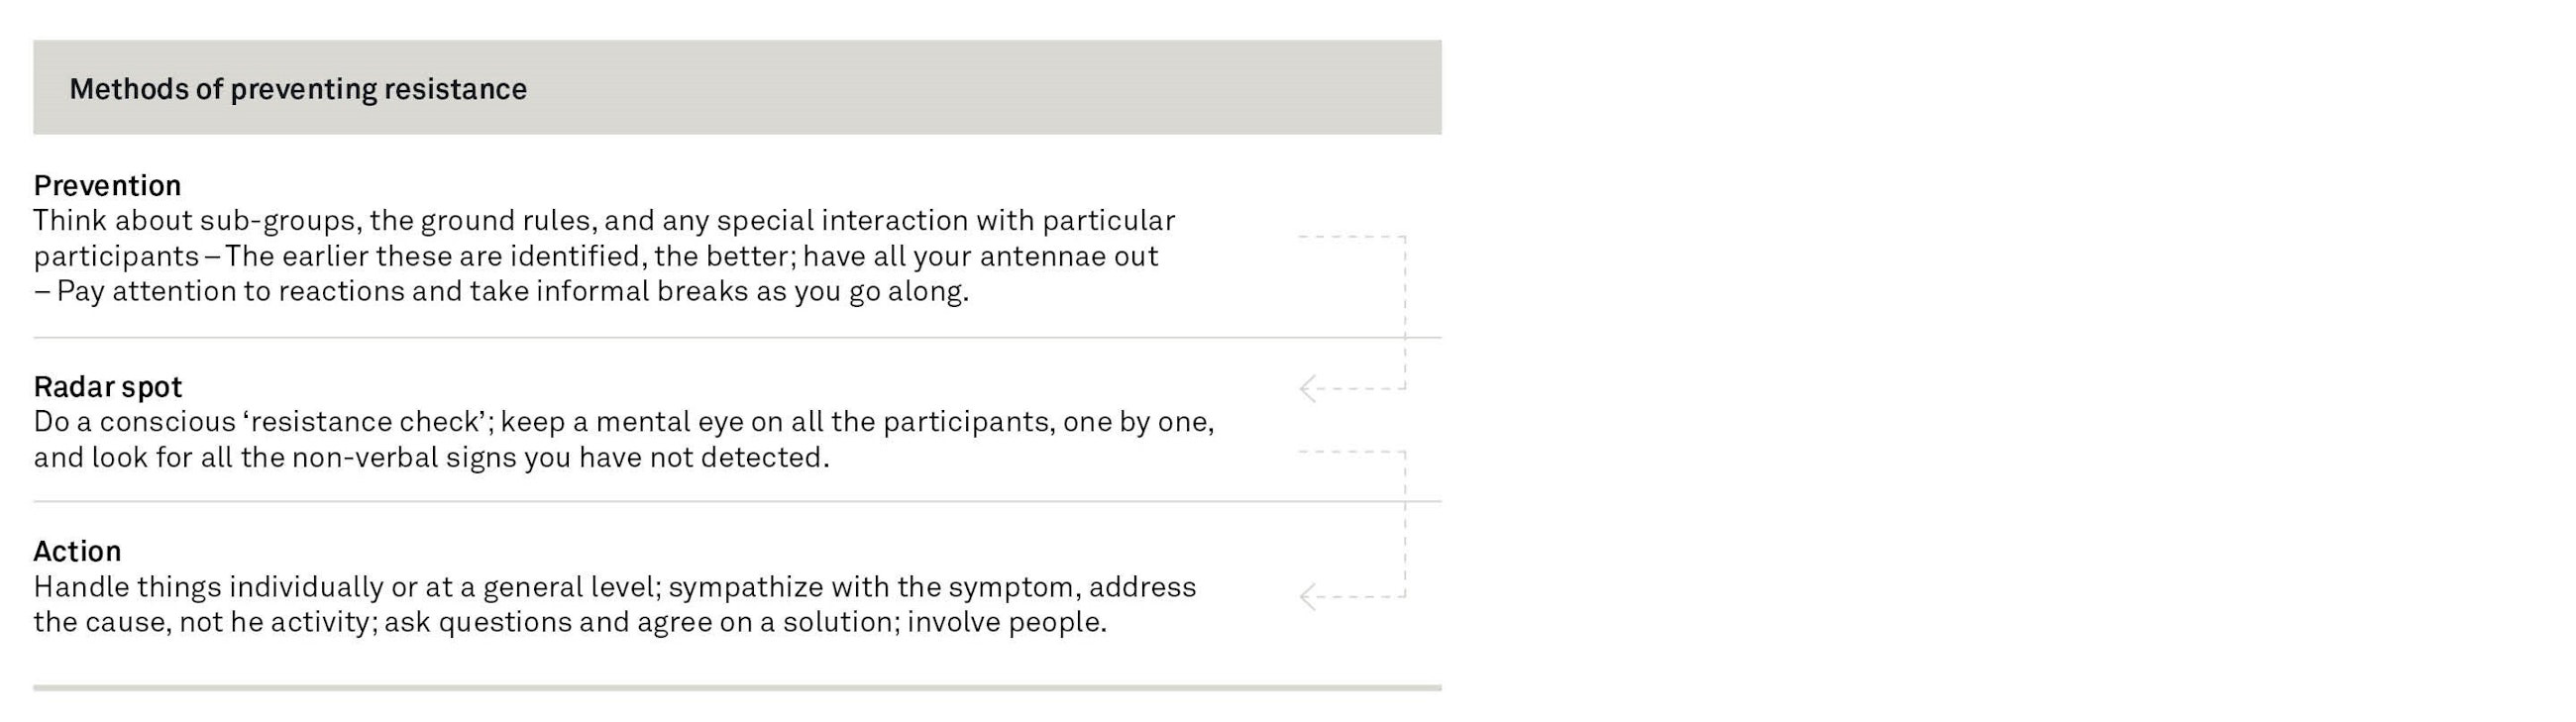
Prevention
As the facilitator, you have major influence over the group process, including the way in which you facilitate the flow of discussion and the work of the group. Here, the design star and your script are two preventive initiatives that can help to ensure that you have planned and thought about possible difficulties or resistance from the participants.
You should obtain all the information you can about the group and its attitude to the subject of the workshop.
In your preparation, you can anticipate a lot of things that could later disrupt the process. You can prevent resistance by actively using the objective of the process, preparing or returning to agreed ground rules or by reminding people of the agreed role you have in terms of leading the process.
Finally, you can establish a “parking lot”, which is a good way of forestalling possible disruptions. A parking lot allows the facilitator to “park” topics or questions and take them up later. In this way, you acknowledge the input and show the participant that you have listened and are happy to note it down for another occasion. Remember to follow up on the point, or it will be seen as a tedious diversionary manoeuvre.
Radar
As a facilitator, you must be able to operate at two levels while the process is under way: in the process and above the process.
In the process is when you are actively facilitating and focused on running the meeting.
Above the process is when you are focused on decoding energy, atmosphere and changes (figure 17).
This means that while you are facilitating the process, you need to drive it forward, guide, listen and ask questions to the participants (i.e. be in the process) while also placing yourself above the process. This is where you can watch and relate to the process from the outside or from above and reflect on whether it is going as intended: “Is everyone engaged?”, “Are we on the right track?”, “Do we need to change anything?”, “What about the person with his arms folded?”, “Should I react, and how ...?”. It is complicated to be in both places, but nevertheless this is what a skilled facilitator must be able to do.
If you have several facilitators, you can help each other to pick up the energy in the room. The person who is not “on” can more easily sit above the process, observe the participants and notice the atmosphere in the room.
Before you take action in response to perceived negative energy, it may be helpful to direct your radar inwards at yourself and outwards at the participants. Are you yourself (unintentionally) causing something? And what about the participants: what are they making you feel? Needless to say, it will never be your intention to create resistance, but you may be there representing a particular department or project or as “one of those people from central management”, and this in itself may provoke resistance from some participants. In this case, a systematic approach to looking at ourselves and the reaction that we as facilitators may provoke in others can be beneficial as we believe that resistance arises in relationships, and the trust equation can help you to create more trusting relationships in the longer term.
Action
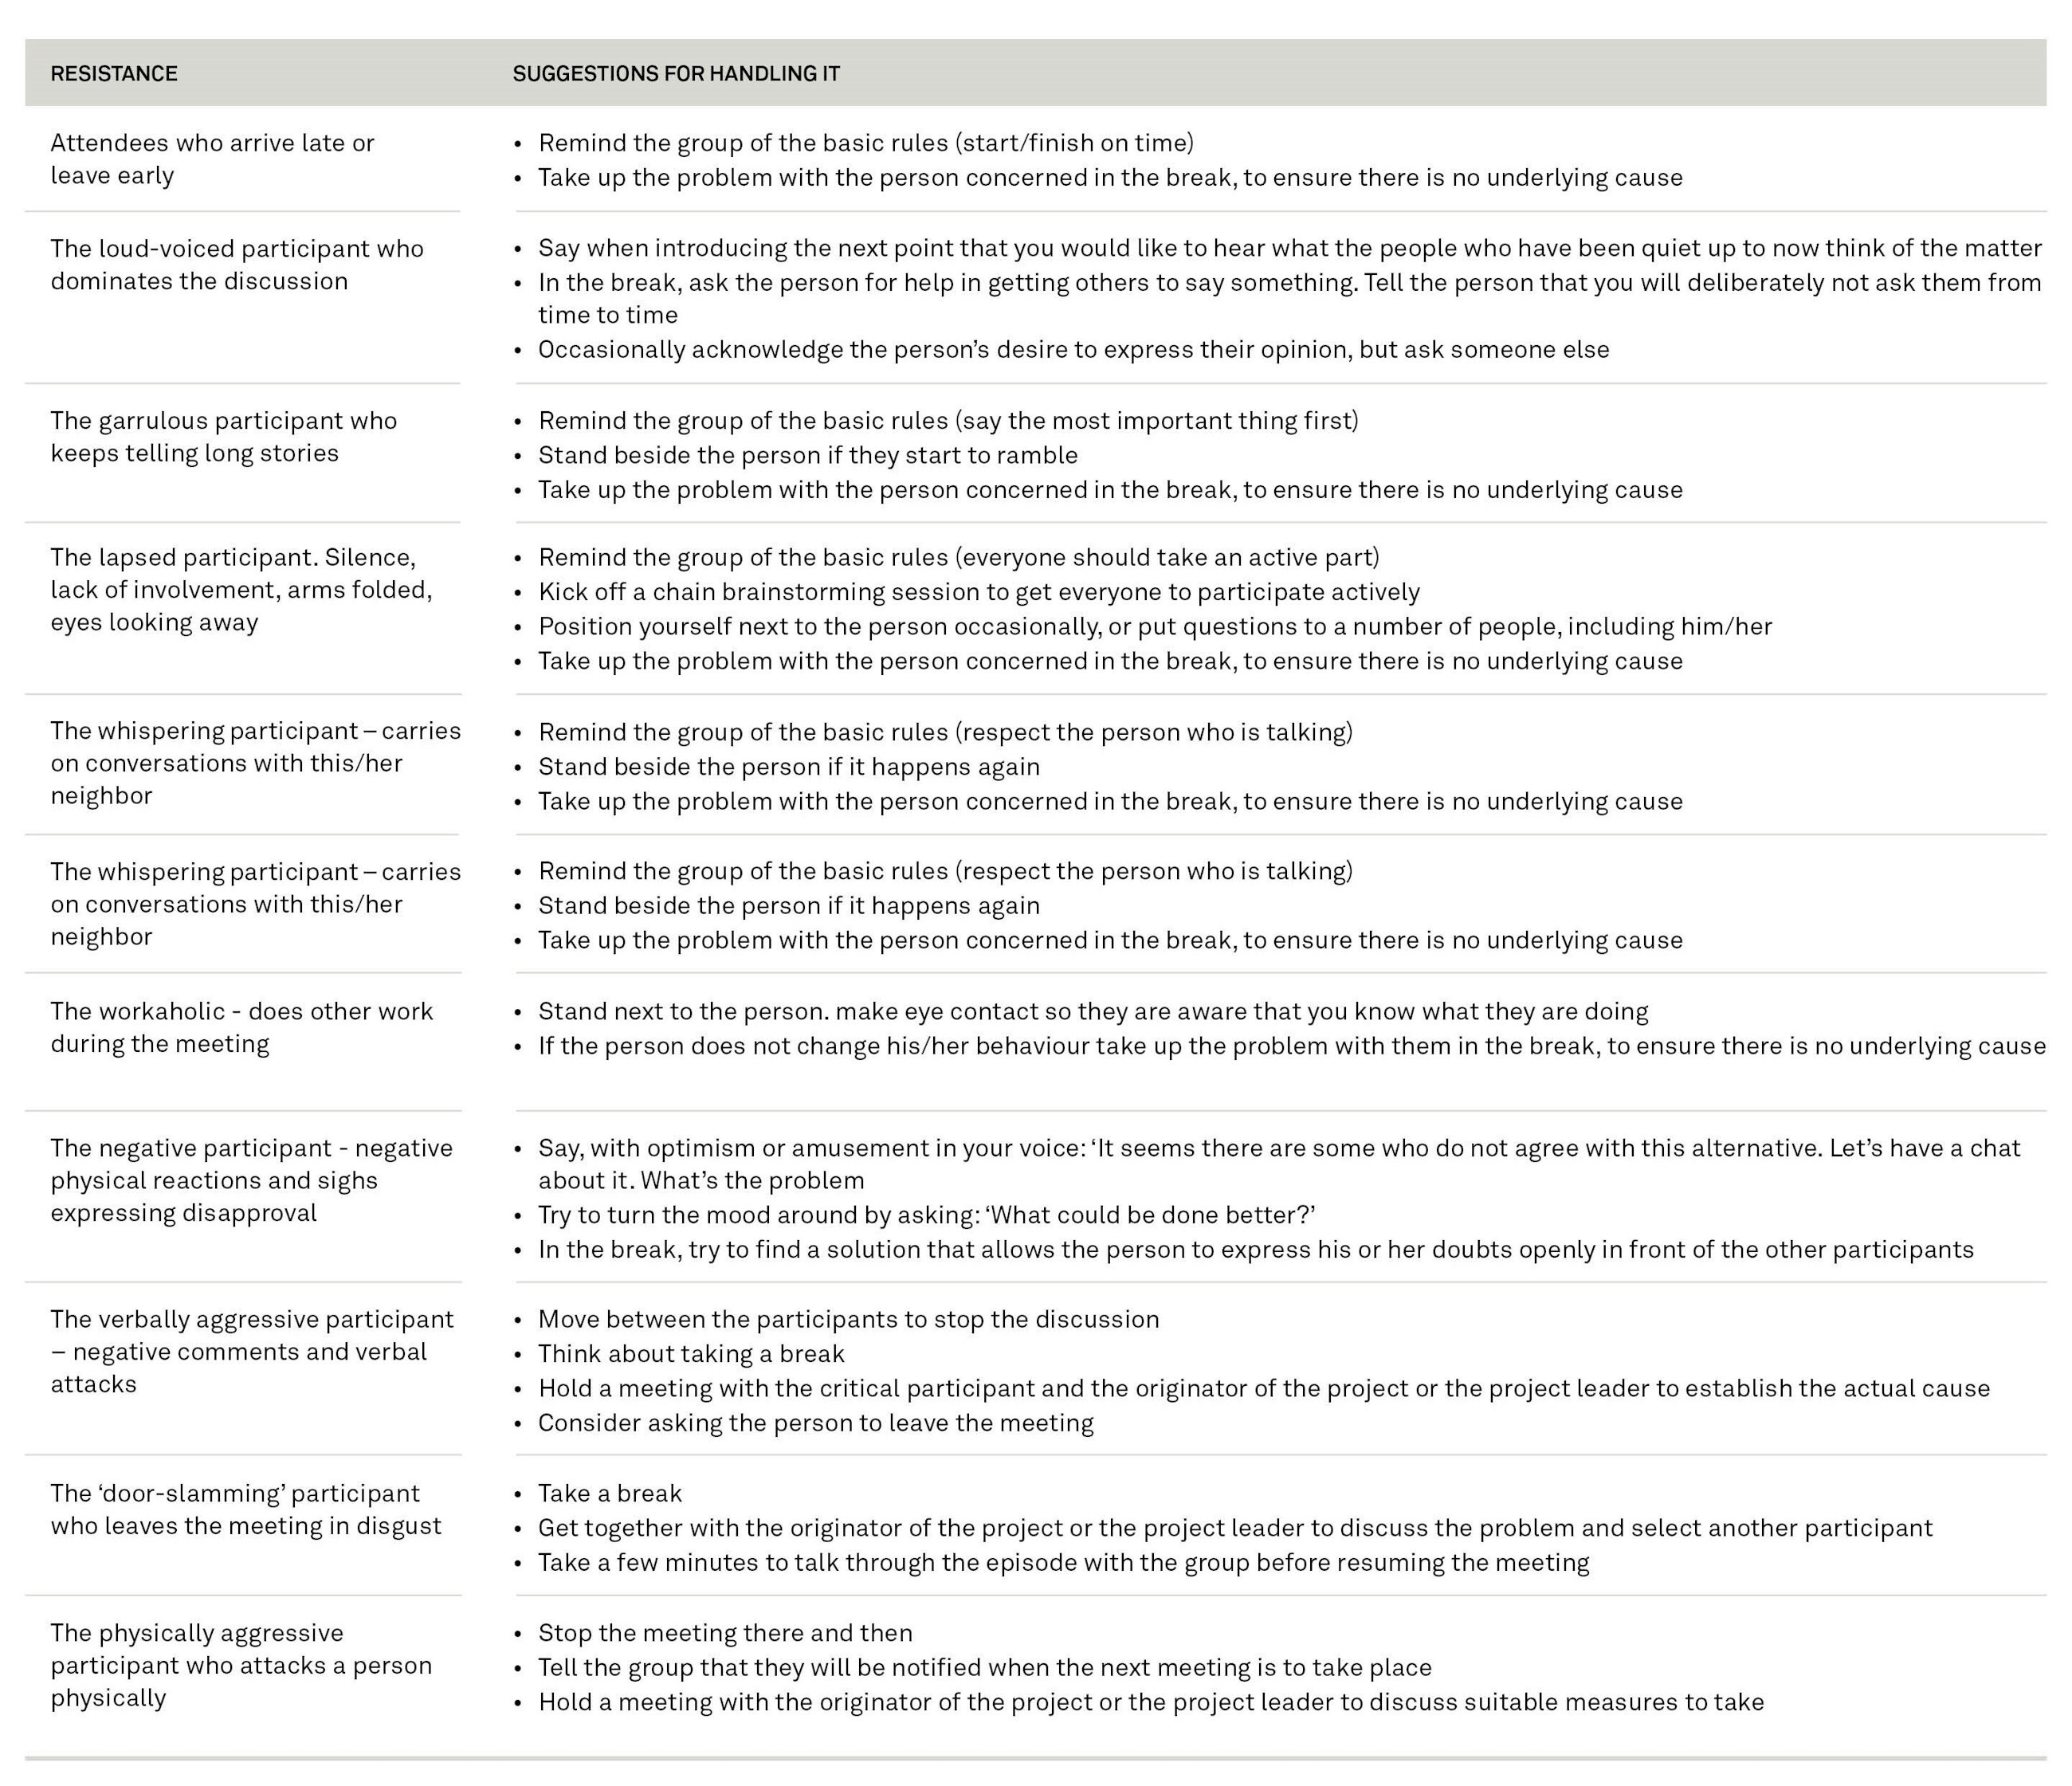
Even if you have taken preventive action based on a good design star and a detailed script and followed all the rules of conduct that you can, unforeseen situations are still likely to arise in the process. Resistance that you did not know existed may rise to the surface or be triggered by the process.
Below are a number of examples of different types of resistance and suggestions for how to handle them. However, it is always important to be careful when you react to resistance. There is no single answer to whether you should always react and take action on a few folded arms, for example. You have to weigh up whether it is a passing thing, and how much it disrupts your process or the other participants. However, we would sooner recommend that you take action rather than leaving things as they are. This will create respect for you as a facilitator, and it may make it easier to manage the process, provided that you do it in a constructive way. If you find that one or two participants are checking emails during the process, it is not certain that this should be seen as resistance. There is no reason to create problems. It is worth noting, however, that any disruption attracts and diverts attention. If the disruption is noticed by a few people for a short time, we recommend letting it pass. A good tip is always to listen to your gut feeling. To prevent resistance, you could:
- If the energy level is low, throw in an energizer.
- Take an extra break and air the room.
- Let the participants move around the room. Physical changes also produce mental changes, so start up plenum or breakout sessions or send the participants out on a walk and talk exercise.
- Address the resistance 1:1 in a break rather than in front of all the other participants; this is the most respectful way.
Be curious and “go along with” the resistance rather than stand against it
When you encounter resistance in processes, we firmly believe that you should be curious and questioning rather than confrontational. A curious approach to what you are experiencing is more respectful and is less likely to make the resistance worse. You may often want to defend yourself and start to explain and argue against direct resistance. However, the risk in defence and counter-argument is either that you will merely shut the participant up temporarily or that you will invite further discussion, which is not always helpful. One of our colleagues refers to going with rather than against resistance when you take a curious attitude.
Be aware of and handle the power in the room
To ensure that the process achieves its objective, it is essential to be aware of and to handle the power in the room, so it does not provide a basis for resistance. Most obviously, it is vital to handle formal power by being clear to the group about the decision-making process and authority and confirming progress with the manager in the breaks or by involving the manager in the process. As a facilitator, you may quite unconsciously look too much at the formal power, which is something you should try to avoid as it is easy to make the others in the group feel (even) less important.
There will often be participants with informal power in the room too who need to have more or less chance to speak. Sometimes you know in advance who they are and what they will say, while there will be other situations where you can see it in the group dynamics – some of them command more attention when they speak, take the lead in the exercises (or take it from others in the group) etc.
A third area in which you may handle power is the “power to set the agenda”. As a facilitator, you can determine the order of the items on the agenda. This is an implicit power, which you need to exercise fairly and be aware can provoke resistance.
The last type of power in the room is the “power of the pen” – the power held by the person wielding the pen. This lies in the fact that you have power when gathering points on a flipchart and when you write up the notes afterwards. If you are gathering points on a flipchart, be careful to use the same words as the participants. If you write different words, you can easily encounter resistance, because the participants feel that you have your own agenda or are interpreting their words. If you disagree with what they say, ask good questions or write it up and ask the other participants whether they agree – then you can cross out or elaborate afterwards. If you think a participant is being unclear or long-winded, ask them for help: “How can I write down your point in one sentence?”. You can then write down verbatim what was said, and, as a side effect, it will be clear to all what the point is.
The “during” phase, i.e. your actual facilitation, will only be successful if it works in conjunction with a thorough “before” phase (design and planning) and a properly considered “after” phase (implementation and effect). You will be well on the way to becoming an excellent facilitator if you have already mastered the “before” and “during” phases. But the crucial thing in order for your facilitation to produce the desired effect – in the longer term too – is the “after” phase. This is described in the next chapter.
AFTER Implementation and influencing behaviour
The “after” phase is designed in the “before” phase. Implementation and follow-up should be designed right back in the “before” phase. Here, a set of good checking questions may be a help:
- What happens after today?
- How do we make use of the results of the workshop?
- Who should be involved in the process from here onwards?
- Who should be presented on the day as the person to take this forward?
- What decisions have a go or no go, so the participants do not spend time on something that cannot be changed?
- What should be the format of the documentation? Minutes, film, posters?
Sometimes the purpose is not to reach an actual decision at a workshop, but for the results of the workshop to serve as input to further decisions. This is true, for example, of many idea development processes where the participants provide input to a group or a project leader who proceeds to qualify the ideas. This further work has to be planned, and it should be clear to the participants who have contributed their ideas and what they can expect to happen with their input.
We may be inclined to surrender the responsibility when we get this far as the great expenditure of energy happens “during”, i.e. as you facilitate your process. We believe you should work not just to conserve energy and momentum but also to ensure that the energy level rises after the process, so the process itself is not the high point. This is illustrated in figure 18.
We believe that if your workshop or meeting is to have a real effect and deliver value, your facilitator role has to continue into the “after” phase. In the “during” phase, you helped the group to reach a specific objective. In the “after” phase, you have to help the organisation to realise the effect of the process, so your role is to facilitate the implementation of the solutions kick-started by the process. Of course, not all processes call for implementation plans and major changes of behaviour, so you need to assess and adapt the follow-up work according to what is needed.
As a follow-up to the good workshop or process you have helped the group with, it is therefore especially important to think of what is to happen “after”. If you do not follow up on “the good day”, you will not get the desired effect, and “the day” will remain at best “an event”. In the worst case, failure to follow up will undermine trust in the management and/or the project, which in turn will make it even harder to get the participants to contribute in the next workshop.
We believe that there are two “after” processes that you need to be very firm about in order to take the process to its final conclusion.
- Immediately after
- 1-3 months after
We always recommend incorporating the “after”/follow-up perspective into your design in your “before” phase. This is to target the process at your follow-up activities and to be aware of what should be communicated to the participants immediately afterwards. The participants will often have a role to play in the follow-up activities too, so it is important to communicate this to them on the actual day.
Figure 18: Difference in effect based on effort in the “After” phase
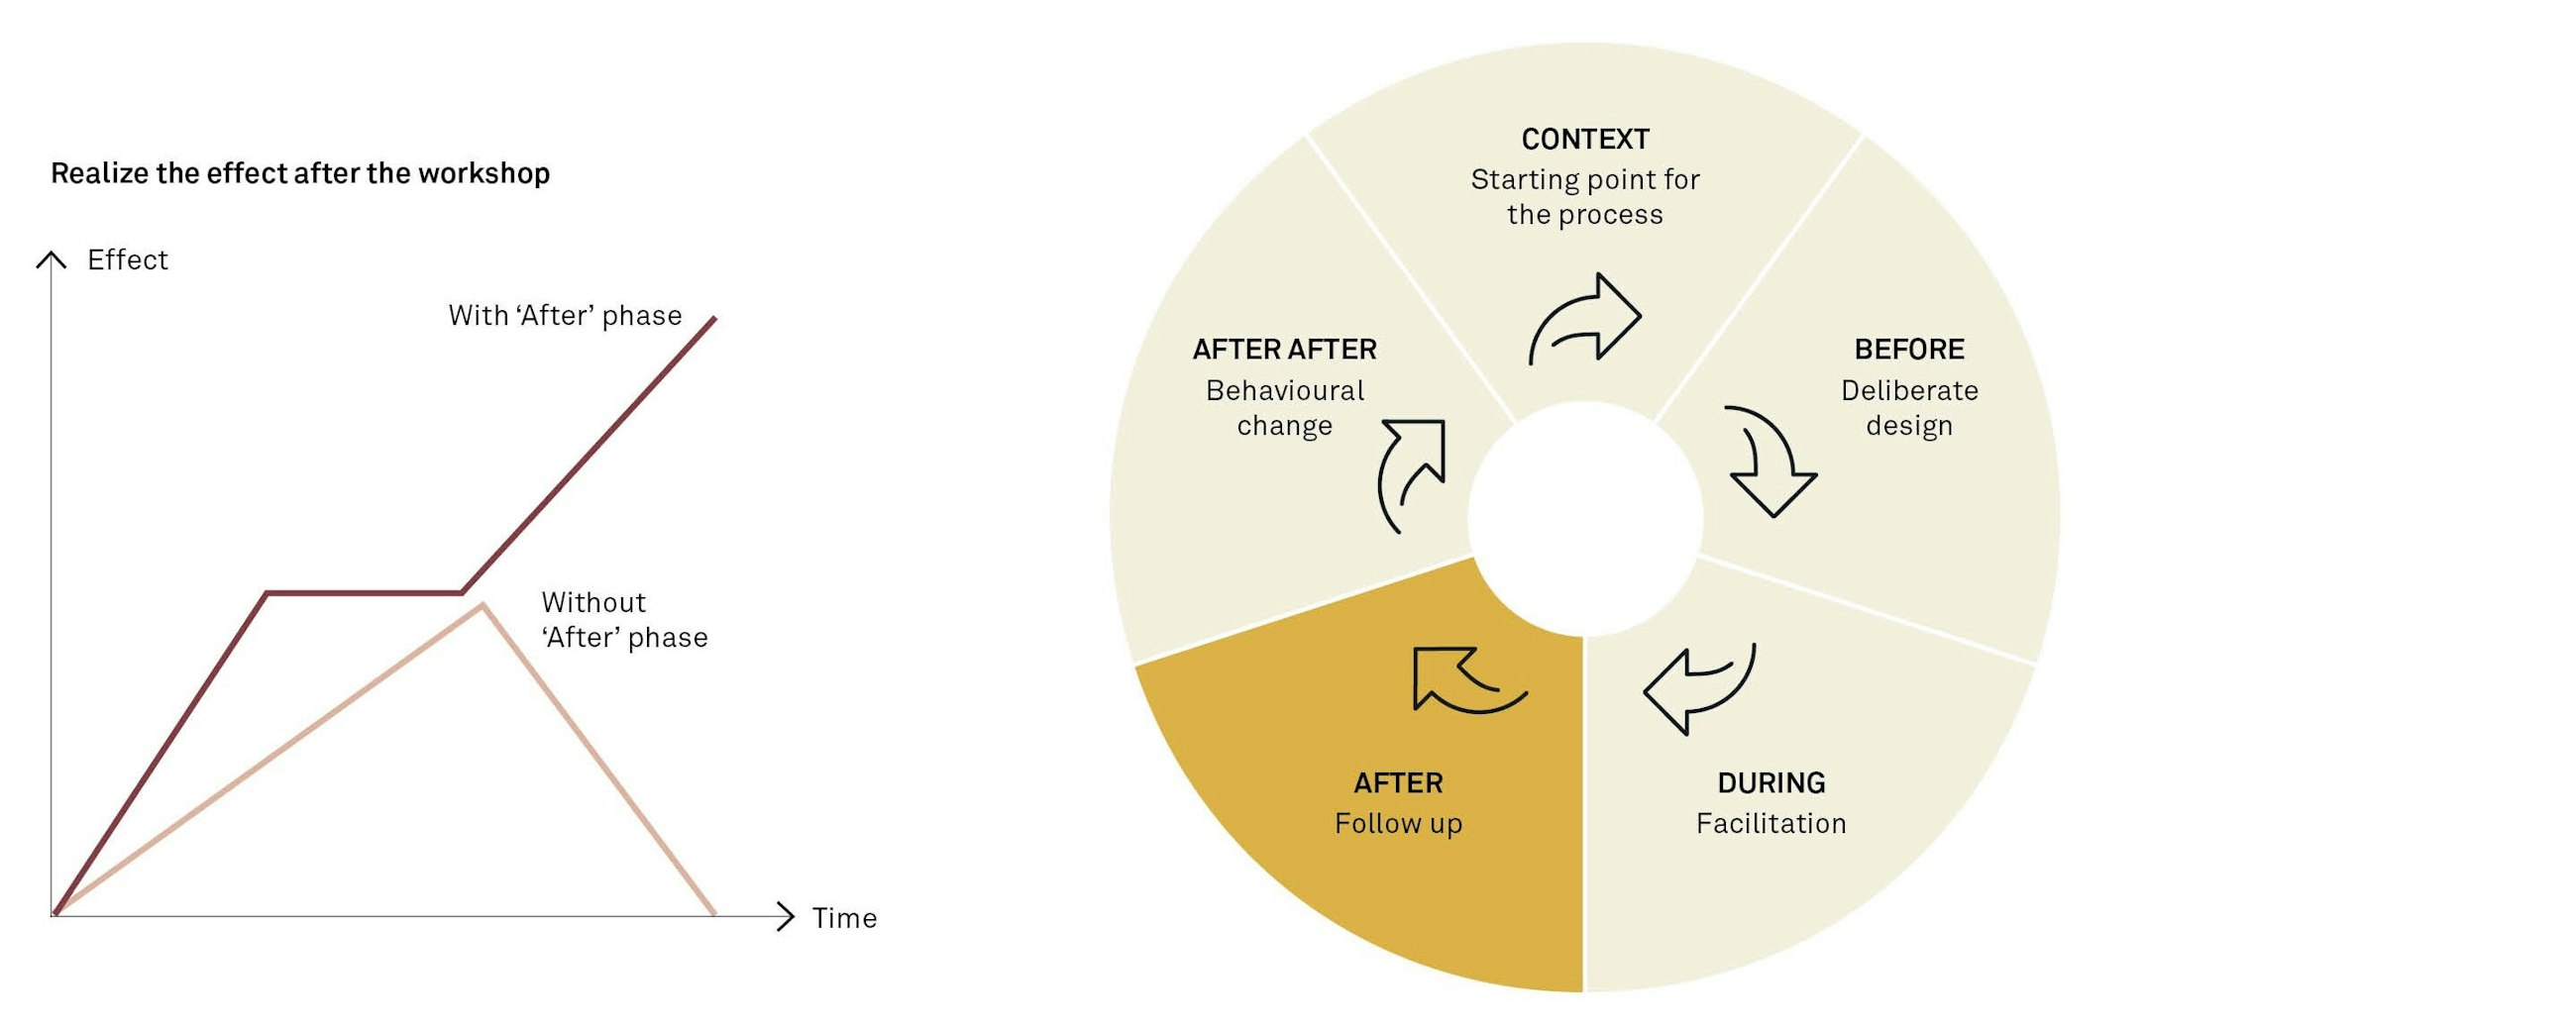
Immediately after the process (1-3 days)
- Documentation of the process via, for example, decision documents, notes, pictures, interviews etc.
- High speed of follow-up – so you preserve the atmosphere and energy you had in the process. Display output, put up pictures and upload video documentation from the process to the intranet.
- Obtain feedback on your process from the participants and any co-facilitators. How did they find it? What worked well? What could have been different? What should be changed for the next time?
1-3 months after the process
The individual process will often be part of a prolonged procedure with activities before and after it. The idea of a series of workshops and meetings taking place over an extended period can be illustrated with the figure that was introduced in the beginning (figure 4). Here, we see a circular process where the “after” phase takes us into a new context-defining phase, which then continues into a “before” phase, etc.:
By planning what is to happen after your workshop, you can communicate clearly to the participants what they can expect from the subsequent process. This will give the participants a feeling of time well spent, and the sense that their contribution has had an effect. These are all important elements if you need to involve them again. Things you need to consider are:
- Formal organisation of the follow-up, continuation and possible implementation of the results. What is the division of roles? Who is to do what and when? Mobilisation of the key players who are to support the implementation, such as managers and employees, often takes place in the “before” phase, and they will often have a role on the day as table facilitators or presenters.
- Visual plan showing the way forward.
- Short and intense implementation rather than a lengthy process with the resources spread thinly, so you maintain momentum and energy.
Rapid actions
A study by the journal “Arbejdsglæde Nu” shows that just 25% of people attending meetings feel that action has been taken on the decisions taken at these meetings.
This is shocking, and it is dreadful when you consider how much time we spend in meetings and workshops. Your participants will definitely have busy lives with lots of tasks and meetings, and the pace will certainly be hot, with one task overlapping with the next. When the participants leave your workshop, they will probably have moved on to another task in their minds or be on their way to another meeting. The fact that employees and managers live hectic lives and almost always have limited time is something you therefore need to consider as a basic condition when you design the follow-up to the process.
Ensure that the quality of the documentation is satisfying
One element that can enable people to act is that you have provided for good documentation of the process. This is a particular challenge in processes where we have the participants working on a topic in small groups, so that, as facilitators, we cannot listen everywhere at once.
All too often, the documentation of group tasks and breakout sessions, for example, is in the nature of succinct key words and notes that do not make sense, unless you took part in the discussion yourself. The purpose of involving the participants is then lost, as the material that is meant to provide a basis for the rest of the project or work is quite simply too scanty. So, it is your responsibility as facilitator to assure the quality of the documentation, so it can be used afterwards.
What you can do
Design templates (posters, sheets, A3 pages) for the participants to make notes in. This will enable you to control the questions that the participants are answering as you can put a question at the top and specify that they should write full sentences, indicate how much to write and ask them to put their initials on the paper so you can refer to them afterwards if you need to clarify their points.
Nominate table facilitators/table leads who should be invited to a preliminary meeting at which they are equipped for the role and told how the documentation should be set out to deliver the right quality.
Ensure that the suggested solutions are prioritised (quickly)
If your process ends up with a number of suggestions, ideas or input which you need to take a view on quickly, it may be a good idea to prepare how this is to be done and by whom. A manager or project leader who signs off input throughout the day and finishes the day by communicating which suggestions are to be taken forward will have a powerful effect in terms of action and implementation. If this is not possible, be sure to have these things resolved as soon as possible after the process. “As soon as possible” means the next day, or no more than three days later. This is especially important if you have participants who are to do more work on the input from the process and so depend on decisions and priorities in order to move forward. You need to keep the (hopefully) good energy from the workshop alive in them by reacting quickly. The most important thing to bear in mind here is that a lack of feedback, priorities or communication from you, the manager or the project leader is also a signal that can cause the project to stagnate.
Communication is not change. Behaviours don’t travel by powerpoint. The life cycle of many meeting ideas ends in the car park (and flipcharts are the greatest graveyards).
(Leandro Herrero at the Change Management Forum in Stockholm, May 2014)
Influence new behaviour
Change with impact is what we are after in all the projects and processes we are involved in with our clients. We take this phrase seriously in relation to facilitating processes too. Producing change with impact does not happen by itself. There are many ways of doing this, and we recognise that in projects that are concerned with training and learning new skills there are plenty of other methods, including technology and apps, online learning and work on habits as the key to influencing behaviour.
As the facilitator of the process, you should always agree with the organisation on how long your responsibility for implementation is to continue. If it ends with you sending out the plan for the way forward, we recommend that you insist on being involved in deciding how the organisation can proceed with the implementation for your process to deliver real value. There is no doubt that many processes do not achieve the intended effect, precisely because this important “after” phase is overlooked or handed over to the local departments and managers in the organisation who may not have had any sense of ownership of the process and may now feel like hostages forced to implement a solution they do not feel equipped for.
When the documentation is in place and the follow-up has been communicated to the participants, there is thus still work to do to influence, maintain or bring about new behaviour or new ways of acting, which your process has helped to kick-start. Particularly in processes which are part of a programme, a project or a change process, you need to help the organisation to realise the effect of the programme. If you generally facilitate ordinary meetings, some of them will also call for the participants to do something different or new afterwards, even if it is not the really big transformation.
What you can do
Implementation plans are good for providing an overview and common direction for a change, and we believe that they are necessary to a successful implementation of new behaviour. However, we should be aware of the inadequacy and rigidity of plans when we have to deal with people and their behaviour. Here, we cannot always count on a dead straight process where everything goes as planned; rather, we have to adapt the process as we go along and look for alternative ways if we want to make genuine changes. Your plans should therefore contain more than just the traditional deliverables where the change is communicated via managers, ambassadors or the like.
Consider making use of the informal organisation as the key to implementing changes rather than the formal one.
The idea is therefore:
- To make much greater use of the people in the organisation that others trust and who can influence other people. This group is not always large, but far more effective. You could also call them the informal opinion formers or influencers, and they can be found in almost all departments. The point is that small changes among few employees will quickly spread to many.
- To produce stories in collaboration with the informal opinion formers. The stories of change will produce themselves anyway if we as a project group or as managers, for example, do not step in, and it is not always the positive stories that arise of their own accord. On the contrary, they often contain misunderstandings of the communication the project has disseminated, with speculations and sometimes unnecessary concerns.
- To use distributed (shared) management to handle communication and training of new behaviour in preference to classroom training and large-scale meetings. It could also take the form of “elevator talk” about the project, “homework exercises” where people interview others in the organisation or gather knowledge or statements about the project etc.
When you look ahead to a new “before” phase, a number of elements that you need to address will automatically announce themselves:
- Feedback and learning on the “before-during-after” cycle. You can ask for feedback from the participants and your partners. This may be done more or less formally. Either at the end of the meeting or via an email requesting feedback, or via an evaluation meeting where you facilitate a dialogue about learning and improvements.
- Communication and reporting on status and results: How do we communicate the follow-up from the last workshop and the actions that were initiated?
- Production of a new design star for the next workshop.
Good preparation is essential – the rest you just have to plunge into
This article has provided a number of suggestions on how to prepare and handle in practice different types of group processes and meetings carried out in organisations today. Everybody who has conducted group processes knows that it is an art in itself to get a group to become the best version of themselves. However, when it is successful, it is a fantastic experience. Both for the group and the results delivered as well as for the person helping the group in this process. Facilitation is a craft that must be learnt, and it takes more than one shot. Becoming a skilled facilitator calls for training and patience. Facilitation is not something you can learn from a textbook. The best advice is to simply plunge into it, gain experience with what works and does not work and get feedback on your role, style and methods.
Footnotes
Footnote 1: A group process is defined as a meeting between a group of people with a work-related purpose. The process result or end deliverable may be determined in advance, for example: ”We are to generate at least five ideas for implementation of a new salary model”. The specific content of the deliverable, i.e. the five ideas, will be created during the process and in the interaction between the members of the group.
Footnote 2: Facilitation can with great advantage be thought into a number of everyday meetings, for example, the weekly departmental meeting, sales meetings at customers, information meetings, job interviews, workshops (300-500 people), project team meetings, steering committee meetings, conferences and other events. For information about other meeting types that can be facilitated (see appendix).
Footnote 3: For further information about the role of trainer or adviser, please refer to the articles ”Projektlederen som forandringskonsulent” by Henrik Horn Andersen and ”Effektfuld træning” by Cecilie van Loon.
Footnote 4: A large number of tools and methods exist for identifying and understanding the participants’ and the organisation’s ways of thinking and acting, for example, Whole Brain, DISC, FIRO-B®, MBTI®, Dunn & Dunn, Insight or Belbin.
Footnote 5: For further elaboration on the involvement techniques (see appendix).
Footnote 6: Experiments with stand-up meetings show, however, that the meetings will be shorter, but that the quality of the decisions made will not be better when standing instead of sitting (Ravn, 2011).
Footnote 7: Find out more from samtalekunst.dk or lenekobbernagel.dk. We would especially recommend her article “Activate your non-verbal language” – an article on the conscious use of body language and space to master interaction at meetings and workshops and on training days (Implement Consulting Group, 2014).
Footnote 8: Frank Barrett, PhD is Associate Professor of Management and Organization Behavior at the Naval Postgraduate Academy.