Tool
– Using the design star and the playbook.

Published
17 November 2020
In this blog post, we will share our approach and tools for designing and planning virtual sessions, including a practical introduction to how to do it as well as actual templates in Word and Miro (for online collaboration).
If you want to know more about the various elements of the design star, the approach in general or how to facilitate virtual sessions with engagement and impact, you may find our book Virtual facilitation useful.
Designing and planning are key to creating successful virtual sessions. If you start a session without being prepared, chances are high that your meeting will have no real impact. Even if it has an impact, it may not be the impact that you wanted to create when scheduling the meeting.
Therefore, when facilitating a virtual session, always keep in mind that the process should be meaningful to the participants and make sure that they spend their time right.
When designing and planning our sessions, we always use a structured approach with a playbook template and the design star.
Designing your virtual session
When designing virtual sessions, we break them up into three parts: before, during and after. We do this to ensure maximum effect of the time spent with the participants during the actual meeting, workshop or training session.
Thorough planning before the session dramatically increases your chances of “hitting the target” during the workshop. In the planning phase, you should also start to consider what happens after the session, keeping in mind the issue, decision or process that you are working with. As a facilitator, you should plan how to keep the participants and other relevant stakeholders in the loop to ensure engagement and impact not only during the session but also afterwards.
What are the steps when designing a virtual session?
You may find inspiration in these four steps when designing your virtual session. We will elaborate on the steps in the text below.
- Start by using the design star to create and align the overall design of your session.
- Establish a high-level agenda for your session.
- To create a specific plan for your session, use the “playbook template” (you will find the template in the section “Create a specific plan using the playbook”). This is basically a template for how to define the elements of what should happen before, during and after a session as well as a detailed overview of what it should look like.
- Design your materials, platforms etc.
Using the design star to design your virtual session
When designing a new virtual session, we always start with the design star. The design star is a star-shaped tool where you start at the centre by defining your purpose. Then you cover all the elements by going back and forth between each corner and the centre of the star to ensure a clear fit between the purpose and the elements.
Tip: You can also collaborate on the design star in Miro. This requires you to download the image of the design star below and upload it in a Miro board, before you invite your team into the board.
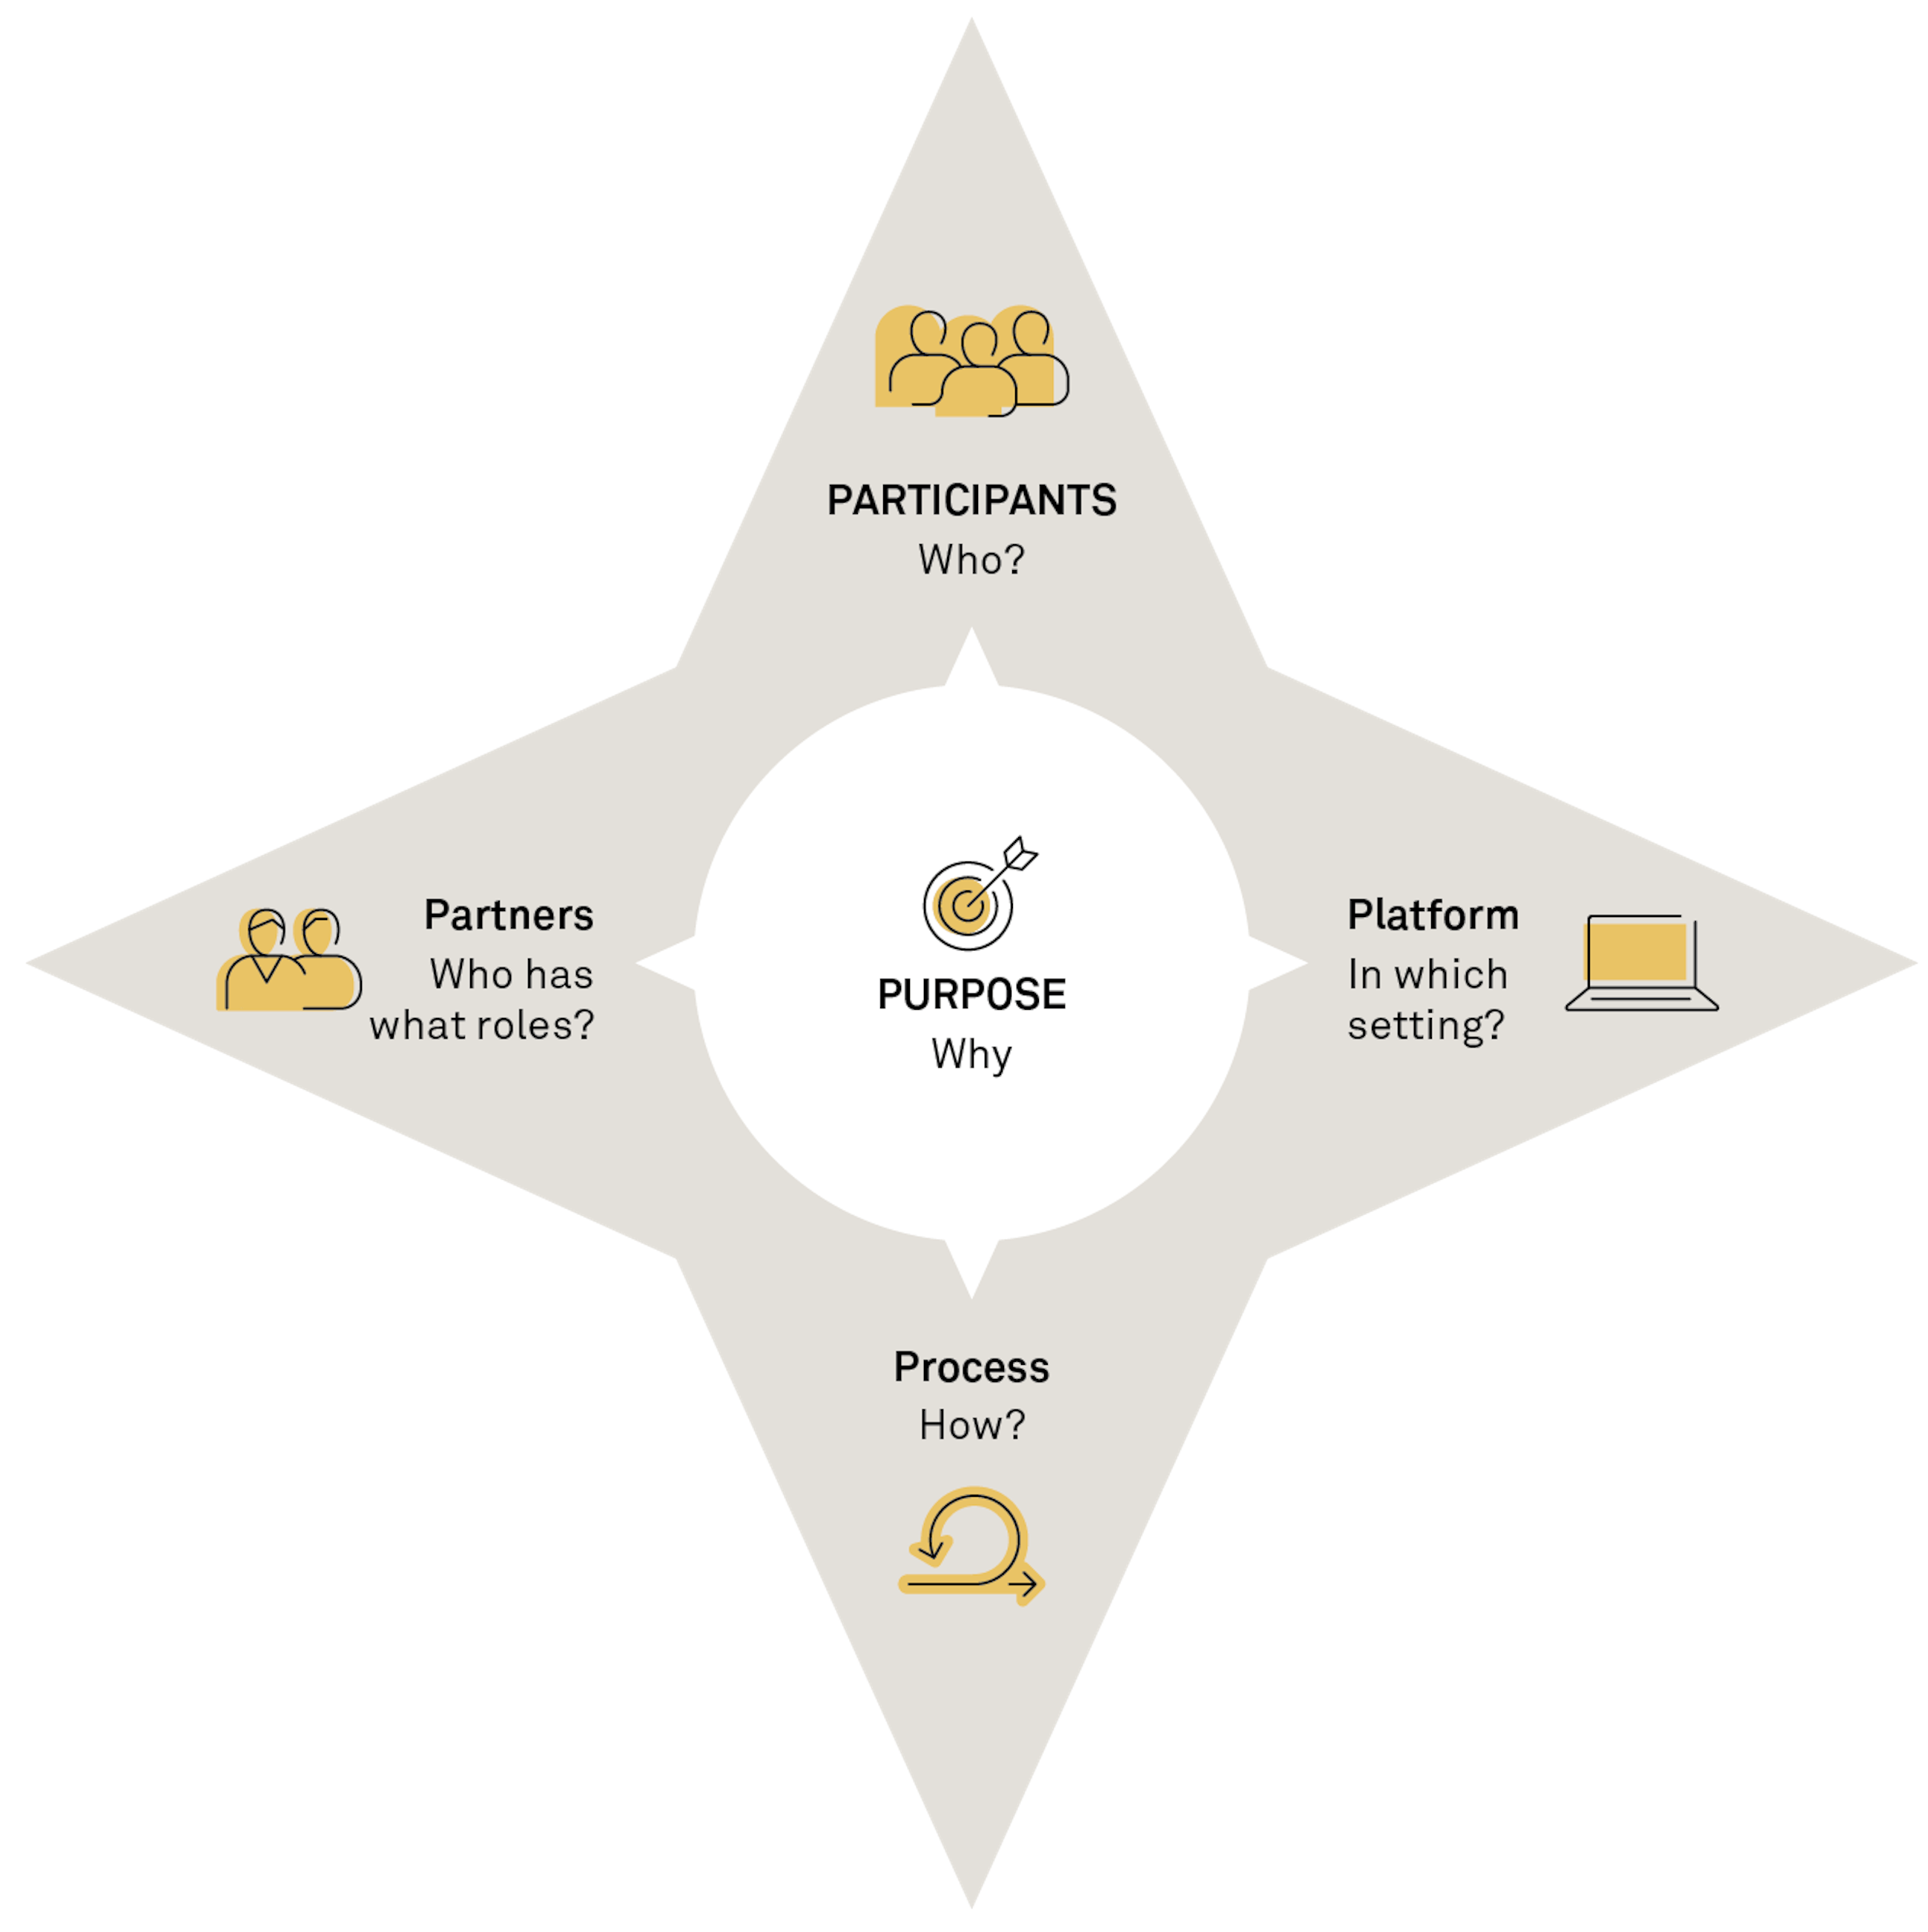
- Purpose: Ask questions such as: What is the purpose of the session? When can we consider it a success? Are there any additional purposes to consider?
- Participants: Consider the list of participants who should join or be invited to your session. Who are they? Are they the right people? What is their background and level of seniority? Are they the right people to ensure impact? Make sure that you know a little about them prior to the session.
- Platform: Consider what technical and mental platforms you need to support your meeting. What technical platform(s) should you use to achieve your purpose? Keep your participants in mind here. What should the mental platform look like? How do you prime the mindsets of the participants on the purpose or content prior to the session?
- Process: Consider which process is best suited to achieve your purpose. How should the flow be? What degree of involvement do you prefer? How do you ensure the right energy and engagement throughout the session?
- Partners: Consider who will play which role during the session. Are you the facilitator, expert and technical assistant all in one, or do other people play some of these roles? How do you handle transitions?
You have created a strong design when all corners of the star support the purpose of your session: The purpose of the session is clear. The participants are the right people to succeed with the purpose. The platform is selected based on the participants, purpose and process. The roles are in place, and the process supports the purpose.
Top tip: We often find that it takes some time to circle in on the purpose. This is also where you may succeed or fail in terms of designing a good session. If you are not specific enough on your purpose, it is difficult to know whether you hit the target – or even tell people why you are all in the session. You may have experienced being part of a session where the purpose was too “big” for the session, so you ended up rushing through each point of the agenda, leaving you with a lot of half-baked ideas rather than real impact.
Create a specific plan using the playbook
To make a specific plan for your session, you should now start creating a playbook to describe in more detail the elements of what happens before, during and after the session.
In the process part of the design star, you had some initial thoughts on what should happen during the session. Based on this, you should now create a high-level agenda for the session and add it to the playbook. You might need to break down the agenda into smaller elements to make sure that you have all the details in place.
Now you have an overall agenda in place, and you can start adding it to the part of your playbook that relates to “during the session”. Add timing and a further description of what you want the agenda to look like, who does what and what platforms or materials to use. This is also where you describe in more detail the specific process to go through during the session: Who is talking? How do you want it to be done – breakout rooms, chat, key notes etc.? When planning the specific process of your session, remember to involve your participants using micro-interactions such as chat, polls, energisers, reflections and breakout rooms.
Top tip: If you are looking for inspiration for process methods, you can find it right here.
When creating a specific plan for your virtual session, you must also add “before” activities to your playbook such as planning meetings, invitations with preparation tasks for the participants, preparation of materials etc. Finally, you add “after” activities such as follow-up emails, feedback and how to keep people informed and in the loop after the session. It is important that you plan these activities early in the process to ensure a coherent design for the session in the wider context of the project or organisation. If it is about implementing a new strategy, it could be to explain what will happen now, how the input will be used, where the participants can read more etc.
Now you have a playbook describing what happens before, during and after the session. Based on this playbook, you are now ready to design the specific materials, slides and platforms to use for the session.
Top tip: If more people are involved in planning the session, the design star and the playbook are great tools for aligning on the design and plan. You can use the templates for the actual planning meetings and bounce them back and forth to settle on the design and plan together.
Top tip: If you are working with recurring virtual sessions, you can spend some time designing and planning the next session and at the same time reuse the approach and most of the playbook and materials. Simply twist minor elements such as processes for openers, closers or process methods.
How much time should I spend preparing?
You could spend either a short or a long time on designing your session – it all depends on the session. In practice, the design process can last anything from 30 minutes to several days. In our experience, the process usually takes longer if the theme or type of session is new to us, if we are experimenting with new elements or if a large group of stakeholders with strong opinions is participating in the session. The design process is usually rather short if the session is something we have done before, is recurring and just needs a small twist to create energy and engagement or you are only one person involved.
The key here is that it takes time to make a strong design. You will often find yourself spending more time preparing than you might have expected.
We wish you good luck with designing your virtual sessions. If you have any questions or comments, please reach out or read the book for further inspiration.
If you want to know more about how to design and execute a virtual session, you may be interested in reading our book Virtual facilitation.

Want to know more?0 3
0
3If you have any questions, please reach out.