Article
A guide to increasing uptime through faster changeovers in your production department

Published
23 November 2020
This article is intended as a guide for everyone looking to minimise the time their production equipment is offline when changing to a new product or material. The guide is divided into six steps and leads you through an efficient way of SMED changeover optimisation. The article also features various tips and hints for involvement, as well as a process designed to ensure a sustainable impact and to boost ownership among both employees and management in the organisation.
* SMED = Single Minute Exchange of Dies – a classic Lean tool used in connection with changeover optimisation on production equipment.
Why even work with changeover optimisation?
Basically, there are two good reasons:
- You want to increase flexibility and thus to obtain a broader mix of products on the individual production equipment within a given period of time.
- You need to increase capacity and therefore wish to minimise costly production equipment downtime in order to increase actual production.
Our own experience indicates that implementing an SMED can reduce the shutdown time for a changeover by more than 40%
We have the fundamental belief that as a production company, you should be skilled at manufacturing – but a world champion in changeovers. Our attitude is drawn from the Lean philosophy and the idealistic goal of one-piece flow. As a result, we strongly advocate that you reduce the changeover time to make room for more changeovers (and thus greater flexibility). This means smaller buffers and shorter lead time for the individual components.
Irrespective of whether you are looking to increase the capacity or flexibility of your production department, SMED is a simple method that can help ensure that changeover optimisation does not result in your production department getting bogged down in expensive changeovers or having to sacrifice flexibility. When we are involved in facilitating a SMED optimisation in different sectors and among different groups of employees, we often witness the following effects of a smoothly executed SMED process:
- Reduced changeover times and greater flexibility in production planning.
- Increased product quality through an improved flow and more standardised work processes.
- A significant reduction in the need for stocks of work in progress.
- Increased focus on improvements and maintenance among employees and managers.
In this article, we will be providing a simple and straightforward presentation of our approach to facilitating a SMED process. The article is intended for anyone who is looking to draw inspiration from the way we work and is keen to optimise changeovers at their production company.
The six steps of the guide:
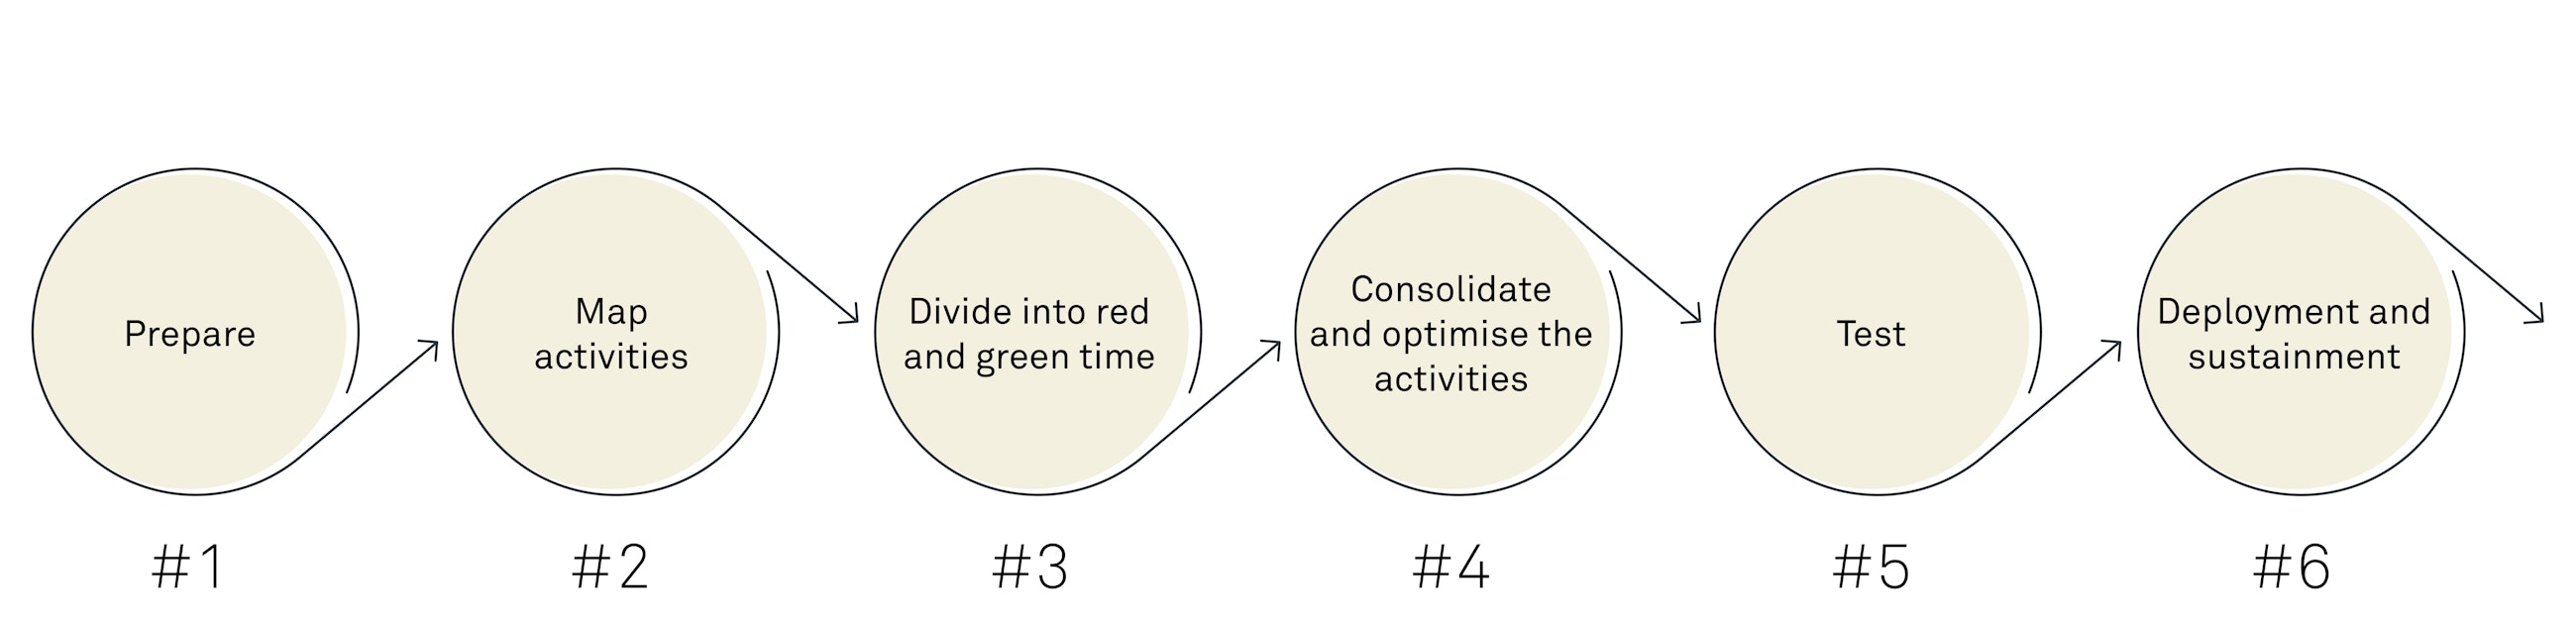
Step 1. Prepare
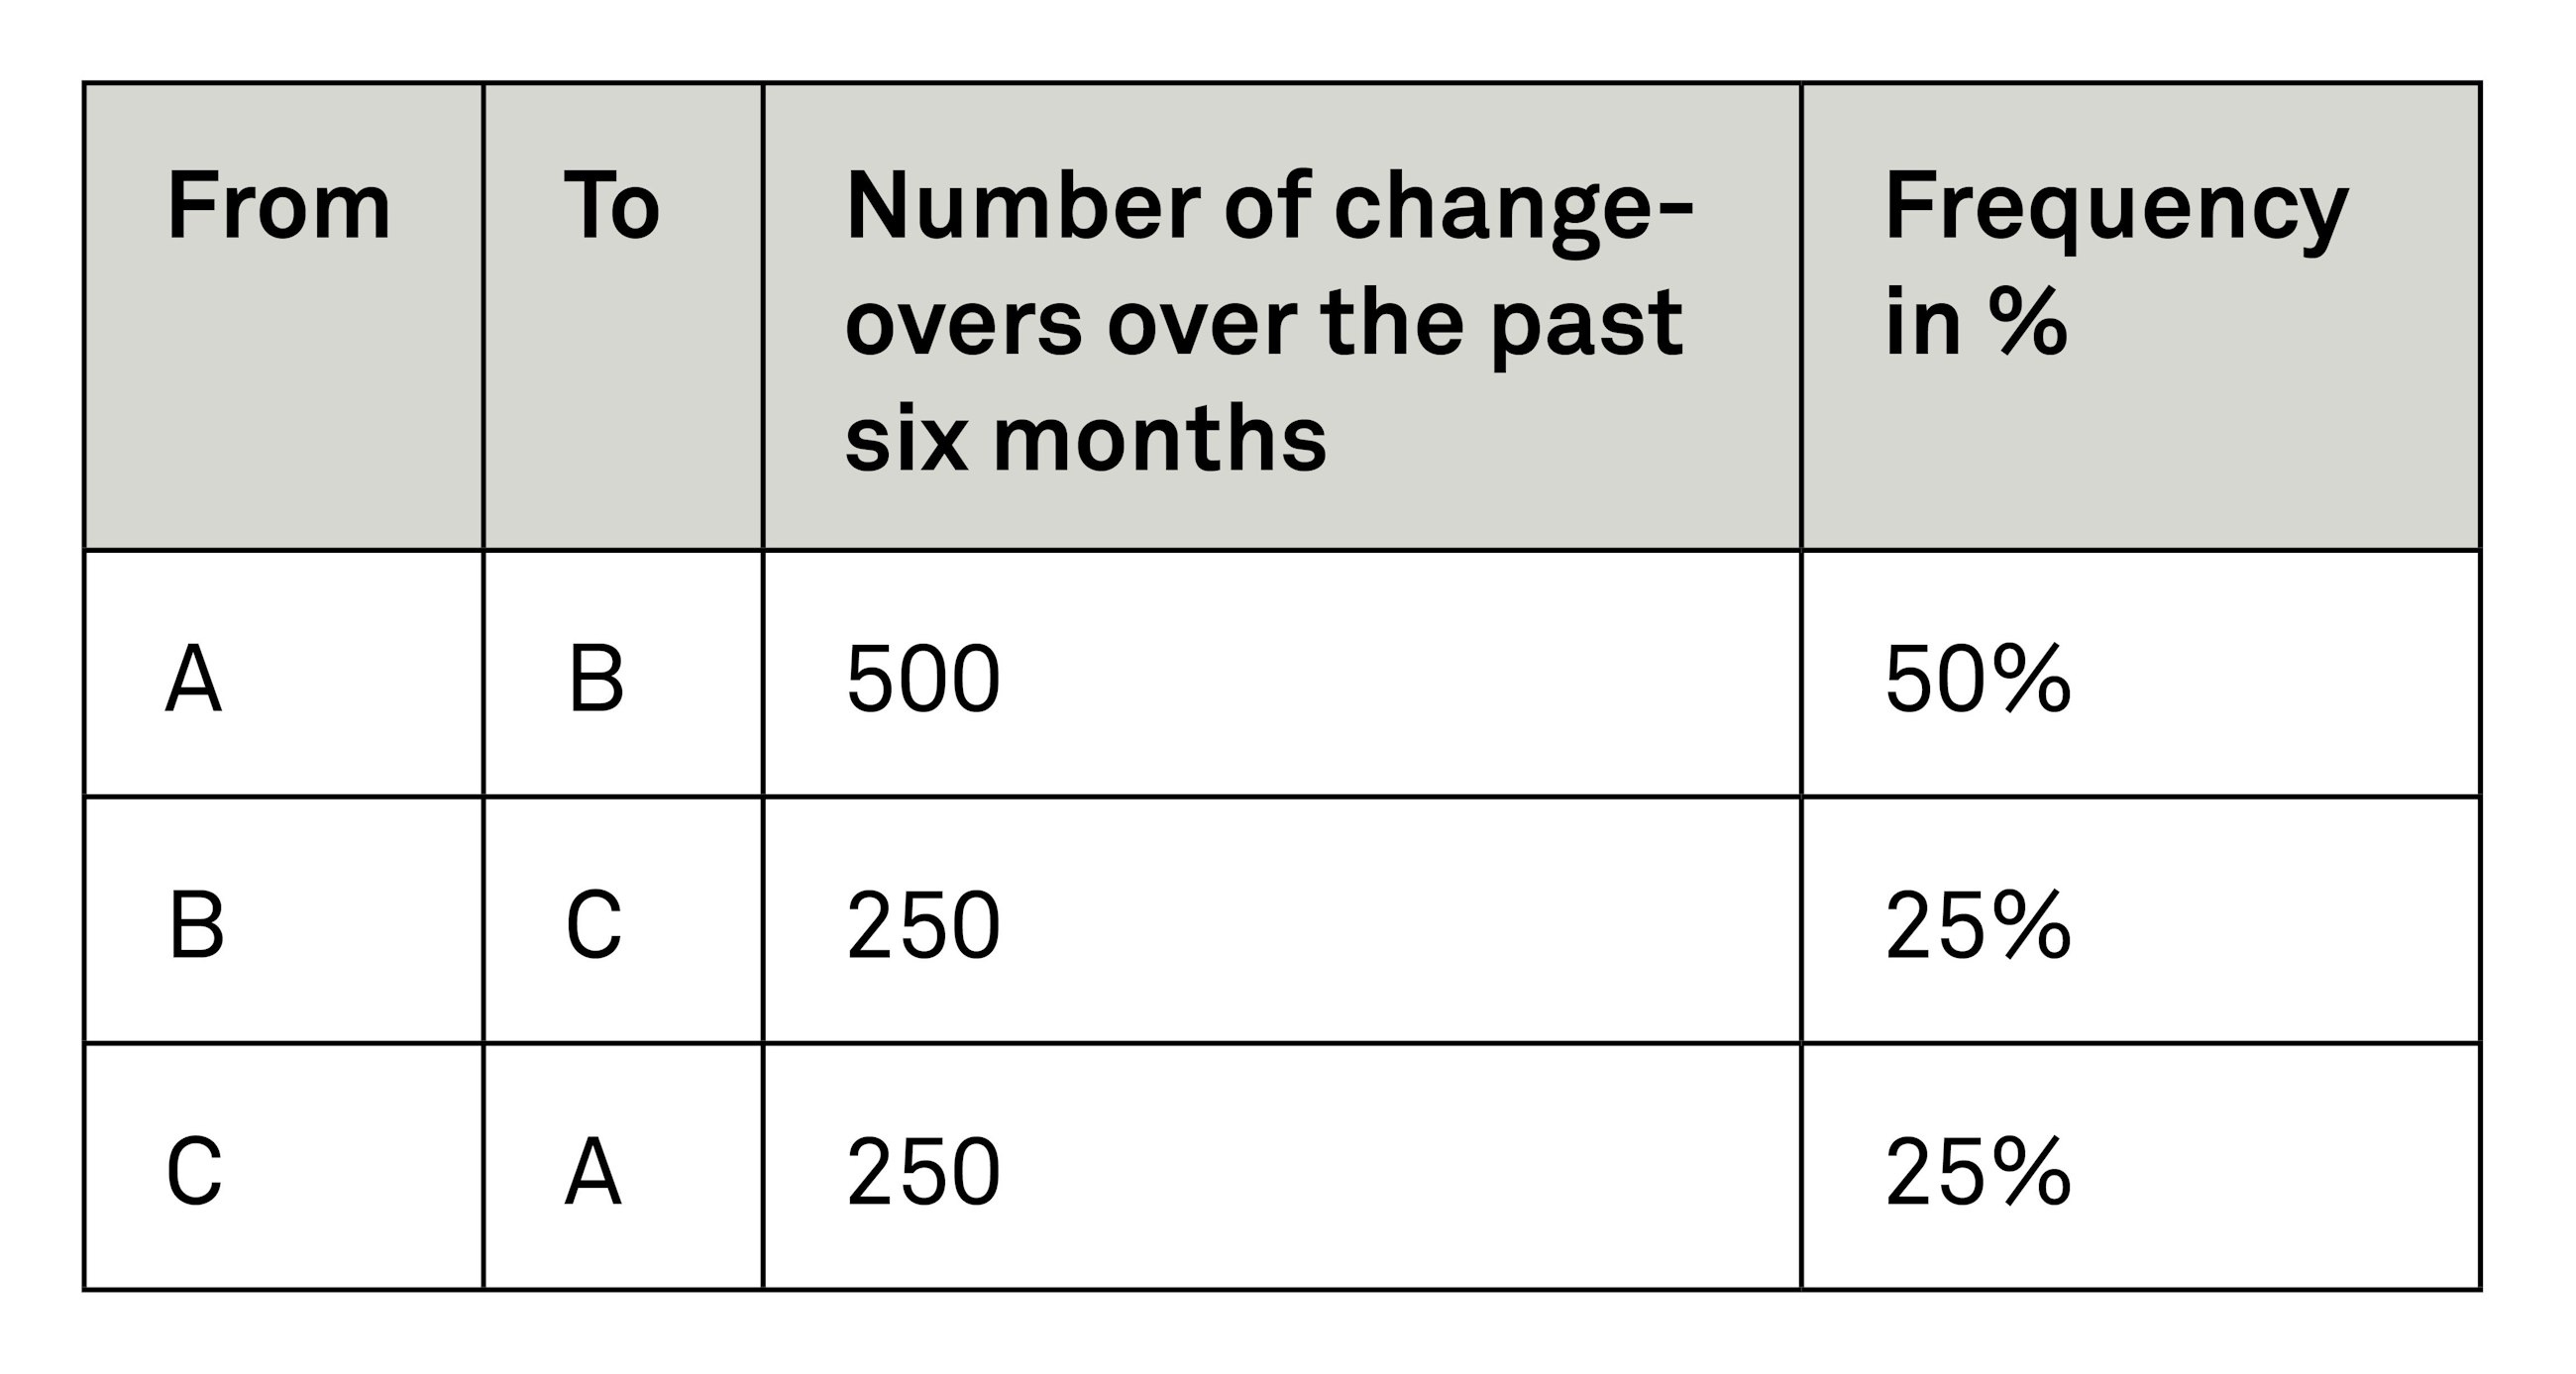
The initial work is primarily focused on you identifying and selecting the changeover you wish to improve. The selection criteria will naturally vary depending on the situation, but in order to make a good start, we recommend that you begin by mapping the changeovers that are carried out on the machinery in question and how often they occur. A good way to do this is to analyse the history of the changeovers performed during the past six months (as shown in the table) in the production area selected.
For the first SMED exercise, you can choose a changeover that:
- Occurs frequently and has the potential to become more efficient.
- Is a limiting factor and constitutes a bottleneck.
- Varies in length, depending on which employee performs it.
Take care not to make the selection more difficult than necessary for yourself. If you are new to this approach, it is better to focus on becoming comfortable with the procedure than to spend a lot of time on analysis. So if there is a specific changeover that you (as an employee or a manager) feel strongly has the potential to be optimised – start with that one.
Tip – show consideration when filming
Some people find it uncomfortable to be filmed by others. So there are three things you need to be aware of to make it a pleasant experience for everyone.
- Be discreet – do not show the film to anyone other than the SMED group, and delete all the files when they are no longer needed.
- Let colleagues film one another to avoid an uneven distribution of power.
- Inform the employees clearly and thoroughly about how the film is to be used and for what.
The next step is to film the selected changeover from start to finish, so that you can use the film in the subsequent analysis work. We have good experience with having a group of employees from the selected area film the changeover themselves. It is often beneficial to select a small group that is familiar with the work processes and is willing to participate in the analysis and implementation work. For the best results, work with the same group of employees throughout the entire process. The participants may prove extremely helpful later when additional staff require training.
It is also a good idea to have the SMED group made up of employees working on different shifts or in different teams. While this is a little harder to plan, including employees from different teams typically produces synergies that prove to be a great benefit when new work procedures are to be implemented. For example, it can be useful to have a member of the evening shift film a colleague from the day shift and vice versa.
When filming the changeover, it is important that the employees “do what they usually do”, and that they do not prepare anything special or change anything in advance of the filming. This ensures that you obtain a realistic presentation of how long a changeover takes at present.
Start filming from the beginning of the preparations and continue until after the machine has produced the first good unit and everything has been cleared away and readied for normal production once more. If the entire changeover takes more than 20 minutes, you may need to make sure you have a camera with a long-life battery and a large memory card. We have good experience of using an action camera (available from most electronics stores) rather than trying to record the changeover on a smartphone. You need to be aware of whether multiple workstations are involved in the changeover at the same time. If so, you will need to use several camera operators to record all the details of the process.
The film should be of sufficiently good quality that you can see what is happening throughout the changeover. This means that in most cases it is not enough simply to mount a camera on a static stand. Ideally, film close to what is happening. This requires the camera operator to move around together with the person actually performing the work.

The first step produces the following results:
- A selected changeover with the potential for improvement.
- A dedicated SMED group consisting of employees who perform changeover (including the one selected) on a daily basis.
- One or more videos of the selected changeover.
Step 2. Map activities
It is now time to map the activities in the changeover process on the basis of the video(s) which the employees recorded.
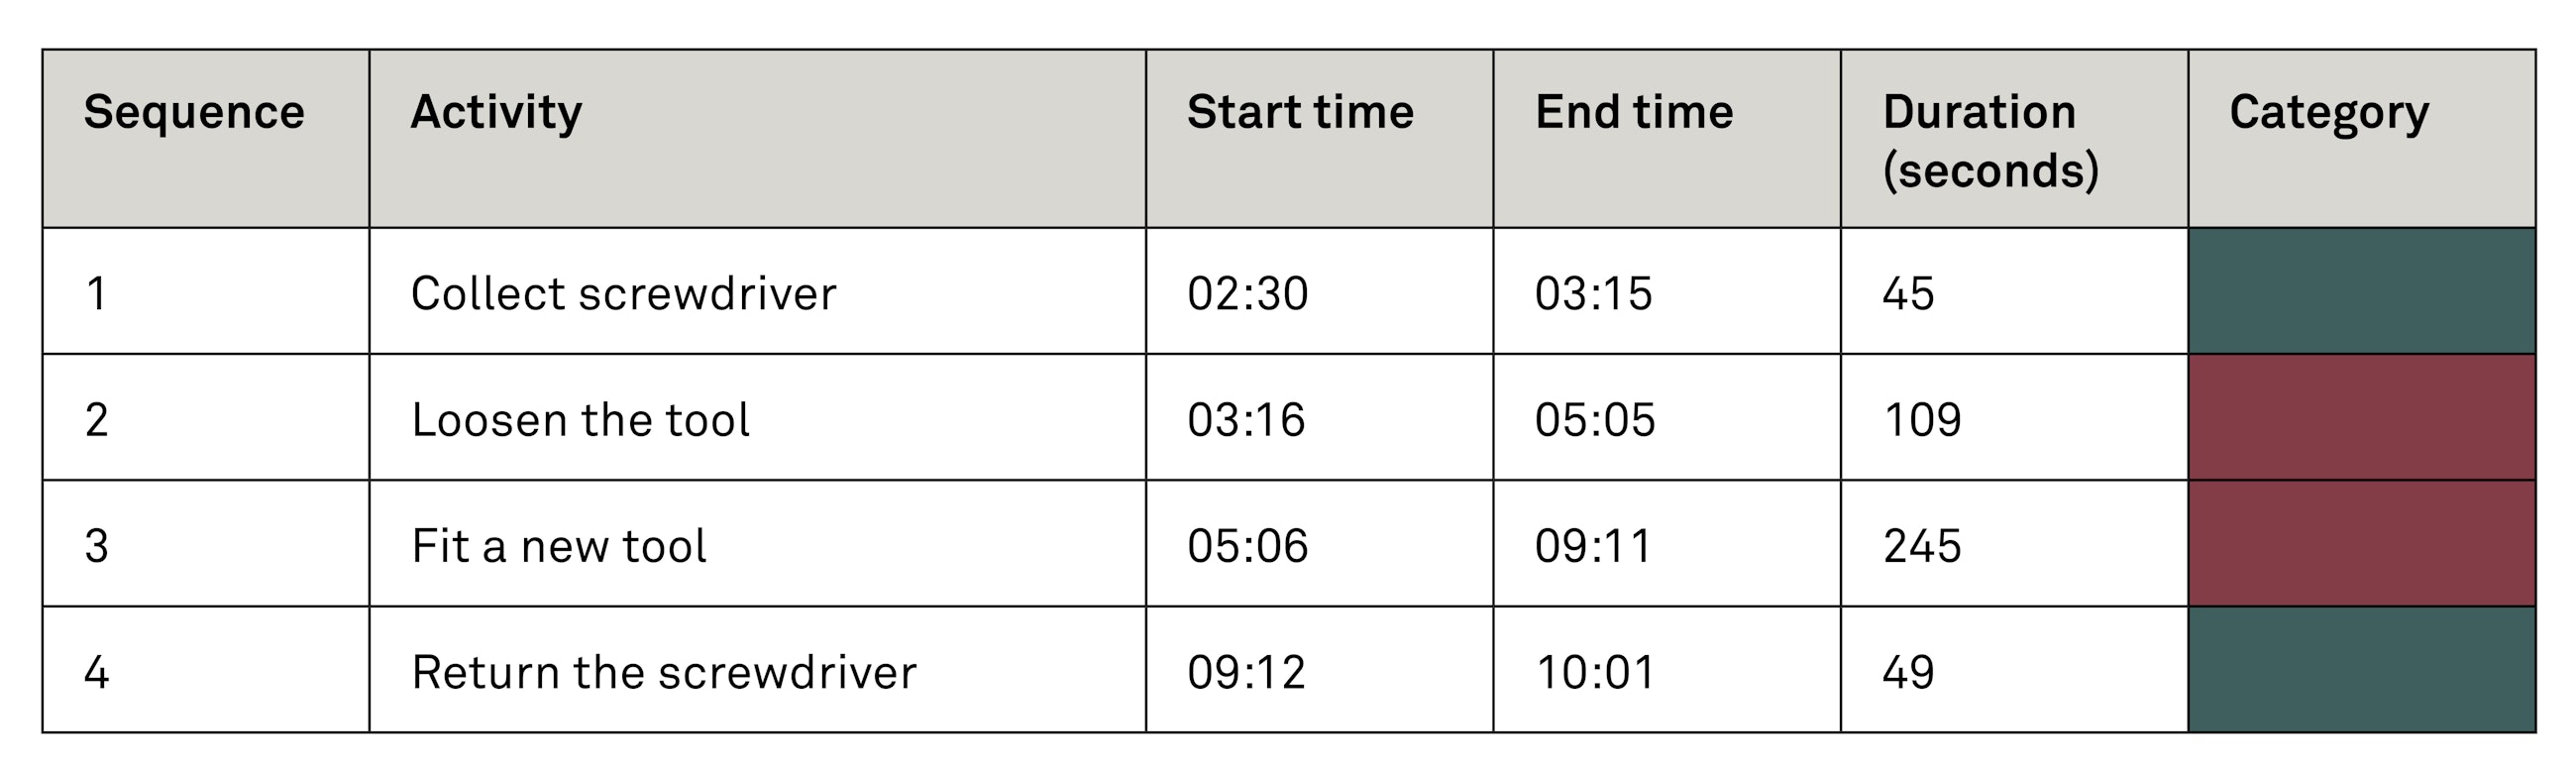
Together with the SMED group, sit down and watch the video(s) from start to finish. As you watch, make a note of every activity in sequence together with the time stamp and duration (see table). Each activity is defined by when there is a shift in the sequence. A shift can be the point where one activity finishes and a new one starts. For example, if you shift from replacing a tool on the machine to collecting a new tool, this is synonymous with a line change or a new activity, which you need to note down.
It is important that you are accurate in your observations in the mapping process, and that you clearly record all activities in detail – even those that only take 10 or 20 seconds. If necessary, pause the video often and rewind and fast-forward to make sure the mapping process covers the entire procedure. The table presents an example of how each activity is listed in sequence with the duration noted down.
Tip – generate energy in the work
The mapping process can be long and demanding. Especially if the employees from the SMED group are not used to “desk work”. So make sure to include short breaks at regular intervals and be sure to provide plenty of sweets/snacks to keep the blood sugar up.
We often notice that the employees in the SMED group experience a number of “Whoa!” moments as they progress with the detailed mapping and start spotting improvement potential simply by watching a video of themselves working. Don’t forget to jot down all the good ideas and keep them to use later.
The second step produces the following results:
- A detailed description of all the activities in the changeover process along with their duration.
- A series of improvement ideas written down and ready to be used in the improvement work.
Step 3. Divide into red and green time and calculate the potential
The SMED group now evaluates the activities from the mapping process one by one in their current sequence and then colours them red or green. The evaluation is based on whether or not the activity actually requires stopping the machine. The red activities are the ones that require stopping the machine, while the green ones are the ones that could potentially be carried out while the production equipment is still running. Ask yourself the question once, twice or more, and perhaps be a little over-critical of yourselves in this stage of the procedure.
In the table below, the activity “Collect screwdriver” is categorised as green, because it is considered to be an activity that can be performed without having to stop the machine. In contrast, the activity “Loosen the tool” is categorised as red, because it is considered to be an activity that can only be done once the machine has been stopped. However, this does not mean that you cannot optimise the time it takes to carry out the red activities. In this case, you could, for example, optimise the activity by using an electric screwdriver instead of a manual one.
Once you have timed and assessed all activities, you can count the total amount of red and green time and use this to determine the potential for a changeover evaluation. This involves evaluating the potential on the basis of a calculated gain by consolidating all the green activities before and after the machine has been stopped, and then performing all other aspects of the changeover while the machine is still operating.
If, for example, your changeover process features 20 red minutes and 15 green minutes, the potential will initially centre on the 15 green minutes, which constitute the amount of time by which you can reduce the stopped time. You can then multiply these 15 minutes by the number of changeovers per day (which you know from your preliminary analysis in step 1) to calculate the total potential in time. You can then convert this potential into products. If, as shown in this example, you perform three such changeovers per day, you therefore stand to gain 45 minutes of uptime on this machine per day. Now multiply this by the rate of manufacture of the units produced. If you produce five units per minute, multiplied by 45 minutes more per day, this translates into a capacity gain of 225 more units per day (45 x 5 = 225).
Tip – invite the management
We have good experience of inviting managers and/or other employees to visit the room where the SMED group is working for a short presentation at the end of the day. This generates positive energy and provides an opportunity to ask questions – and it typically takes no more than 15 minutes.
This is often the calculation that convinces the production management to approve the investment in employees’ time that is required to complete an analysis and the improvement work. The potential calculation can also help to demonstrate whether the input is justifiable in the first place. Clearly, if the changeover you are looking at turns out to contain only a tiny share of green minutes, it may make little sense to continue the work, given the investment in time and effort it demands.
Step 3 produces the following results:
- A completed SMED diagram featuring green and red activities.
- A potential calculation that demonstrates the optimisation potential inherent in continuing the work.
- A decision as to whether to continue the improvement work.
Step 4. Consolidate and optimise the activities
Having completed the initial phase and the potential calculation, it is time to make a start on the serious improvement work. Start by consolidating the red and green activities, such that you lay out all the green activities in order, like pearls on a string, and position them before and after the machinery has been stopped. Then improve the red activities to minimise the downtime.
Bring out all the good ideas that have arisen during the analysis work and add any new ideas. One good way to do this is to “park” all the good ideas that arise during the process on a whiteboard or a sheet of paper displayed in a visible location. It may also be the case that several of the group members have used the “free day” that often appears between steps 3 and 4 to come up with some more good ideas. There is much to be gained by allowing some time for the group members to go back to the “parked” improvement ideas and add the new ones. In many cases, you will notice that the improvement ideas pair up with some of the other Lean tools we work with in the context of production. For example, it may be a matter of moving tools closer to the machine, throwing out some objects that often get in the way etc. (Classic optimisation initiatives that are often a part of 5S).
Once all the ideas have been discussed and written down, it is time to sort and prioritise them. To achieve consensus and generate a rapid effect, it may be relevant to state that it must be possible to implement the improvements without having to make major changes to how the existing production unit is set up (i.e. without having to invest in a completely new machine etc.). So start by optimising simple things that do not require major investments of time and/or money to execute.
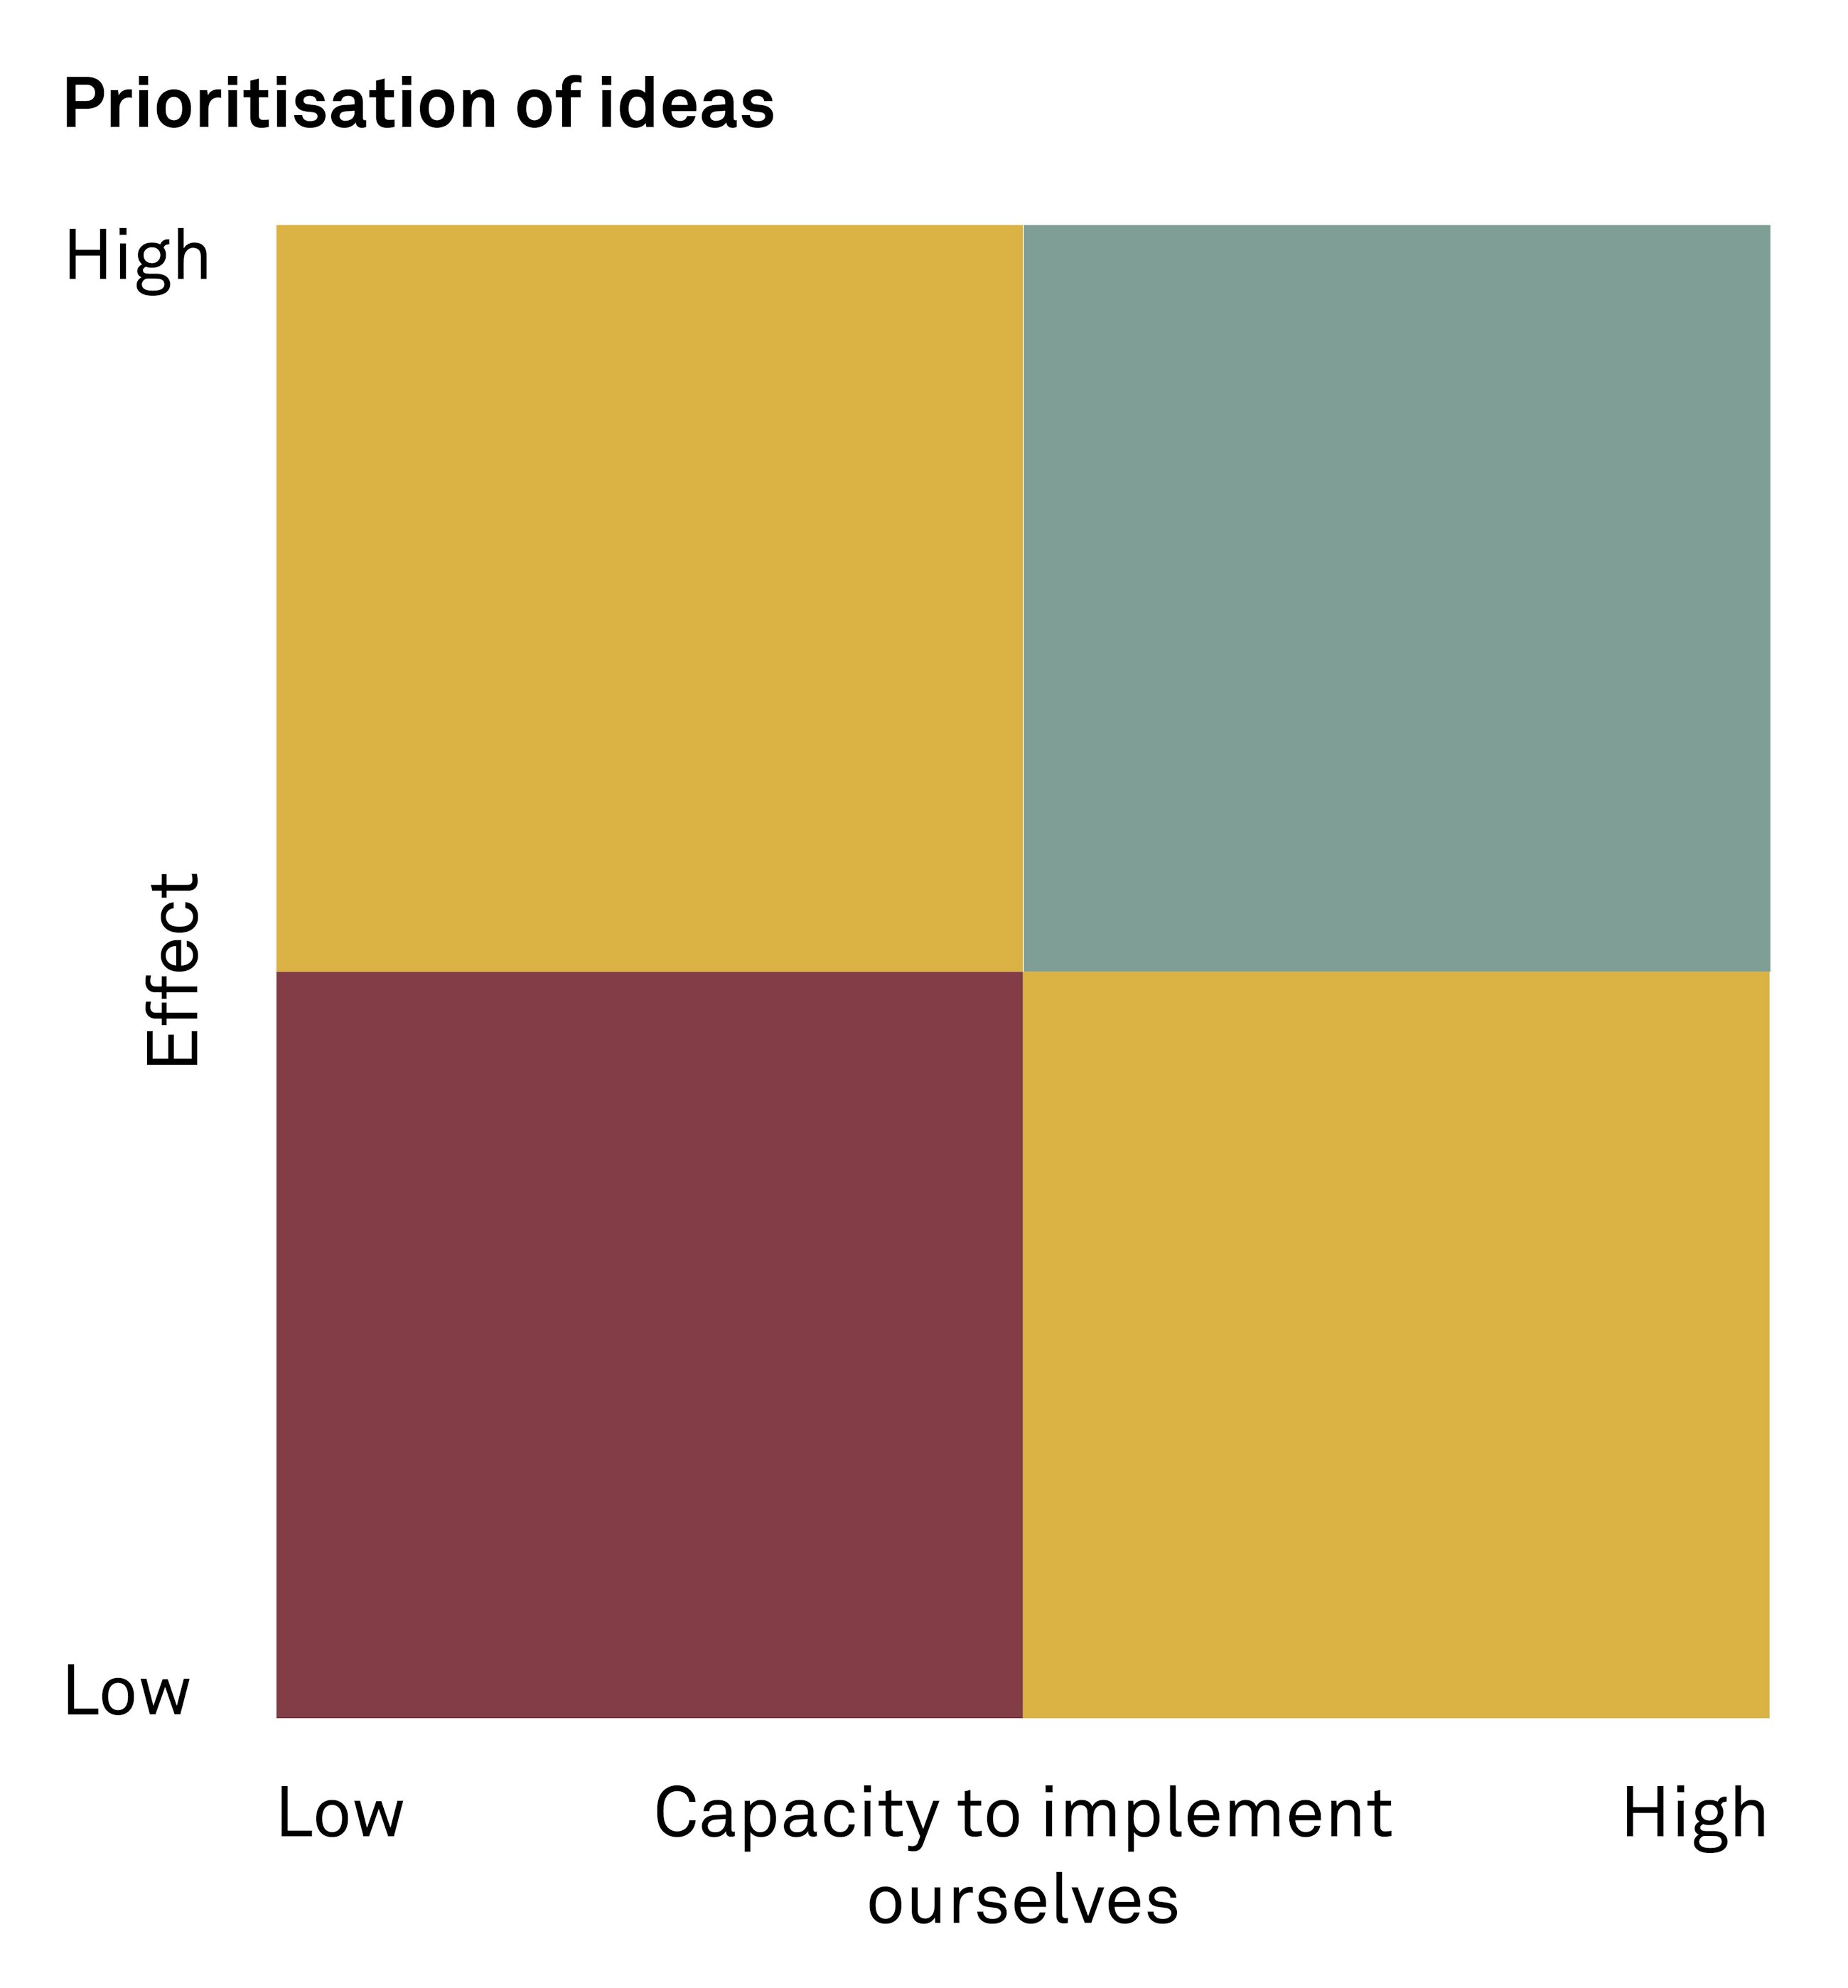
The priority matrix is a useful tool when you are prioritising your improvement ideas. To use it, divide the ideas into four categories on the basis of two parameters. One of the parameters is the ability to implement the improvement yourself, while the other is the effect of the improvement initiative. This means that improvements that are easy to implement, and which you assess as having a major effect on the machine uptime, will be placed in the green category and accorded high priority. It is a good idea to do an exercise with the SMED group where you work together to evaluate suggestions and divide them into the four categories.
You can then start work immediately on several of the ideas that you placed in the green category. Prepare an action log to establish an overview of who is responsible for which improvements, and when he/she expects to have implemented the improvement. Take care not to launch too many initiatives at the same time.
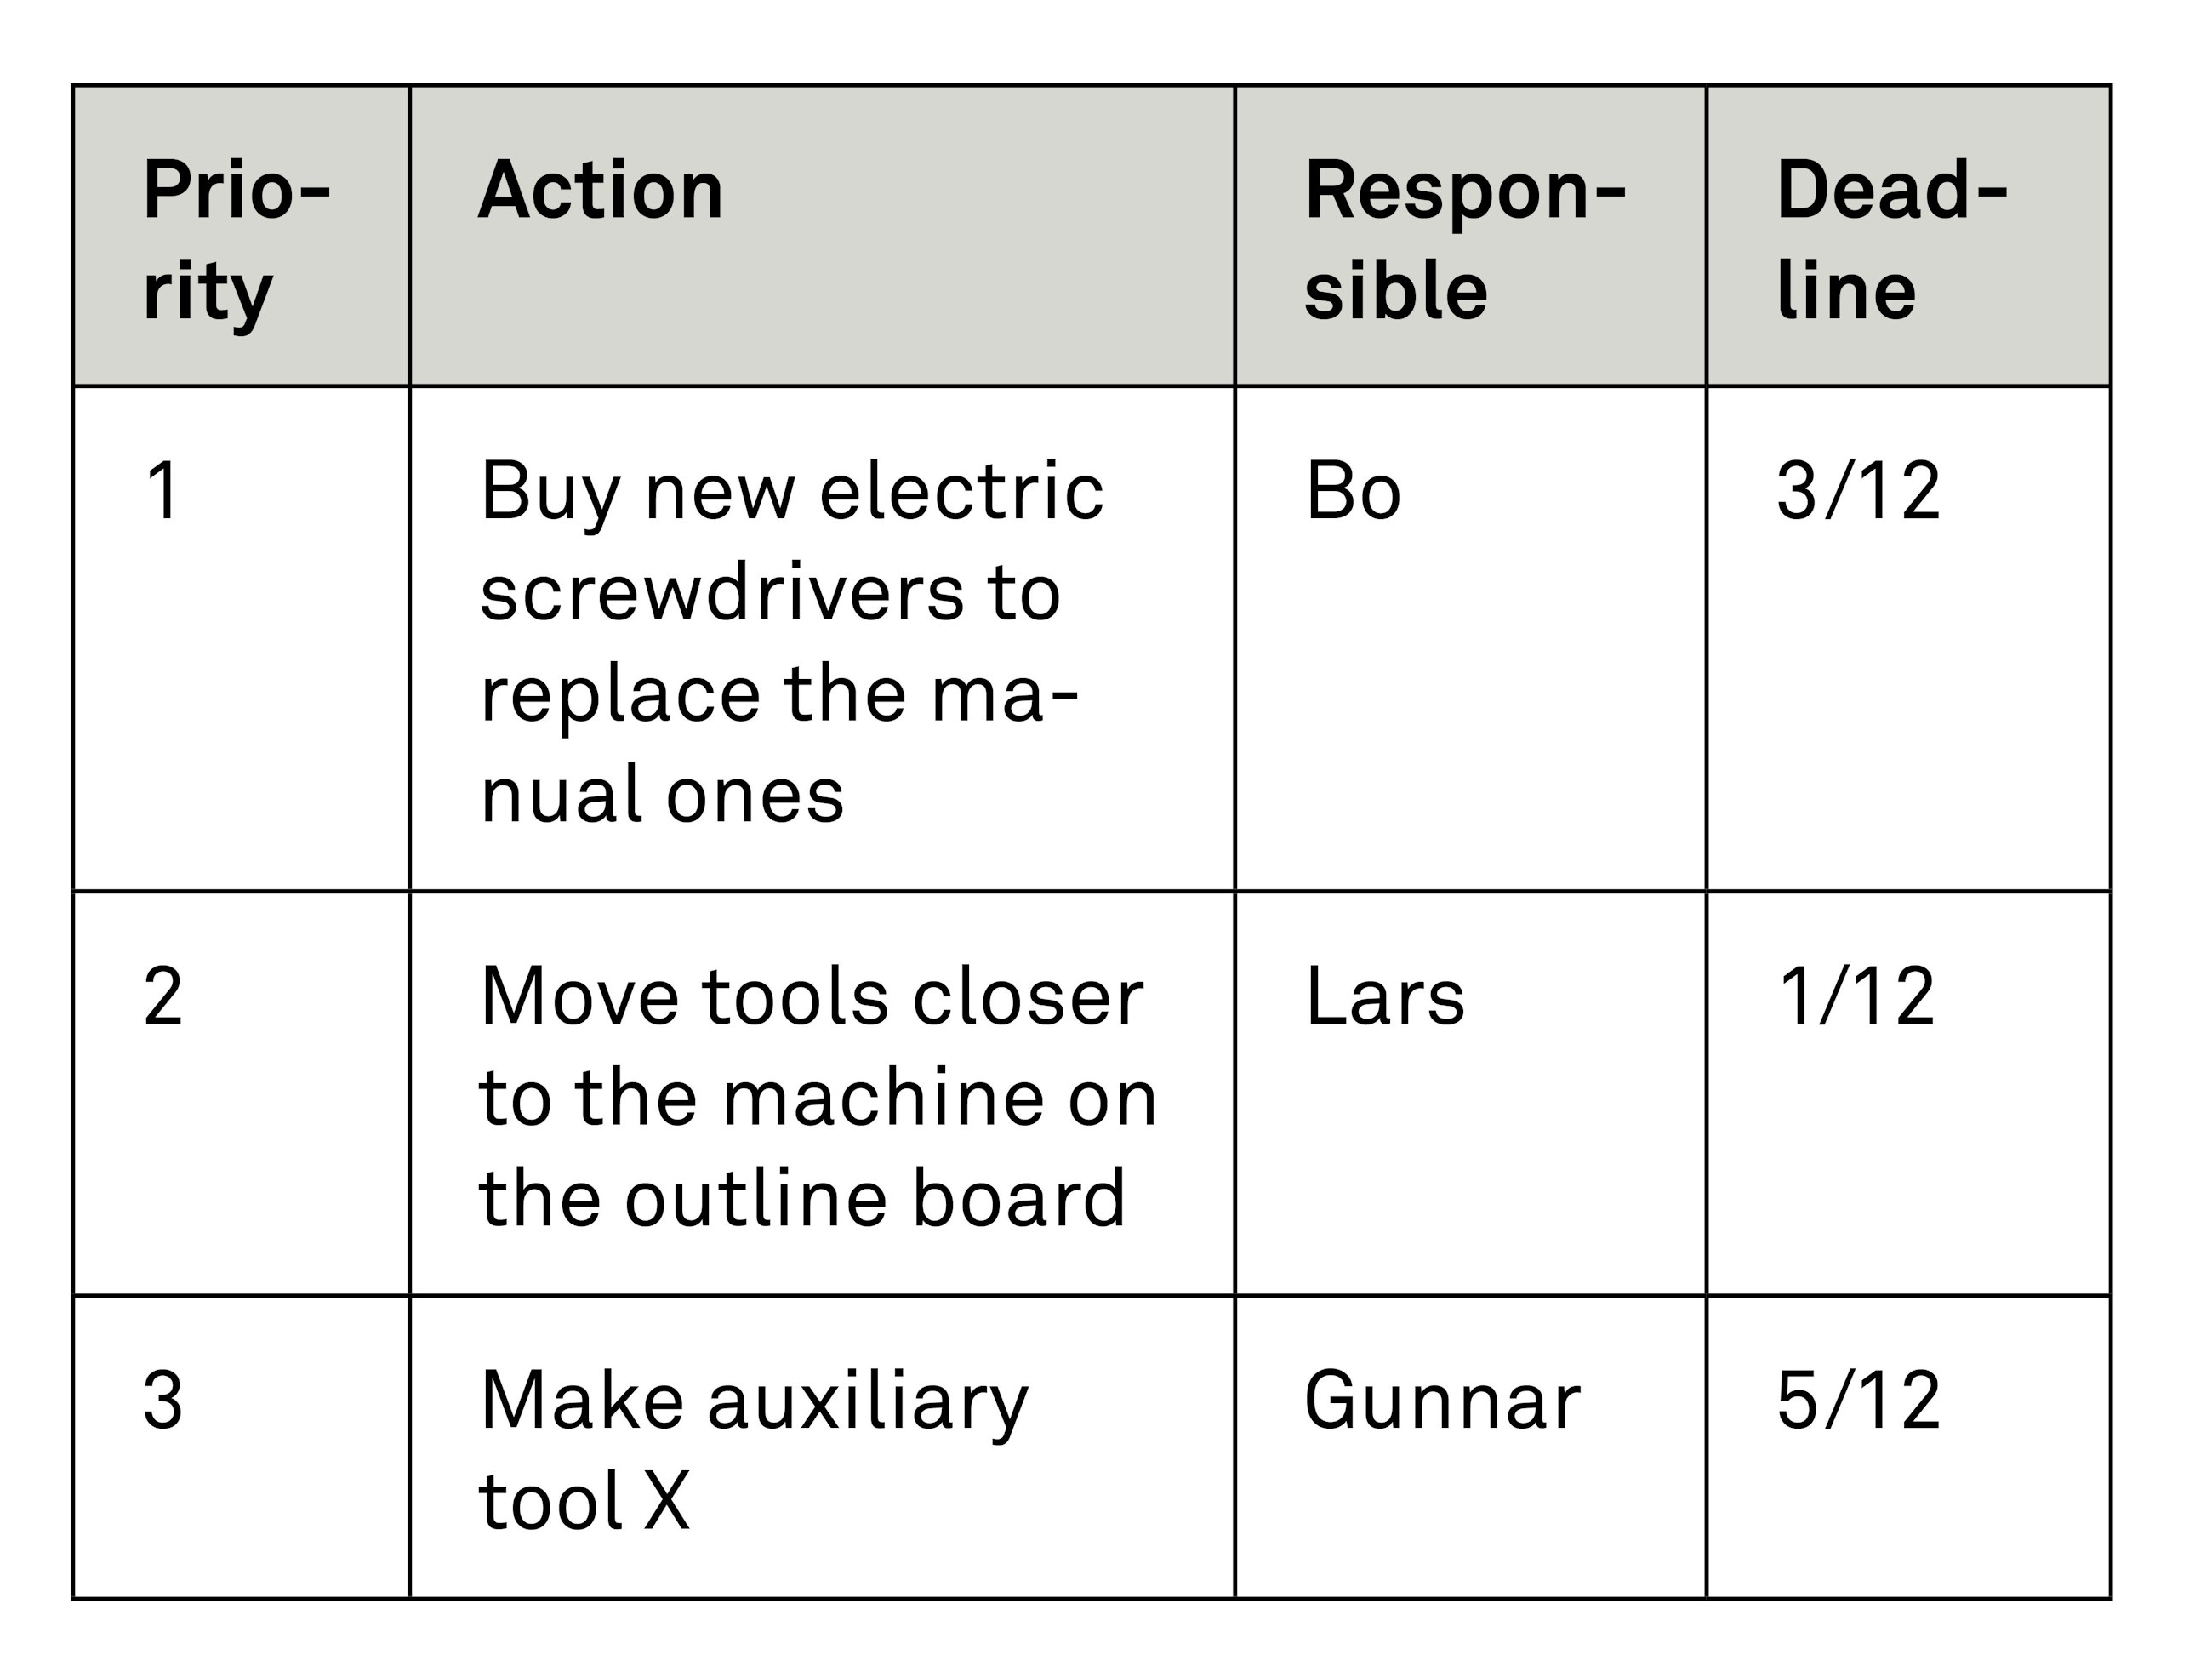
When starting the initiatives, there is much to be gained by finding out who in the group has the time and energy to work with a given idea. It should ideally be someone who is willing to do it voluntarily, as this guards against the expectation that the person who put forward the idea is also the person responsible for carrying it out. You could perhaps integrate the list into an existing programme of ongoing improvements and have the manager(s) in that area follow up and acknowledge the employees for completing them.
Please note that it can be time-consuming if you have to buy new tools or consumables, for example. You should therefore typically allow a suitable period of time after step 4 to make sure that the employees have/are given time to perform the agreed activities, and for any minor purchases you make to arrive.
This step produces the following results:
- A prioritised list of improvement activities that are simple to carry out and do not entail major expenditure.
- A series of tangible improvements carried out.
Step 5. Test and implement
Once you have completed the chosen initiatives, the next step is to document the changeover process in a standard, which will become the new “recipe” for how to perform a changeover. The standard must make clear which activities are to be carried out before, during and after the machine shutdown. It is a good idea to have an employee from the group write the standard in consultation with you or someone from the production department who has responsibility for standards. Remember to prepare a standard for each of the workstations that play an important role during the changeover so employees at specific stations know the sequence in which to carry out the work.
Once the standard has been prepared, you need to find a suitable time to test it. If appropriate, talk to the planning department to see if it is possible to rearrange the production schedule to include a few changeovers that you can practise at a time that suits the group. All the agreed improvements from step 4 must have been implemented before the test, and all employees who are working during the changeover must have been fully familiarised with the new standard.
Once all the preparations have been made, it is time to start practising. The test must naturally be carried out on the machines themselves, where the whole team must be ready and follow the changeover process as agreed with each activity timed. It may take a little time and need a few adjustments before it is finalised. It is therefore important to pay extra attention the first few times you carry out the new changeover process and to stop for evaluation after each. The reason for this is that you have to update and communicate the standard while you increase your knowledge about the process. To minimise possible confusion, it may be relevant to test the changeover a few times with the SMED group employees before communicating the standard to everyone else.
Once the new work method has been tested and adapted a suitable number of times, you need to make the standard visible in the area and train the rest of the employees in the new work process(es). Remember that it can take a while and that regular sparring is necessary if there are any employees who were not involved in the SMED process. There can be different ways to tackle this. In many cases, we choose to run a shared introduction for all employees in the area, with time for questions, and then let the SMED group take care of “buddy training” on the different shifts. Here, it is a major advantage to spread the members of the SMED group between the different shifts to give them the opportunity to answer questions and be present close to the actual implementation. If your company does not work with shifts, that will naturally make this part of the work easier.
When facilitating the testing and implementation, it is useful to experiment to establish which preconditions are required to maintain an efficient changeover. These could be things such as planned maintenance or a good 5S standard in the area around the machines. It is also useful to consider which data points serve as reliable indicators of the changeover efficiency in the area in question. This will help you establish one or more KPIs for the changeover efficiency in the final phase of the work.
This step produces the following results:
- A new changeover procedure has been tested and documented in a standard that is then adapted on an ongoing basis.
- All employees in the area have been trained in the new standard.
- Consideration has been given to the conditions necessary to maintain efficient changeovers.
Step 6. Deployment and sustainment
At this point, you have already put a lot of work into the analysis and implementation of new standards, and the management must now focus on establishing fixed procedures and follow-up to prevent all the good new habits from being gradually lost and forgotten. For this purpose, we use two specific management tools, namely performance measurements and process confirmation. However, it is important to remember that they are not enough in and of themselves, as an involved and interested management is an equally important factor. Deployment and sustainment is largely about presence, inquisitiveness and ongoing evaluation – better known as “Gemba management”.
A SMED process that has required intensive work with analysis and implementation can often help boost motivation among employees. The task of the management is now to retain this investment and consensus about the work and to guard against the risk of people slipping back into bad habits. When we receive feedback from employees who have participated in SMED processes with us, they often express a desire for visibility and involvement from both the senior and immediate levels of management. For this reason, we recommend that managers get involved to a relevant extent in all areas of the process and step up visibly in this final phase to demonstrate general inquisitiveness and to be in Gemba/present regarding the changeovers in the period immediately after the new standard has been put into place. The easiest approach is if the manager has been present in all stages of the process, keeping track of which improvements have been made and which agreements have been concluded regarding the new procedure as the work progresses.
Ongoing measurements and follow-up on performance
One simple approach for managers to follow up on the issue of whether the changeover speed continues to be reduced, or has stabilised, is to take regular performance measurements. The uptime of the machine is an obvious KPI to add to your Lean board (or whatever you work with) in order to follow up on this aspect. Uptime is an expression for how many hours (or minutes) out of the total number of minutes available (i.e. the employees’ working hours, less breaks and other absence) the machine has been running. If it is not possible to measure uptime, revisit your observations from step 5 and select a measurement that provides information about how long the machinery is active, or for how long the work is stopped. If you are working with old machinery that does not feature built-in automatic registration of uptime, there are a number of different digital OEE solutions you can buy. Alternatively, you can have the employees make the registrations manually. This approach is often difficult and prone to error, however, so the digital approach is clearly preferable.
With ongoing follow-up and an acknowledging conversation about the results, it is natural to ask questions about the occasions where the stop times have been longer or shorter than normal, and to use this as the basis for implementing additional improvements. In this way, you as the manager can help to ensure retention of the good habits.
Process confirmation
Another important management tool that contributes to deployment and sustainment is ongoing process confirmation. It is a good idea to make this a fixed item in a routine where you check the changeovers (together with other important processes) at regular intervals. Process confirmation entails the manager watching the production employees carry out the changeover and assessing whether they are following the applicable standard. A practical way to do this is to use the current documented standard as a kind of checklist during observations and then afterwards discuss opportunities for improvements with the employees in the area based on their performance. You must naturally show consideration for the employees, as well as respect for the work they have done, but managers who are good at this will often generate a high level of involvement among employees by showing genuine interest in the task at hand.
Step 6 is thus more of an ongoing phase than an actual step. It is not about taking a stride towards something specific; rather, it has to do with continuous sustainment and improvement. In principle, at this stage you may want to start again from the beginning and launch a new SMED process on the same changeover, where it is highly likely that you will achieve additional improvements. The SMED process should therefore not be a one-time event, but a tool you can keep on using on your changeover processes, constantly identifying the additional improvement potential that exists. Once the new changeover process has been implemented, you can take measurements to compare with your potential calculation from step 3 to establish how accurate your forecast was.
Time consumption and schedule
The task of anyone responsible for facilitating an SMED process is to establish the framework for a successful and engaging process. It is an assignment that demands thorough planning and preparation. By focusing the input on a few intensive days, you can achieve a major effect in just a short time. These are often costly days for the production department because the SMED group members cannot play an active part in the everyday production activities, and as a facilitator you need to respect this.
All in all, you should count on a full SMED process taking about a month to complete, and that this will include 4–5 intensive workshop days. In addition to these four days, the employees will need time to work on improvements, so the process as a whole will take a little longer. Over and above this one month, you will also need to devote time and energy to sustainment and deployment, so it is relevant to ask whether you will ever be “finished”. From our experience, however, it seems that one month for analysis and implementation is often a suitable period of time.
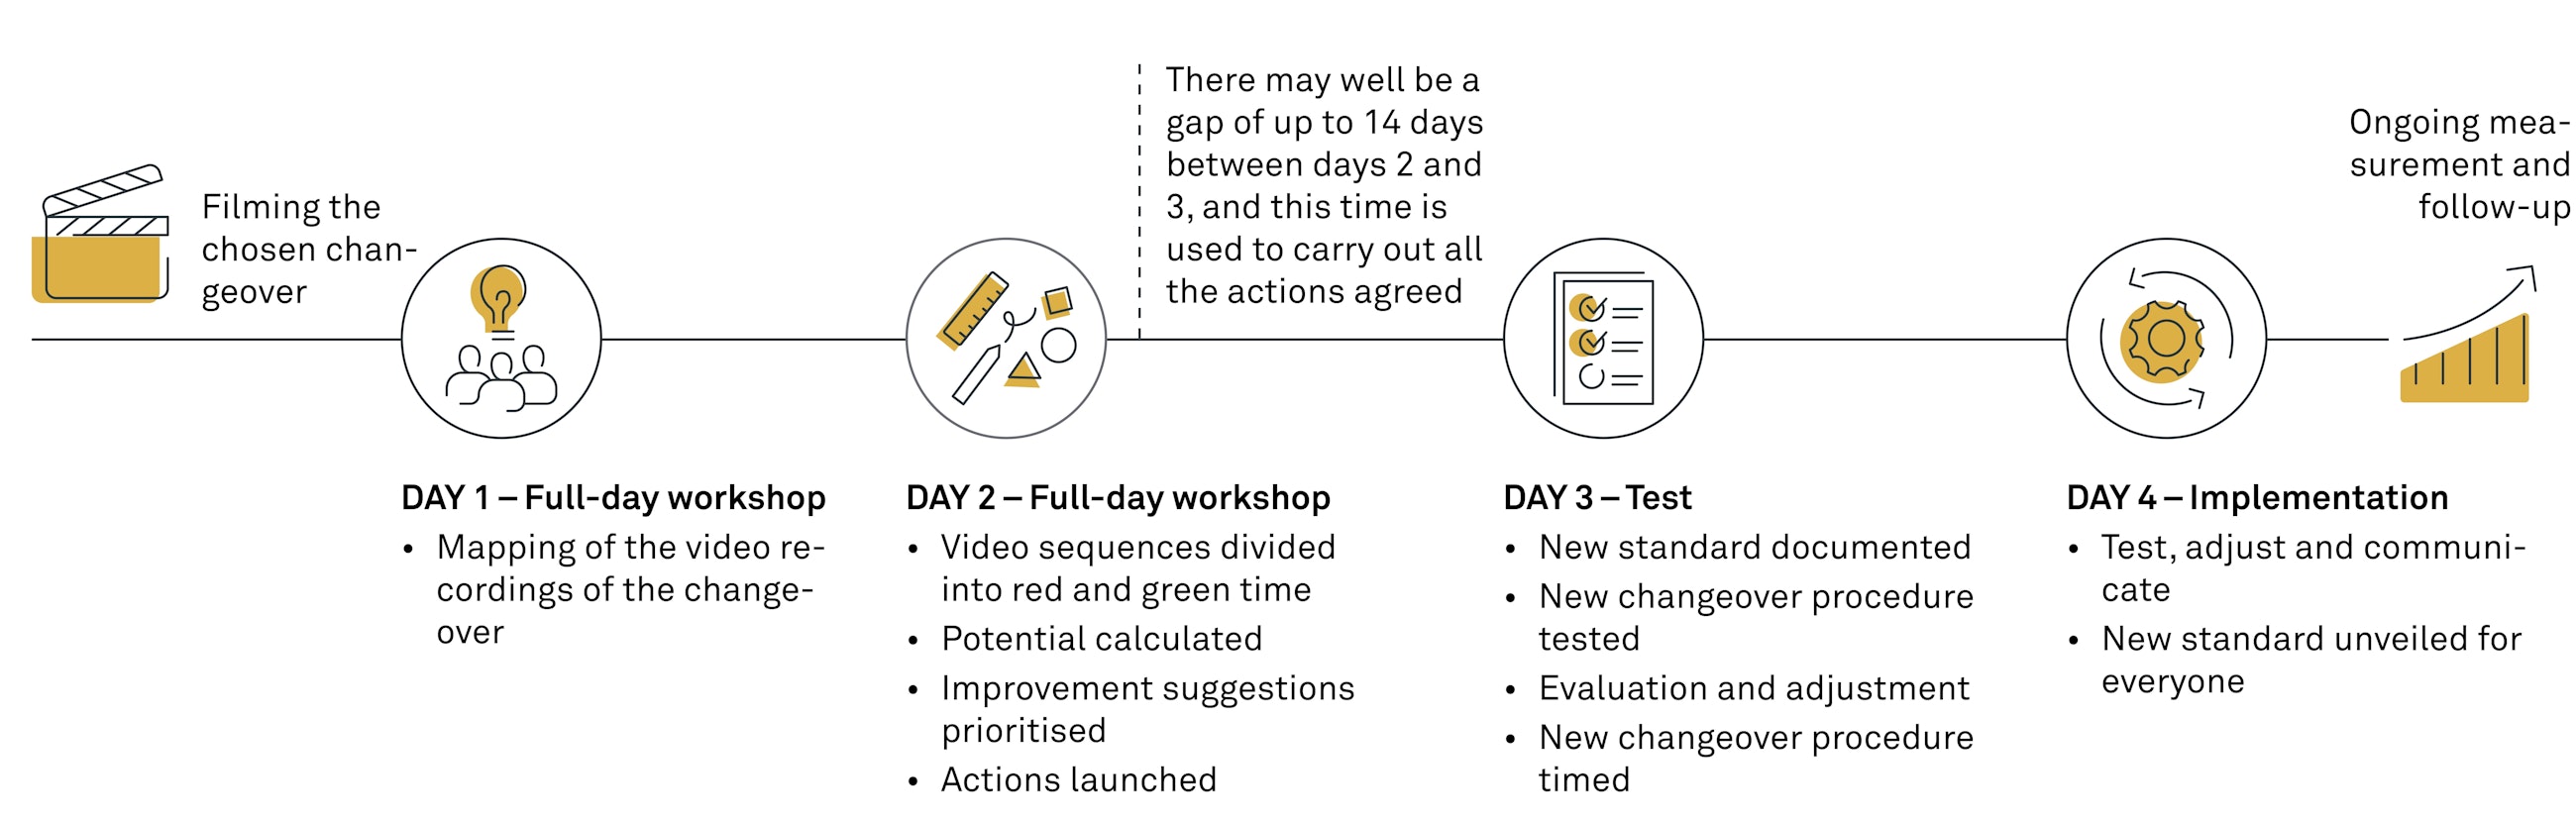
Below, you can see an example of a timetable comprising four full working days. However, not all four days will require absence from the production department. This must be coordinated with the SMED group, as well as with the other management, the planning department and the other employees.
The two first days are used to analyse the video sequences, prioritise the improvement initiative and to launch them (steps 2–4). The timetable then features a period where the group has time to implement the specific improvement initiatives. This may last 14 days or less, depending on how long it takes for the minor purchases to arrive to the factory. Finally, two full days have been set aside for testing, measurement and communication (steps 5 and 6). Of course, there is a good deal of work to be done before and after the four full days. Before the first full-day workshop, all preparations must have been made and the video(s) recorded. After the last day, there is a fair amount of work to do to establish performance measurements and process confirmation and to ensure thorough training of the other employees.
We have now presented our work method, which we hope has provided some inspiration for how to plan an SMED process. We hope that it will prove helpful when the time comes for you to take on the work of implementing efficient changeovers in your production department.
Want to know more?
If you want to hear more about changeover optimisation, please reach out to:
Related0 4
Article
Read more

Trends reshaping manufacturing footprint strategies
Four global trends that are currently reshaping how companies should approach their manufacturing footprint strategy.Article
Read more

Unlocking efficiency with S/4HANA PP/DS Scheduling Optimizer
Utilising automation in production planning and scheduling.Article
Read more

Exploring aATP Supply Creation-Based Confirmation
Opportunities when transitioning from APO PP/DS with gATP to S/4 PP/DS with aATP.Article
Read more
