Article
Five selected features of the 2205 upgrade of SAP IBP


Article
Read more
13 June 2022
As a planner, working with large planning data sets can sometimes be overwhelming. Therefore, all the support you can get from the systems you are using is highly appreciated. One of the key elements in helping planners focus on where it matters is segmentation of products into what we tend to define as impact and stability. Based on the different characteristics, different planning approaches should be adopted.
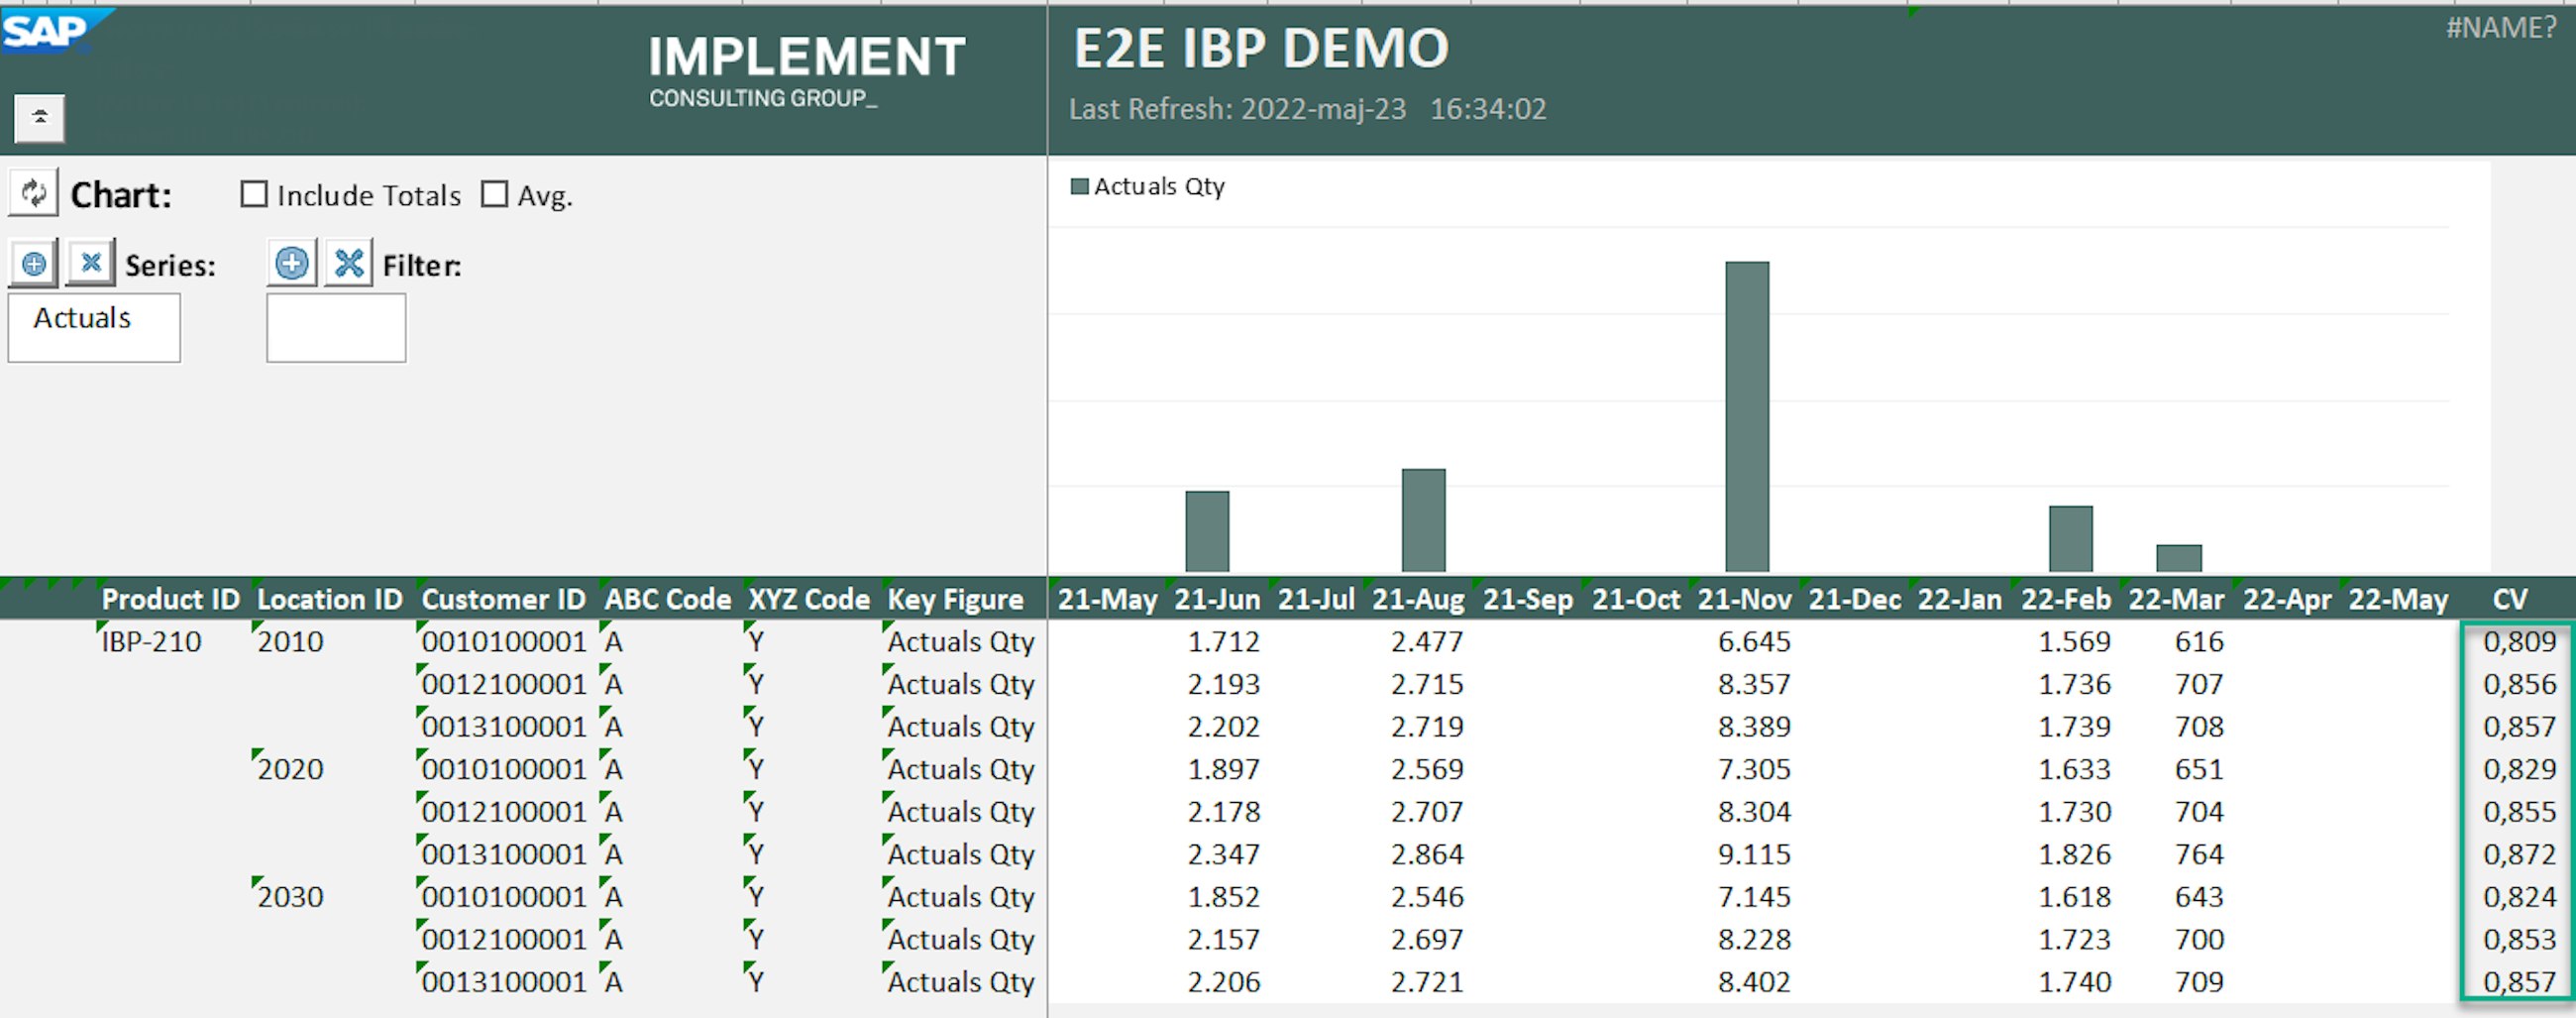
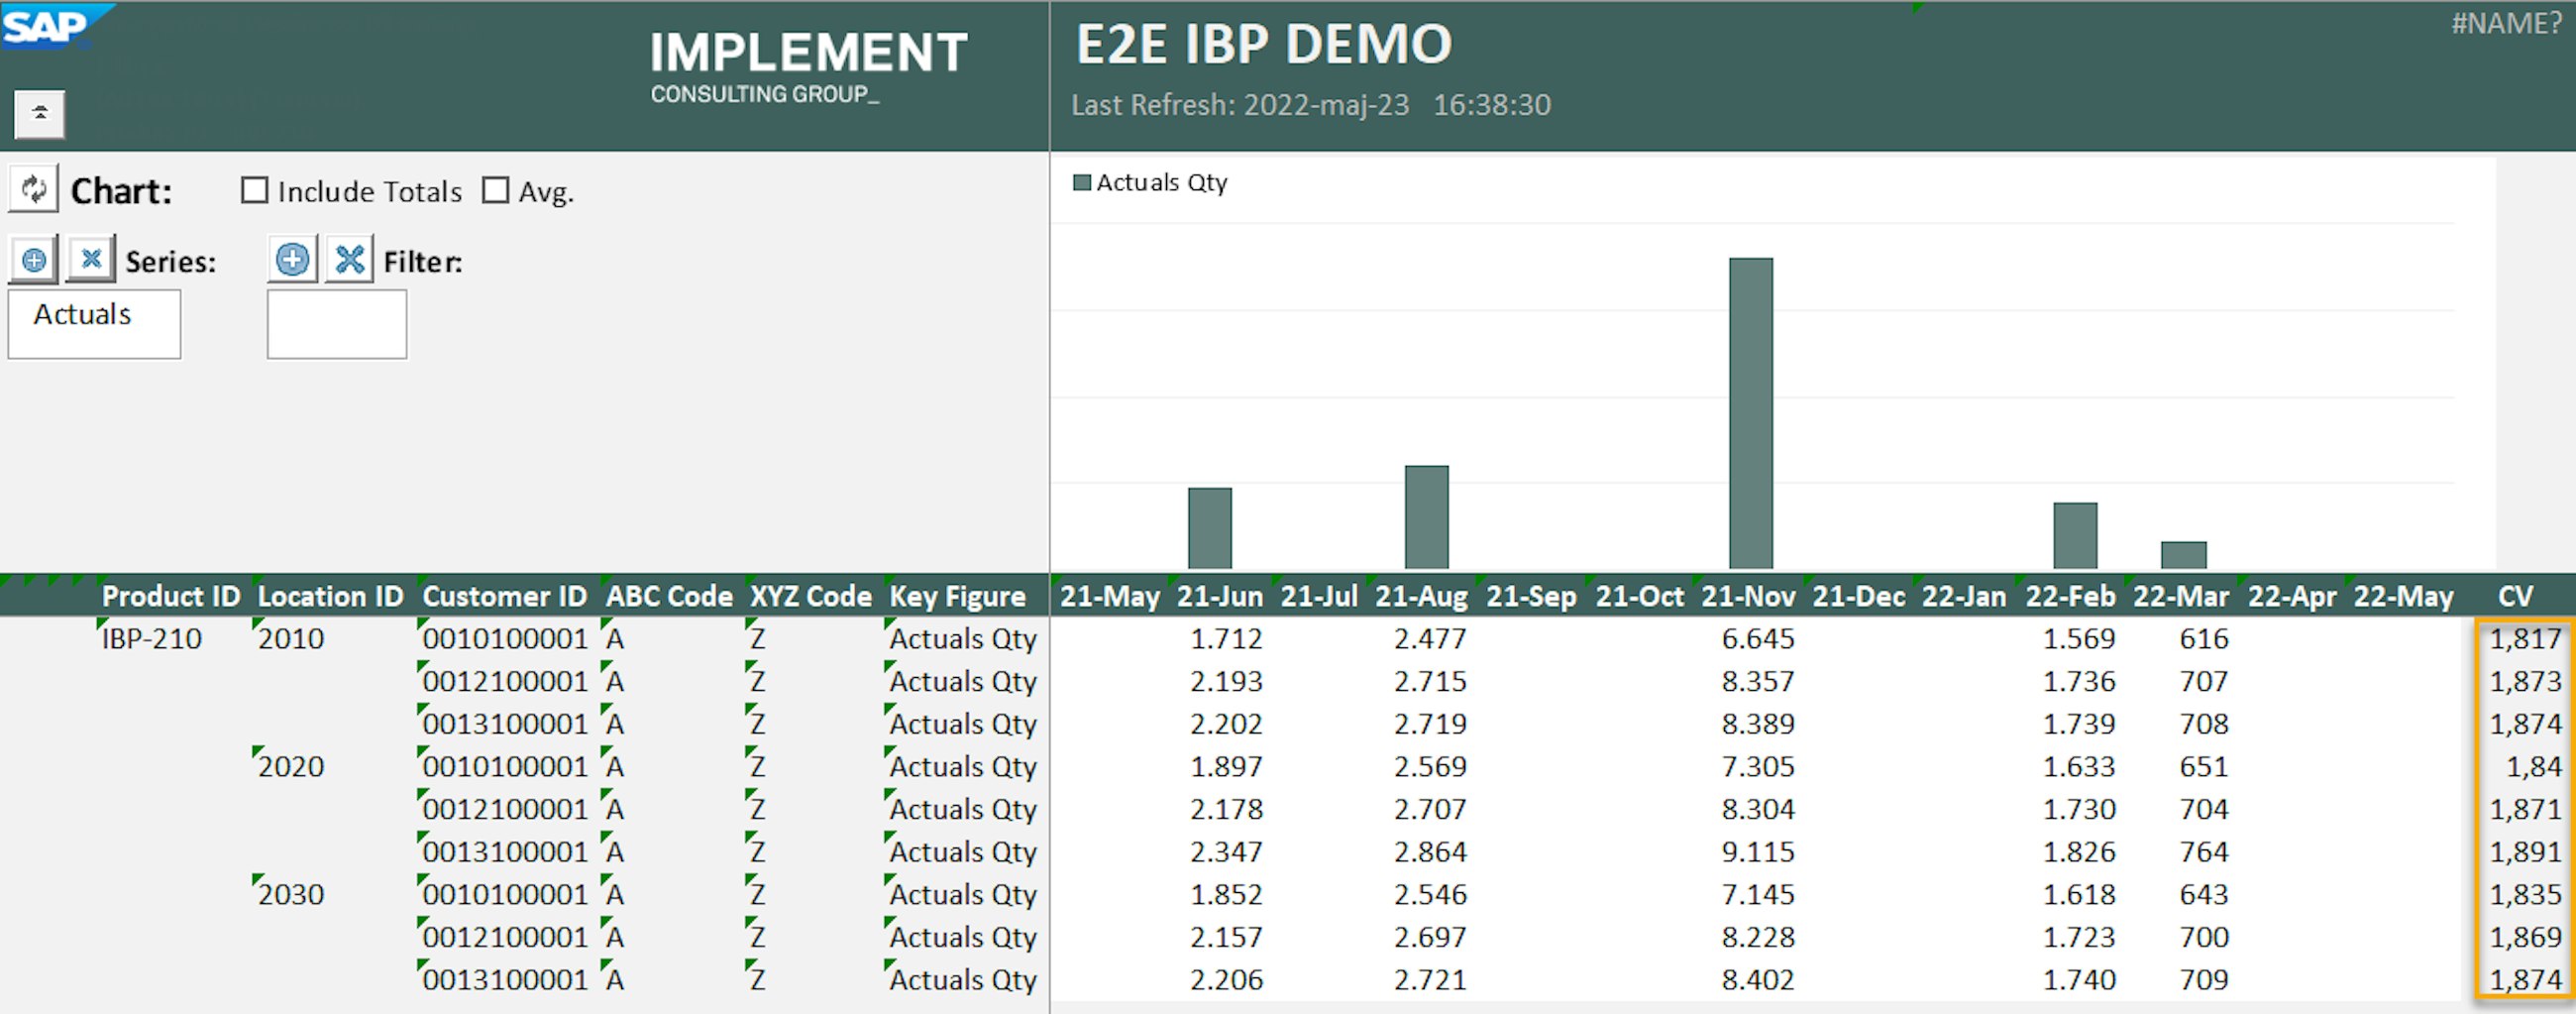
SAP IBP offers multiple ways to calculate impact and stability as well as ways to help planners identify products that need special attention in the planning process. Before the 2205 release, some planners experienced that data sets with many NULL values were not calculated as expected by the segmentation engine. The newest upgrade of SAP IBP now provides better ways to handle NULL values to ensure that these are treated correctly. For the XYZ segmentation, you can now use Replace Leading Nulls with Zeros and Always Include Items with some missing values to better handle NULL values.
To set up the segmentation model, open the Manage ABC/XYZ Segmentation Rules app and choose the ABC/XYZ segmentation profile that you want to add the newest settings to. In the XYZ segmentation tab, select Replace Leading Nulls with Zeros and Always Include Items with some missing values.
Reviewing the planning segments should be performed at an interval that suits the behaviour of your supply chain, e.g. many seasonal products or many new product introductions. As a starting point, we recommend a quarterly review. When the segmentation has been done in SAP IBP, the products are automatically maintained with their updated segments.
For people maintaining master data in their respective SAP IBP systems, SAP is bringing some good and convenient new features to you. From now on, you can do mass editing of master data in the Manage Master Data app, which is in the Fiori app and an add-on to the Web-Based Planning landscape.
As mentioned in our blog post from the 2102 release, SAP introduced master data in the cloud as well as an easier way to view, create, edit, copy and maintain a single master data record at a time and then view the result in the master data workbook in the Excel front end. This feature was a great add-on to Web-Based Planning; but with the new mass editing functionality, the app is taken to a new level of user-friendliness.
With the new functional addition, you have the possibility to create, maintain or delete multiple master data entries directly in SAP IBP using the Fiori app Manage Master Data.
By selecting Mass Edit in the list report view, you can choose to do whatever mass editing you want to the selected master data and the associated attributes. Thus, the Manage Master Data app allows you to do editing of attribute values as well as mass deletion of master data records in one single step.
You can use the Mass Edit functionality at the attribute level, but there are some elements that you will have to adhere to, as not all attributes are editable; therefore, we recommend that you consider the following:
To make use of the Mass Edit functionality in the Manage Master Data app, please ensure that you have the correct business catalogue for your business role. The catalogue that you need is Manage Master Data.
SAP has now developed a new app to manage planning notes. In fact, the new app allows users to view and delete planning notes that have been created for a specific planning area, version and scenario by you or other users in the SAP IBP add-on to Excel and in the Web-Based Planning and Planner Workspaces apps.
Planning notes are used during the planning process to provide notes on specific attributes, key figures and/or time periods to provide additional information for other users about certain key figure values.
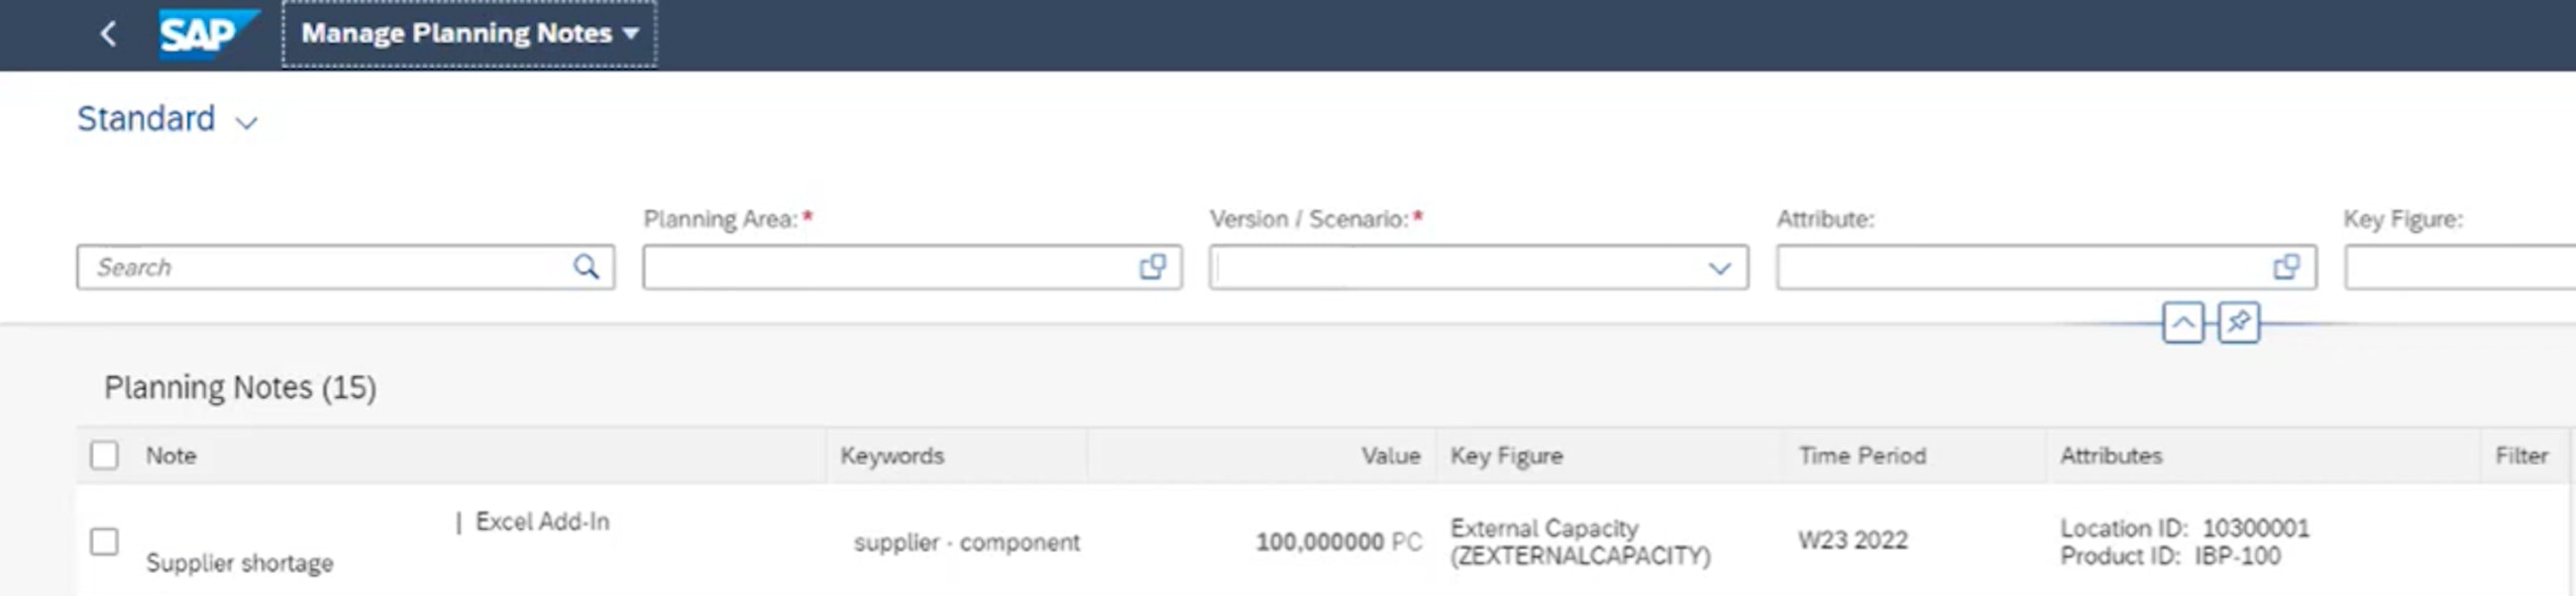
Moreover, it is now possible to create keywords for planning notes. This means that the planning notes can be classified or grouped in keywords, which helps to organise and find them during the planning process. So now, when entering a planning note, you will be asked to fill in a keyword, as shown in the picture below.
When the planning notes have been entered, they are visible across SAP IBP, which can be seen in the Planner Workspace picture below.
In the new Manage Planning Notes app, you can now display all the planning notes that have been created for a specific planning area. In the app, it is also possible to delete planning notes. Moreover, the app provides a wide variety of filter capabilities where the user is able to search the planning notes by using keywords. This helps users to organise their planning notes in the planning process.
Therefore, it is a step forward for the planning notes that enables more structure in the process. Furthermore, a systematic evaluation of the planning notes helps to reveal potential process improvements.
With the new upgrade, SAP has developed more functionalities in Planner Workspace, improving some crucial aspects that emphasise the simplicity of performing simple planning tasks in Planner Workspace instead of using the Excel interface.
The new functionalities added to Planner Workspace include:
These enhancements have been made to the Planner Workspaces app to provide you with more options while you plan, analyse issues in your plans and solve the issues.
Let us now take a closer look at these new features.
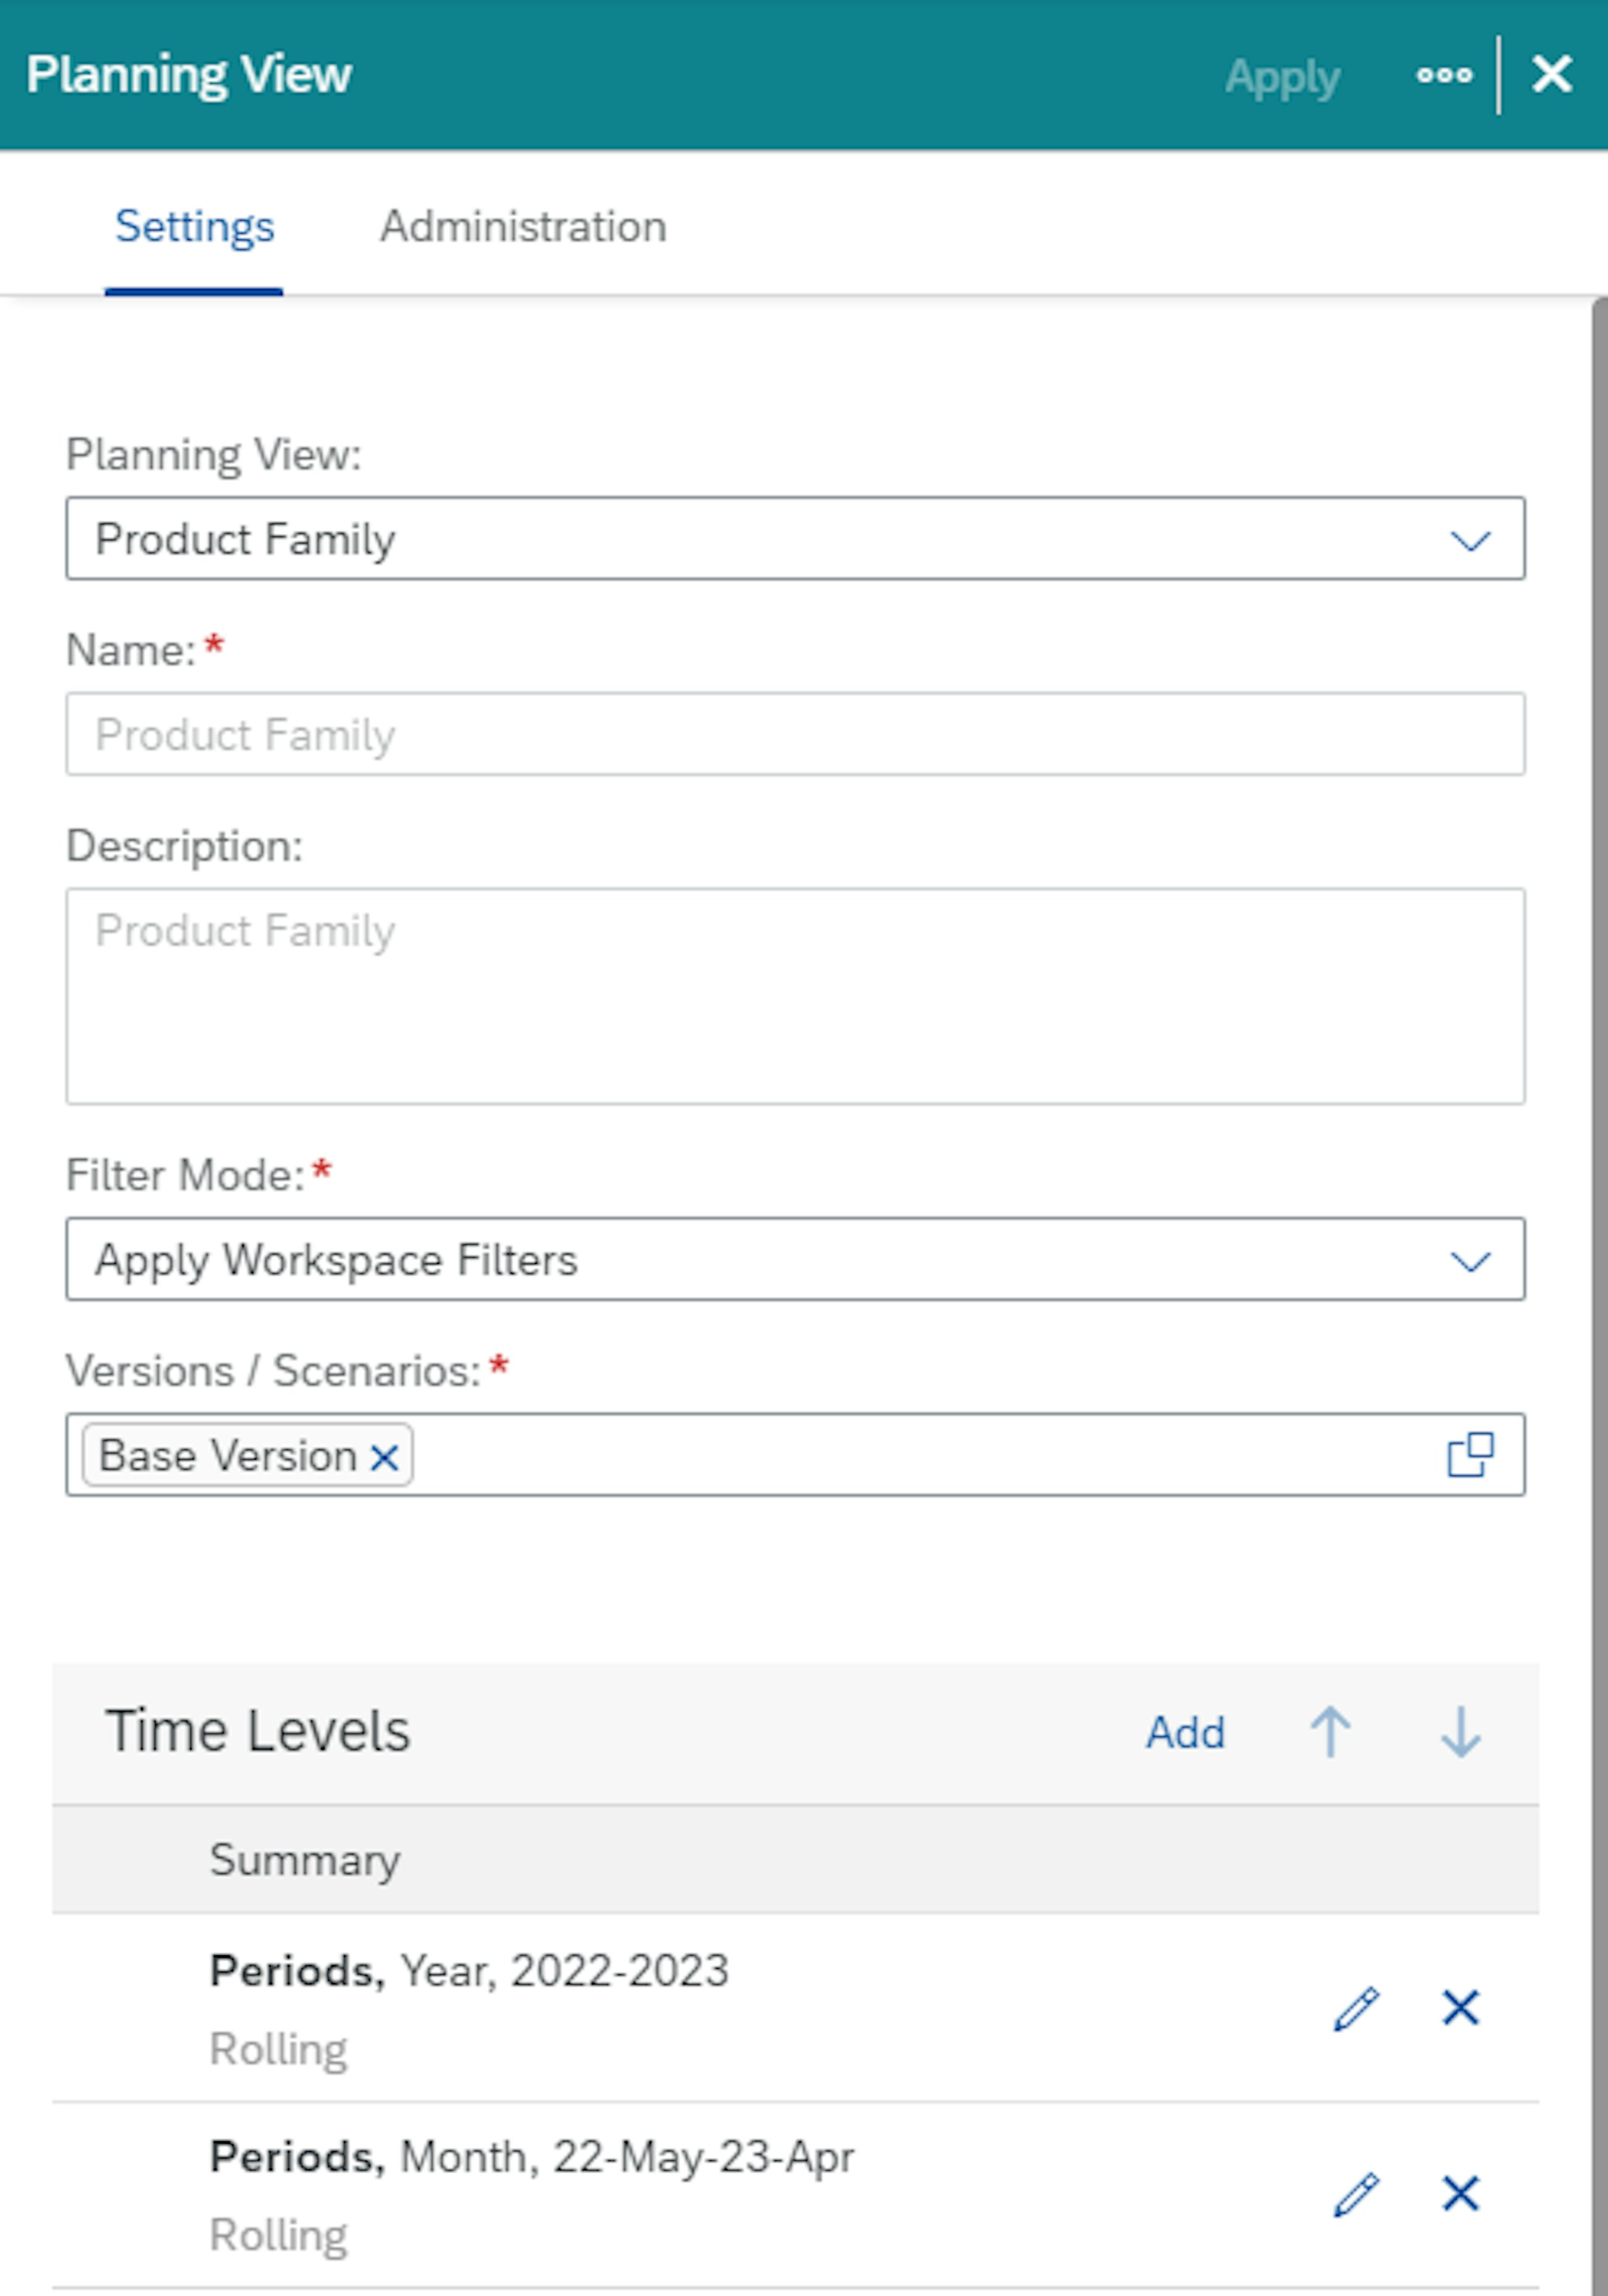
In the planning view, it is now possible to display time at different time levels. You can display the current quarter at a monthly level, the next quarter at a quarterly level and periods after that at a yearly level. In addition, you can choose to start the planning view in the current period. Depending on the time levels you have set up and the order in which you have set them up, the current period can be the current month, quarter or year.
To do so, it is necessary to set up multiple time levels in the settings, as shown in the picture below, depending on your needs.
Once you have selected the time levels you need, they will be visible in the planning view.
By doing so, you can create telescopic views to help you while performing your planning tasks.
With the latest release, it is also possible to add up to five keywords to your planning notes or add existing ones, as described in one of the features above. This will allow you to search for all the planning notes that have a specific keyword assigned to them in the Manage Planning Notes app.
The last feature that has been added to Planner Workspace is the Interactive Planning on Orders Now Available in Planner Workspace. This new feature gives you the possibility to manually change, delete, fix and unfix the following planned receipts directly from the Planner Workspaces app:
Order information such as quantity and date can be changed for supported order-based planning key figures. This enables planners to interactively change an existing plan to improve the planning results or to solve a problem. They can perform a simulation to review the updated orders and key figures. Planned receipts and key figures can be updated right there in the same app.
With the new features developed in the SAP IBP 2205 release, it has become even easier for some planners to perform simple planning tasks in the Planner Workspace environment instead of using the IBP Excel tool. In the future, SAP is investing even more in improving the usability of Planner Workspace.
With the new upgrade to SAP IBP, the forecasting algorithms have had an upgrade. For the new release, SAP has introduced a new forecasting method called Croston TSB. Furthermore, a new add-on to external forecasting has been added which enables you to add external forecasting algorithms to your forecast models. Let us have a look at the two new additions to forecasting and see how they potentially can benefit the statistical forecasting needs of your business.
The Croston TSB Forecast model is a new variant of the well-known Croston method which is highly relevant to products with an intermittent demand pattern. Like the regular Croston model, the new Croston TSB model calculates demand and length of intervals between periods of demand, but the TSB model is different in the following ways:
To use the new Croston TSB forecasting method, there are some prerequisites that you need to consider, e.g. any missing values will have to be substituted by a 0 value. Furthermore, you should not make use of outlier corrections in your forecasting algorithm, as the zeros might be wrongly adjusted as outliers.
In the settings, you have different settings options in the Croston TSB method: Create Sporadic Forecast or use an Alpha and Beta coefficient. If you use the Create Sporadic Forecast functionality, the system will use the Alpha value to smooth only the periods that have value in them and create the future constant forecast for the periods between the calculated intervals. If you do not choose this option, the algorithm will use the Alpha and Beta coefficients to smooth every data point in the time series data before calculating the future constant forecast.
External forecasting
Another addition to the forecasting that has been added to the 2205 upgrade of SAP IBP is the inclusion of external forecasting in your forecast models. This is added to the Manage Forecast Models app in the Fiori tile. The new inclusion of external forecasting allows you to make use of a custom forecast that you may find relevant to the series of products that have a complex behaviour or are dependent on data outside of your IBP system.
The benefits of adding external forecasting to your forecasting run are that it is tightly integrated into your existing forecasting process. Therefore, you do not need to adjust your data aggregation in your custom model. Furthermore, the model can be called upon through an application job or interactively through Excel. The model can also be part of a Best Fit forecasting run.
The external forecast models could potentially be models that are created in RStudio, Python or Visual Studio and integrated into SAP IBP. When the external algorithm gets the required input from the SAP IBP system, it calculates the forecast and sends it back to SAP IBP where it is leveraged the same way as the forecasts calculated by internal algorithms.
You can add one or more external algorithms to your forecast model. You can equally specify custom parameters and independent variables which the algorithm must consider.
To make use of external forecasting, you need to set up a new communication scenario in SAP IBP, for which a setup guide can be found in the following link:
https://help.sap.com/docs/SAP_
Furthermore, you need to have an HTTP server for the external system to initiate the External Forecast model.
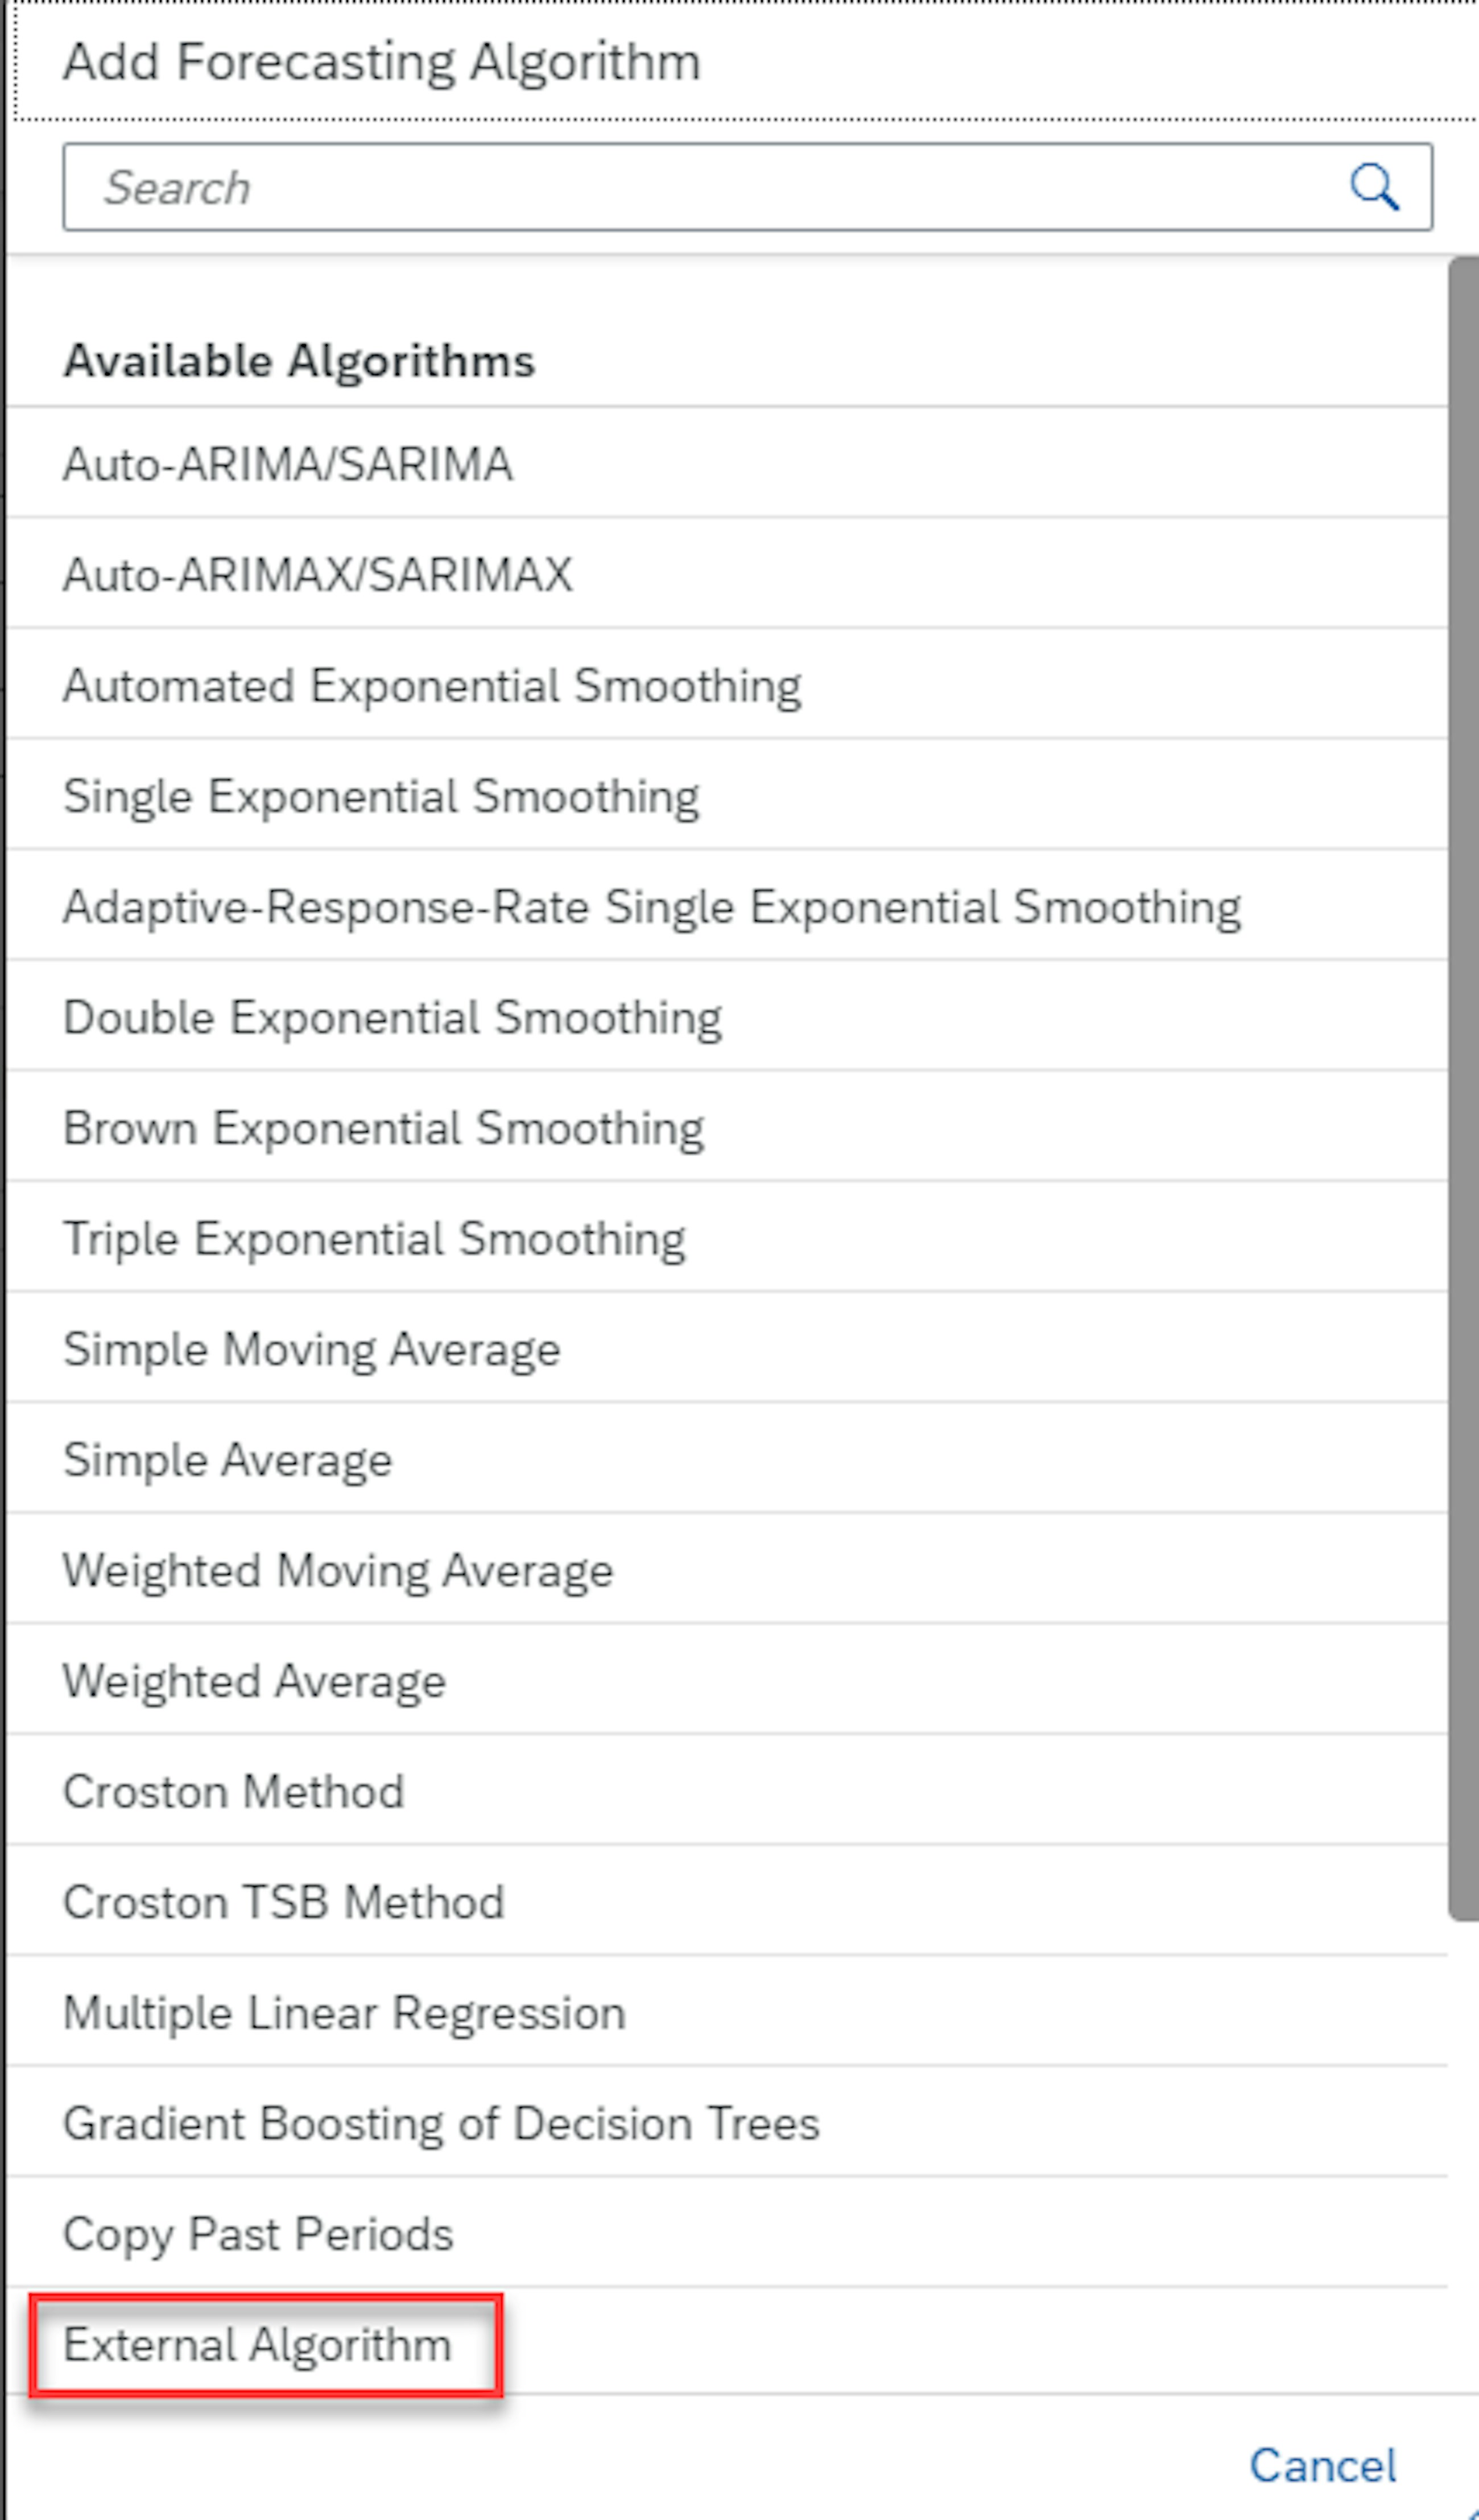
When creating the forecasting model, select External Forecasting in Add Forecasting Algorithm in the drop-down menu.
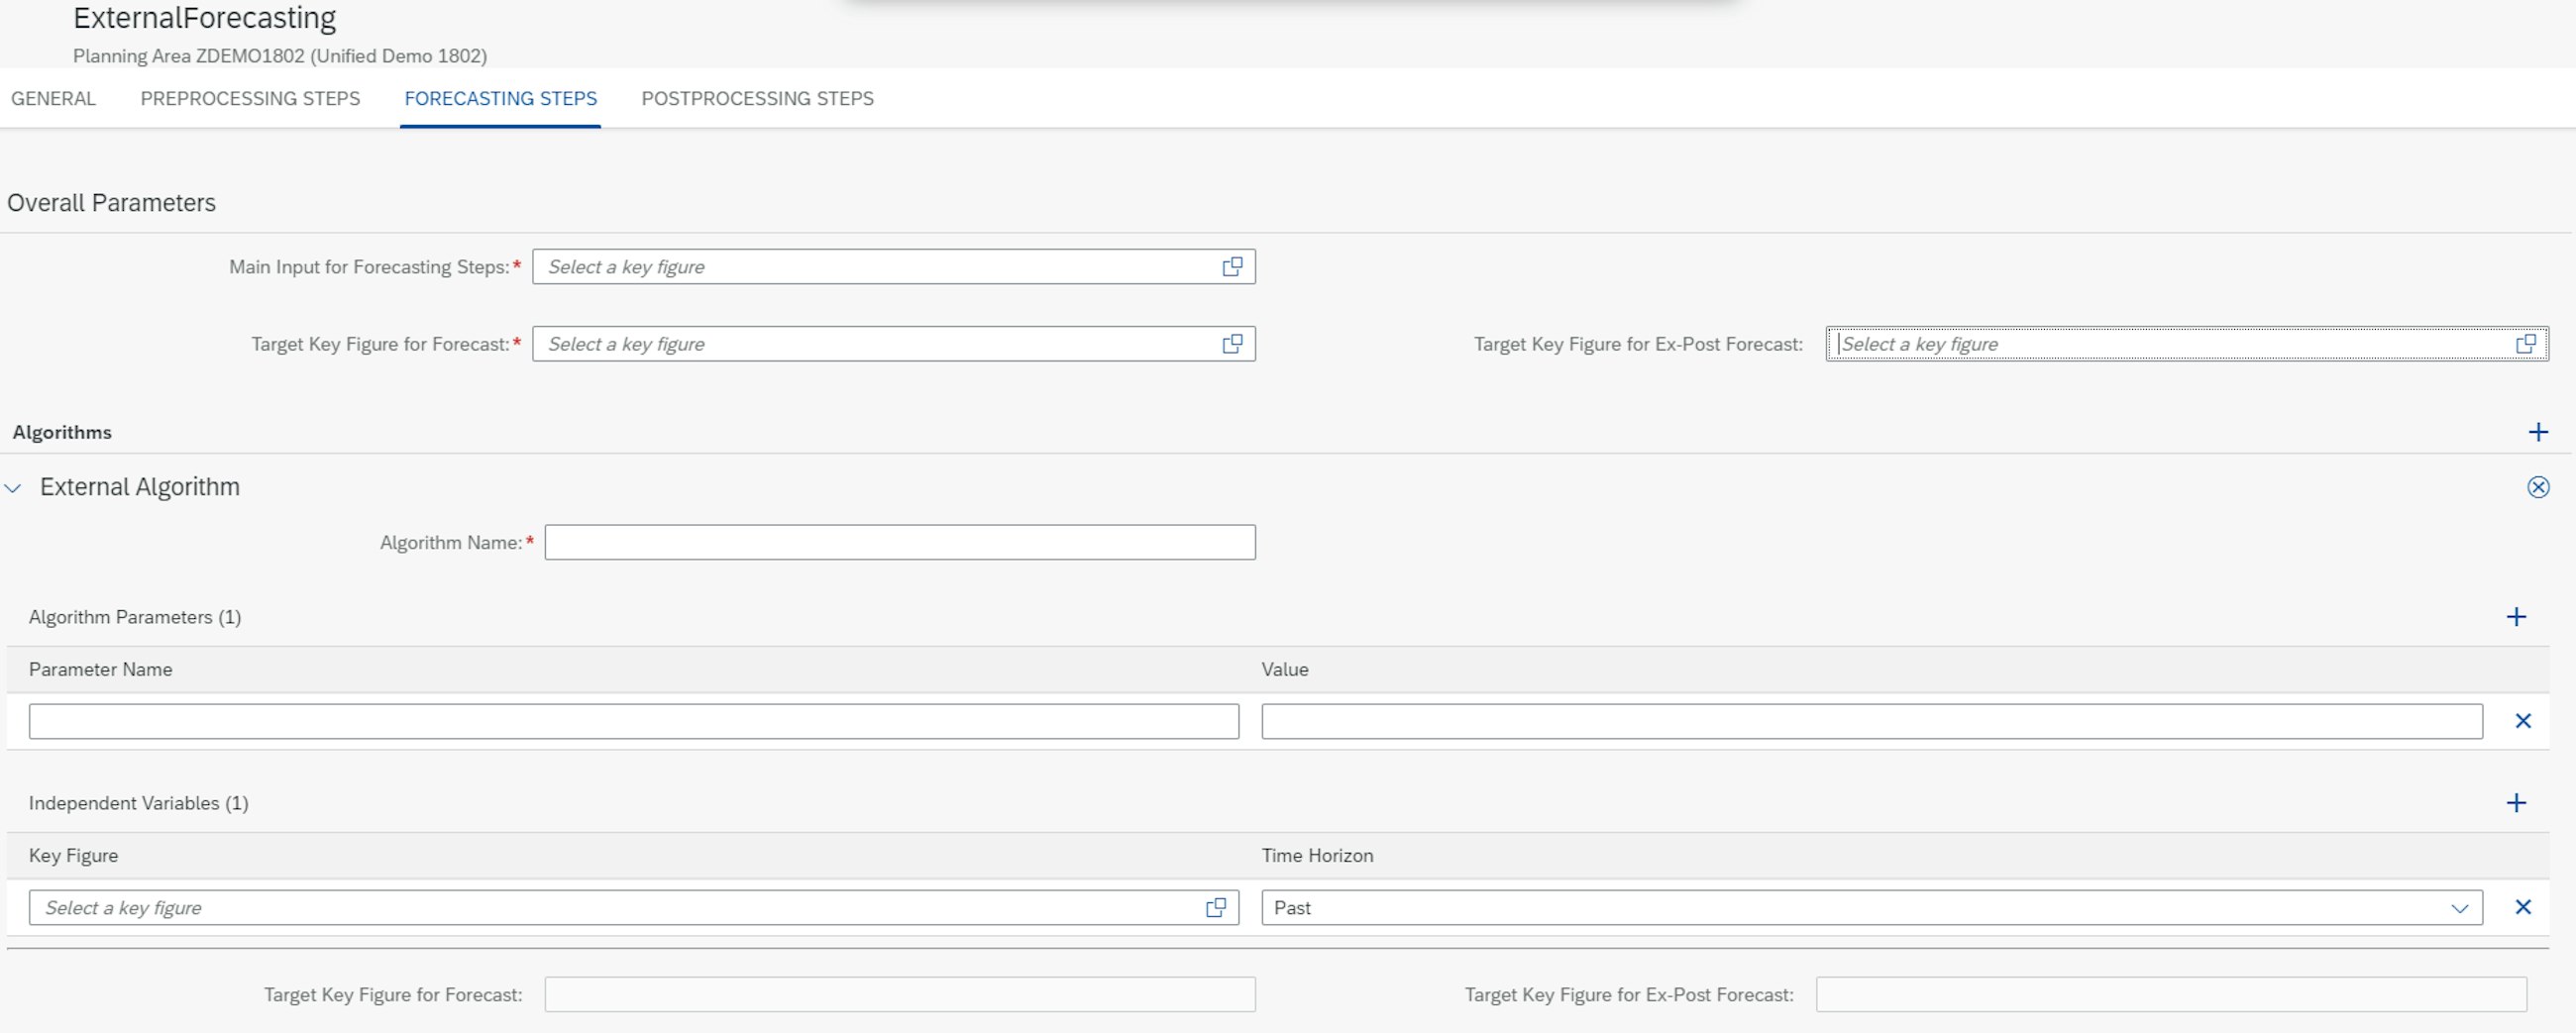
Then you fill in the Algorithm Name of the external forecasting algorithm. The algorithm parameters and independent variables are optional parameters that you do not necessarily need to fill in for the external model to work. Furthermore, the key figures for forecast and ex-post forecast are not a prerequisite either. When the forecast model is saved, you are now ready to run your external forecasting algorithm.